Documentation
Introduction
CharAI SaaS - Ultimate AI Business System
Thank you for purchasing CharAI SaaS script.
Welcome to Char AI, where we harness the power of artificial intelligence to innovate and solve complex challenges across various industries. Founded by visionaries in AI technology, our mission is to deliver cutting-edge solutions that enhance efficiency and creativity for businesses and individuals alike. Our diverse suite of AI tools ranges from enhancing digital content to streamlining business processes, all designed with user-friendliness and effectiveness in mind. Join us as we continue to push the boundaries of what AI can achieve, making technology accessible and transformative for all.
- Version: 1.0
- Author: morningstarcode
- Created: 11 August 2024
- Update: 11 August 2024
Please feel free to contact us via Item Support Page for any query related to template.
Introduction on Local
To operate PHP Laravel locally, it's essential to have a server environment such as XAMPP, MAMP,
or LAMP installed on your machine. Without one of these servers, running a PHP Laravel
application on your local device would be impossible. Follow the links below for installation
instructions tailored to different operating systems.
You must acquire a web server to execute the application.
- For macOS, obtain MAMP or XAMPP Server.
- For Windows OS, obtain MAMP or XAMPP Server.
- For Linux OS, obtain LAMP or XAMPP Server.
- MAMP Server is available for download at https://www.mamp.info/en/mamp for both Windows and Mac systems.
- XAMPP Server can be downloaded from https://www.apachefriends.org/download.html, supporting Windows, Linux, and Mac operating systems.
PHP Version Requirement
Required PHP version: >= 8.1
To verify the installed PHP version on your server, execute the command below in your terminal or command prompt:
php -v
If PHP is not installed, please install the necessary version first.
Required PHP Extensions
- bcmath PHP Extension
- gd PHP Extension
- ctype PHP Extension
- curl PHP Extension
- fileinfo PHP Extension
- json PHP Extension
- mbstring PHP Extension
- OpenSSL PHP Extension
- pcre PHP Extension
- pdo PHP Extension
- tokenizer PHP Extension
- pdo_mysql PHP Extension
- xml PHP Extension
- zip PHP Extension
Composer Installation
Composer is a prerequisite for running Laravel applications. If Composer is not yet installed on your machine, follow the installation instructions for different operating systems below:
- For Mac, initiate Composer installation by clicking here.
- Windows users can complete Composer setup by clicking here.
- For Ubuntu users, learn more about Composer installation and use by clicking here.
Running Laravel on Local
-
This guide assumes you have PHP and Composer installed on your system. If not, please refer to the official documentation to install PHP and Composer.
Step 1: Database Configuration
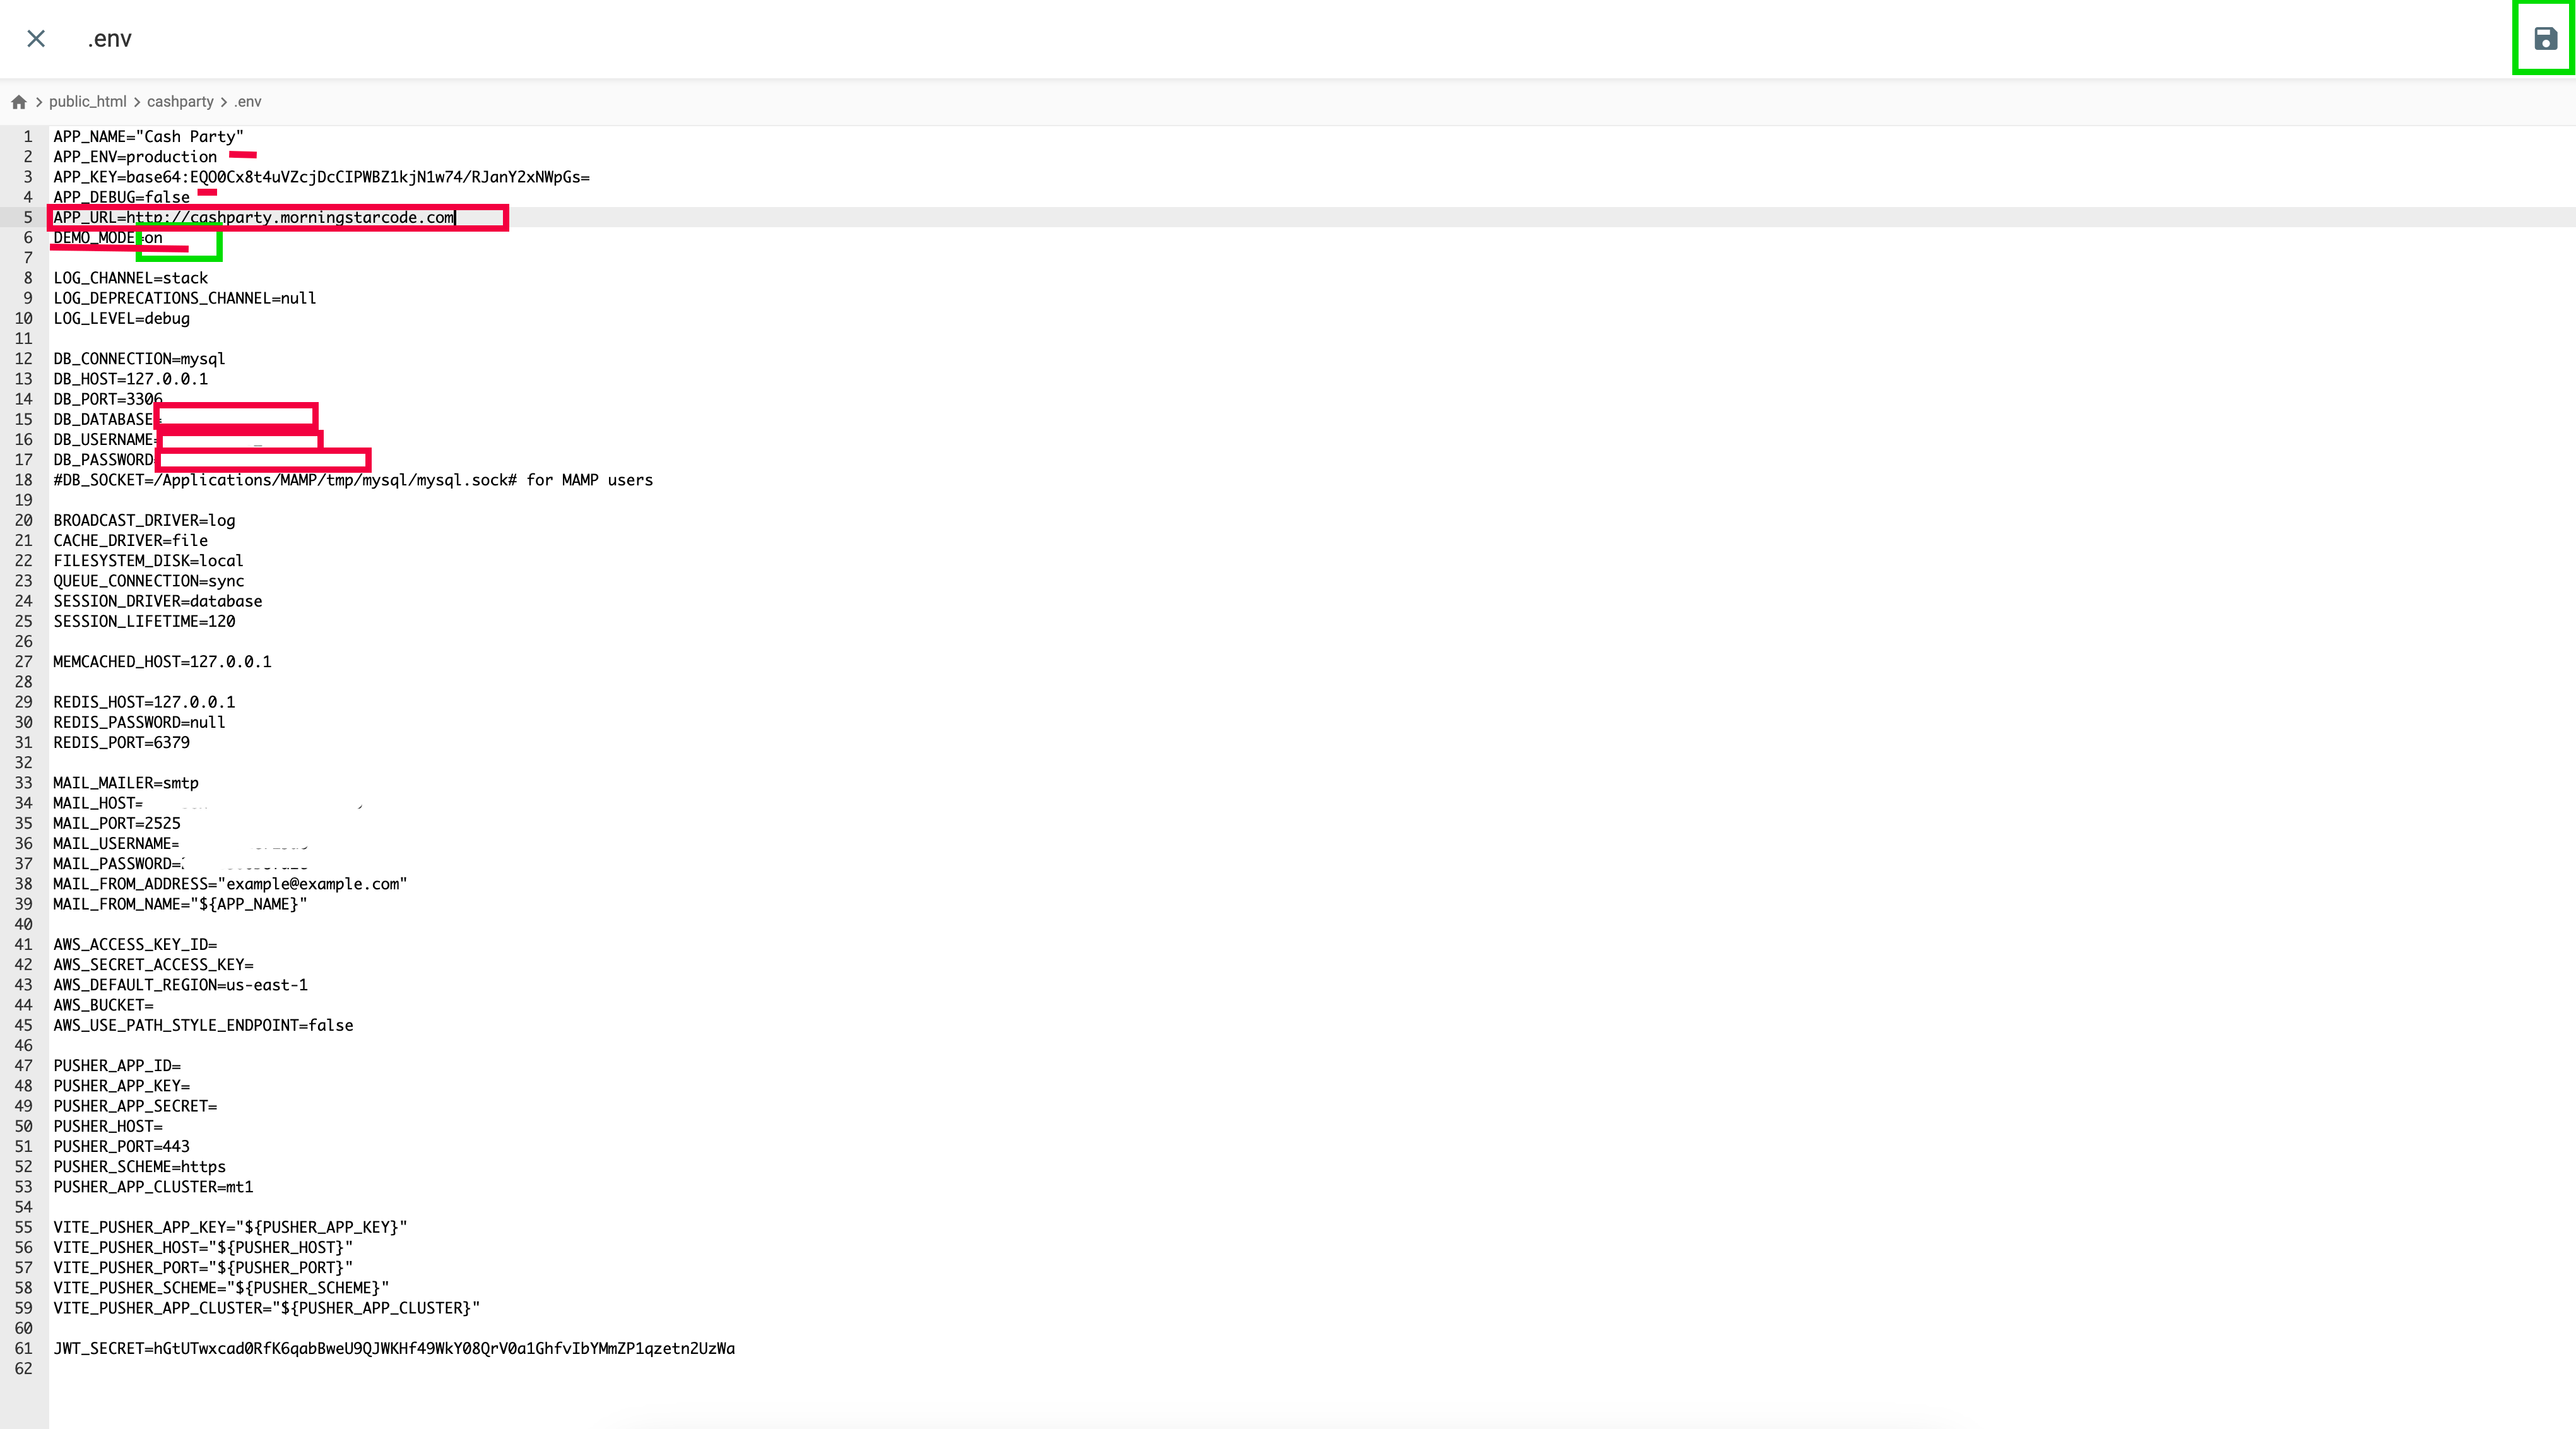
First, create a new database for your Laravel application locally. After creating the database, import the charaidb.sql file in phpmyadmin from the database folder in your downloaded directory.
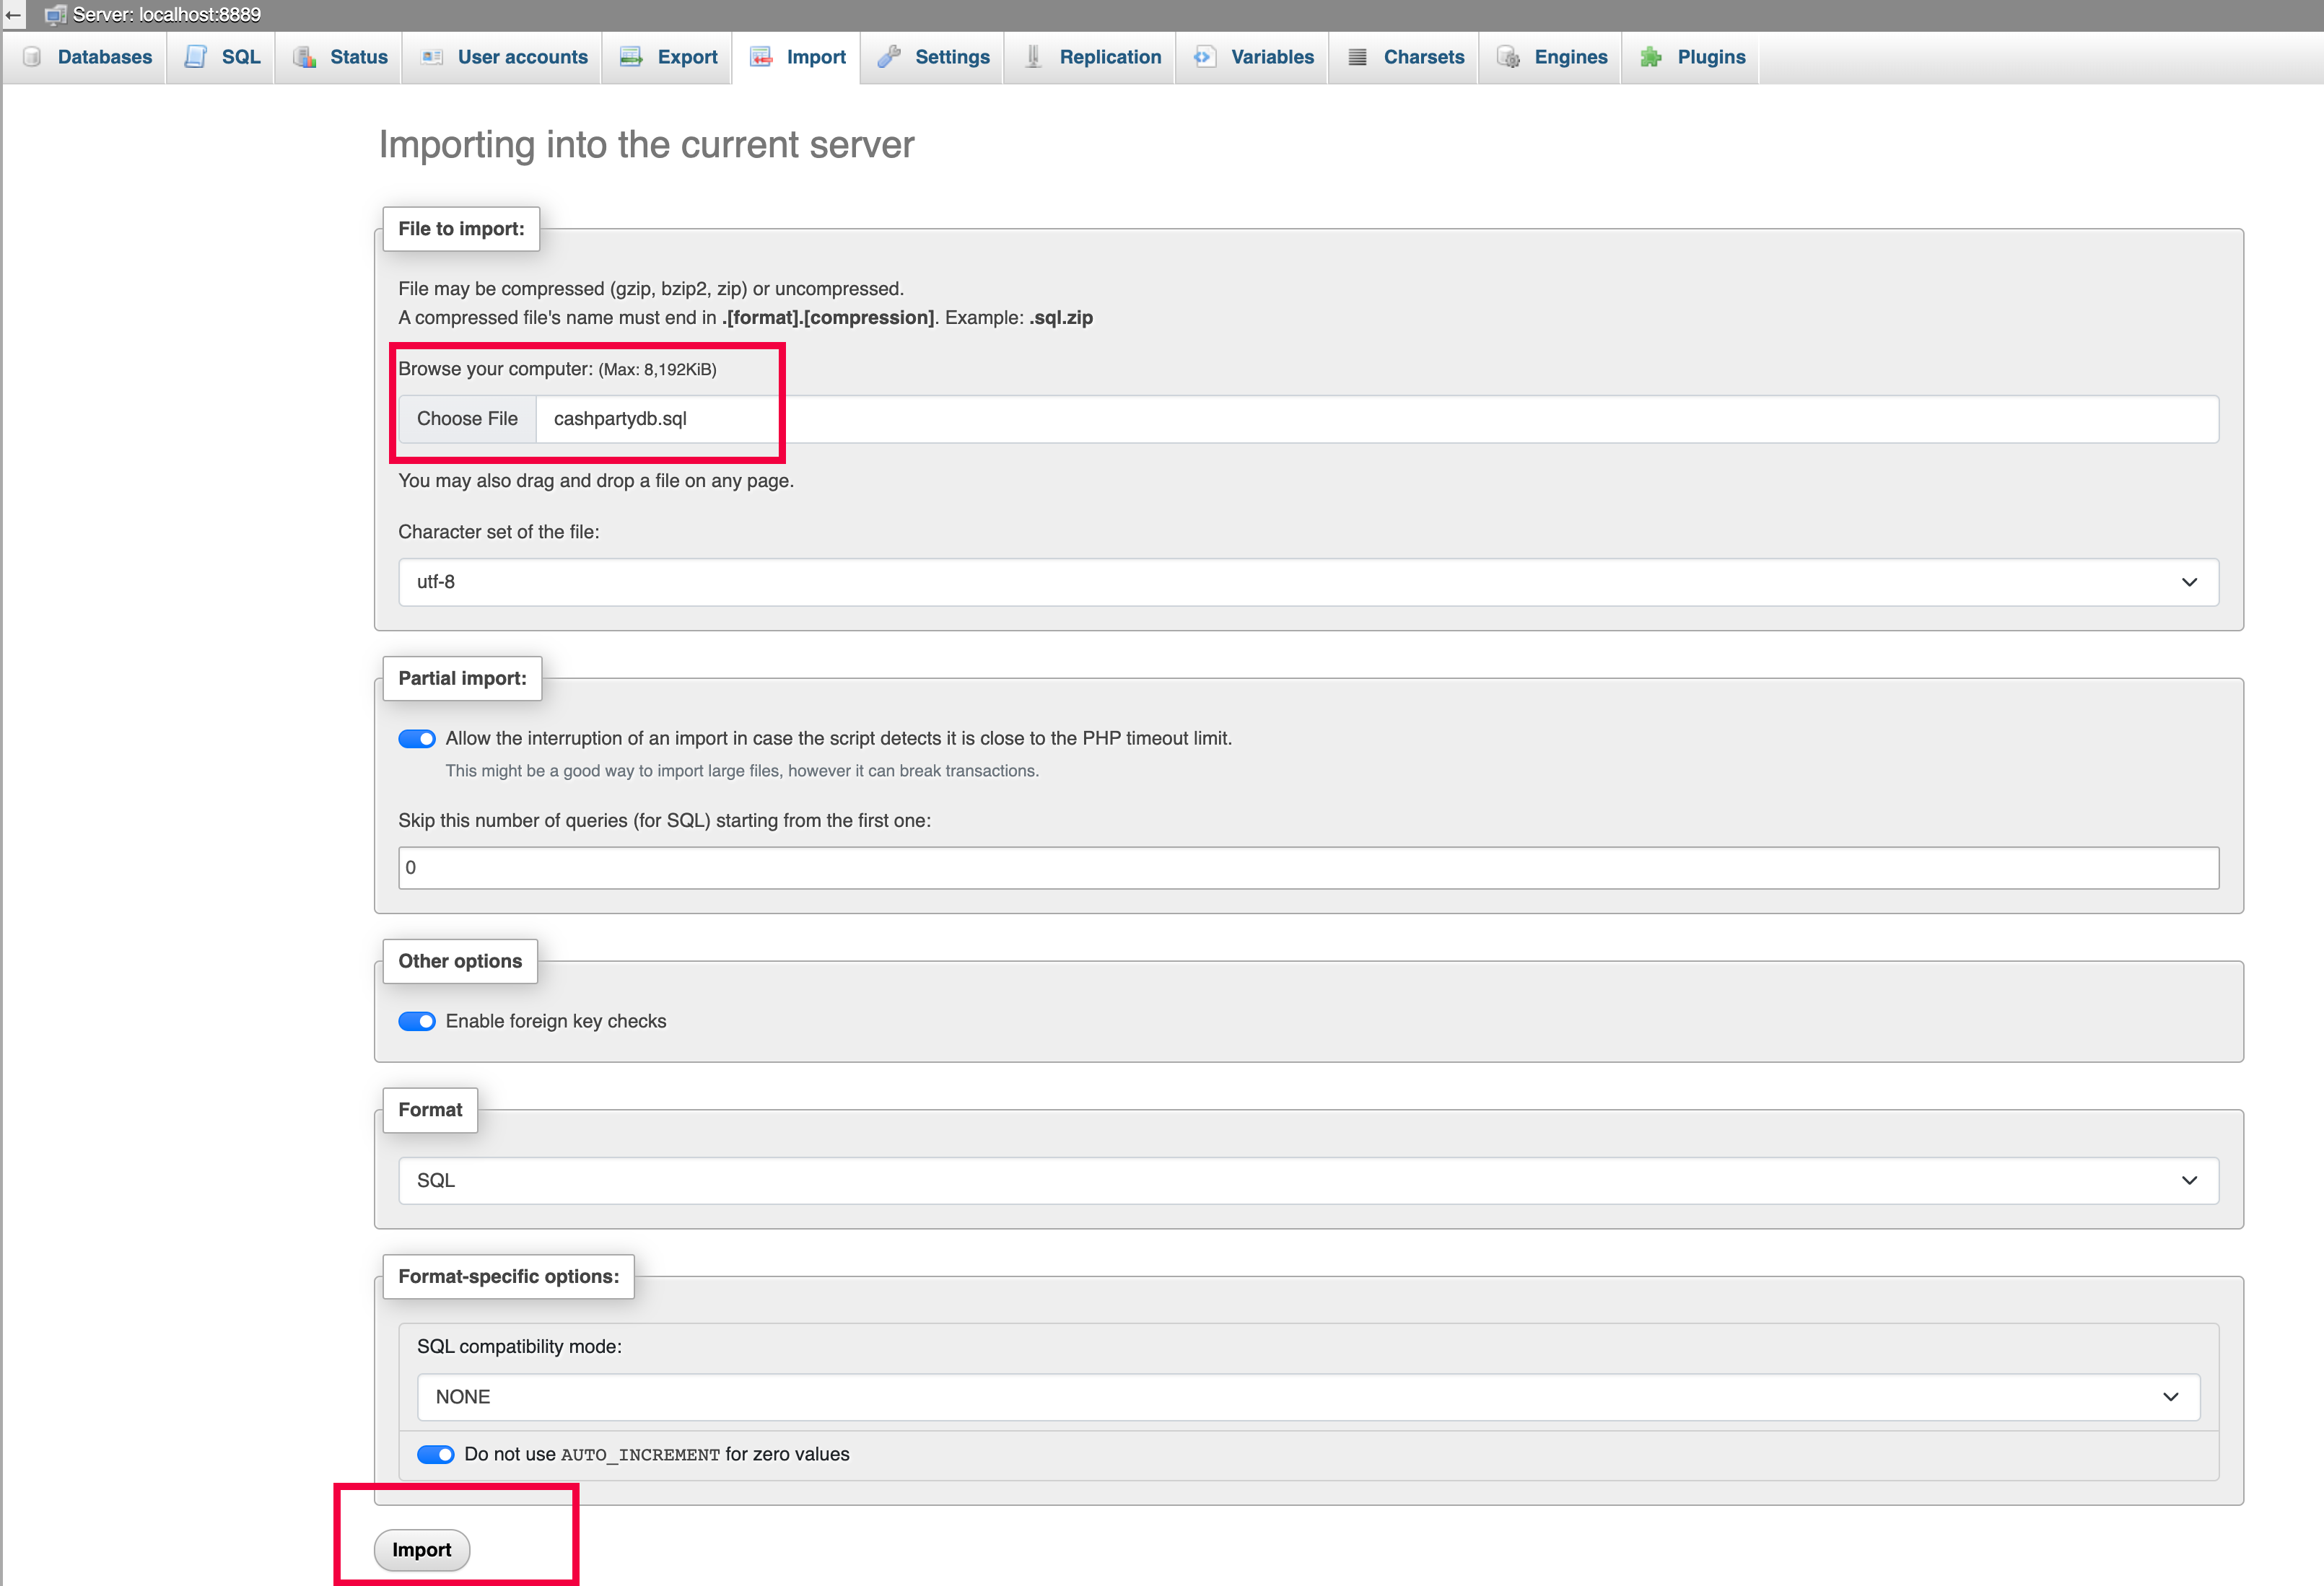
Open the .env file in your project root and update the database settings accordingly.
DB_CONNECTION=mysql
DB_HOST=127.0.0.1
DB_PORT=3306
DB_DATABASE=root
DB_USERNAME=root
DB_PASSWORD=
Step 2: Serve the Application
Once the database import is complete, navigate into admin panel folder from your downloaded directory on terminal:
cd char-aiTo start the Laravel development server, run:
php artisan serveThis command will start a development server at http://127.0.0.1:8000. Open http://127.0.0.1:8000/dashboard in your web browser to see your Laravel application. Login with following credentials info.
admin@admin.com : password
For further development and deployment instructions, refer to the official Laravel documentation.
Deploying to Shared Hosting
This guide also applies to other hosting providers.
After downloading the package from the marketplace, you will find a folder named
'char-ai'. This folder contains the Laravel project.
Recommended (via GIT)
After purchasing this item, you will gain access to our private GitHub repository (a GitHub account is required). This allows you to receive the latest updates instantly without waiting for them to be released. We highly recommend using this repository for deployment on your hosting platform, ensuring you always have the most up-to-date version without any conflicts or the need for manual updates.
How to Use GitHub for Beginners https://www.youtube.com/watch?v=BovIkSKStPwVPS
How to Deploy Laravel Project on a Virtual Private Server https://www.hostinger.com/tutorials/how-to-deploy-laravel
Shared Hosting
Deploy Laravel App in Shared Host Linux | HostGator | Namecheap | Bluehost https://www.youtube.com/watch?v=kYjGyLDK3Ec
Deploy to Hostinger
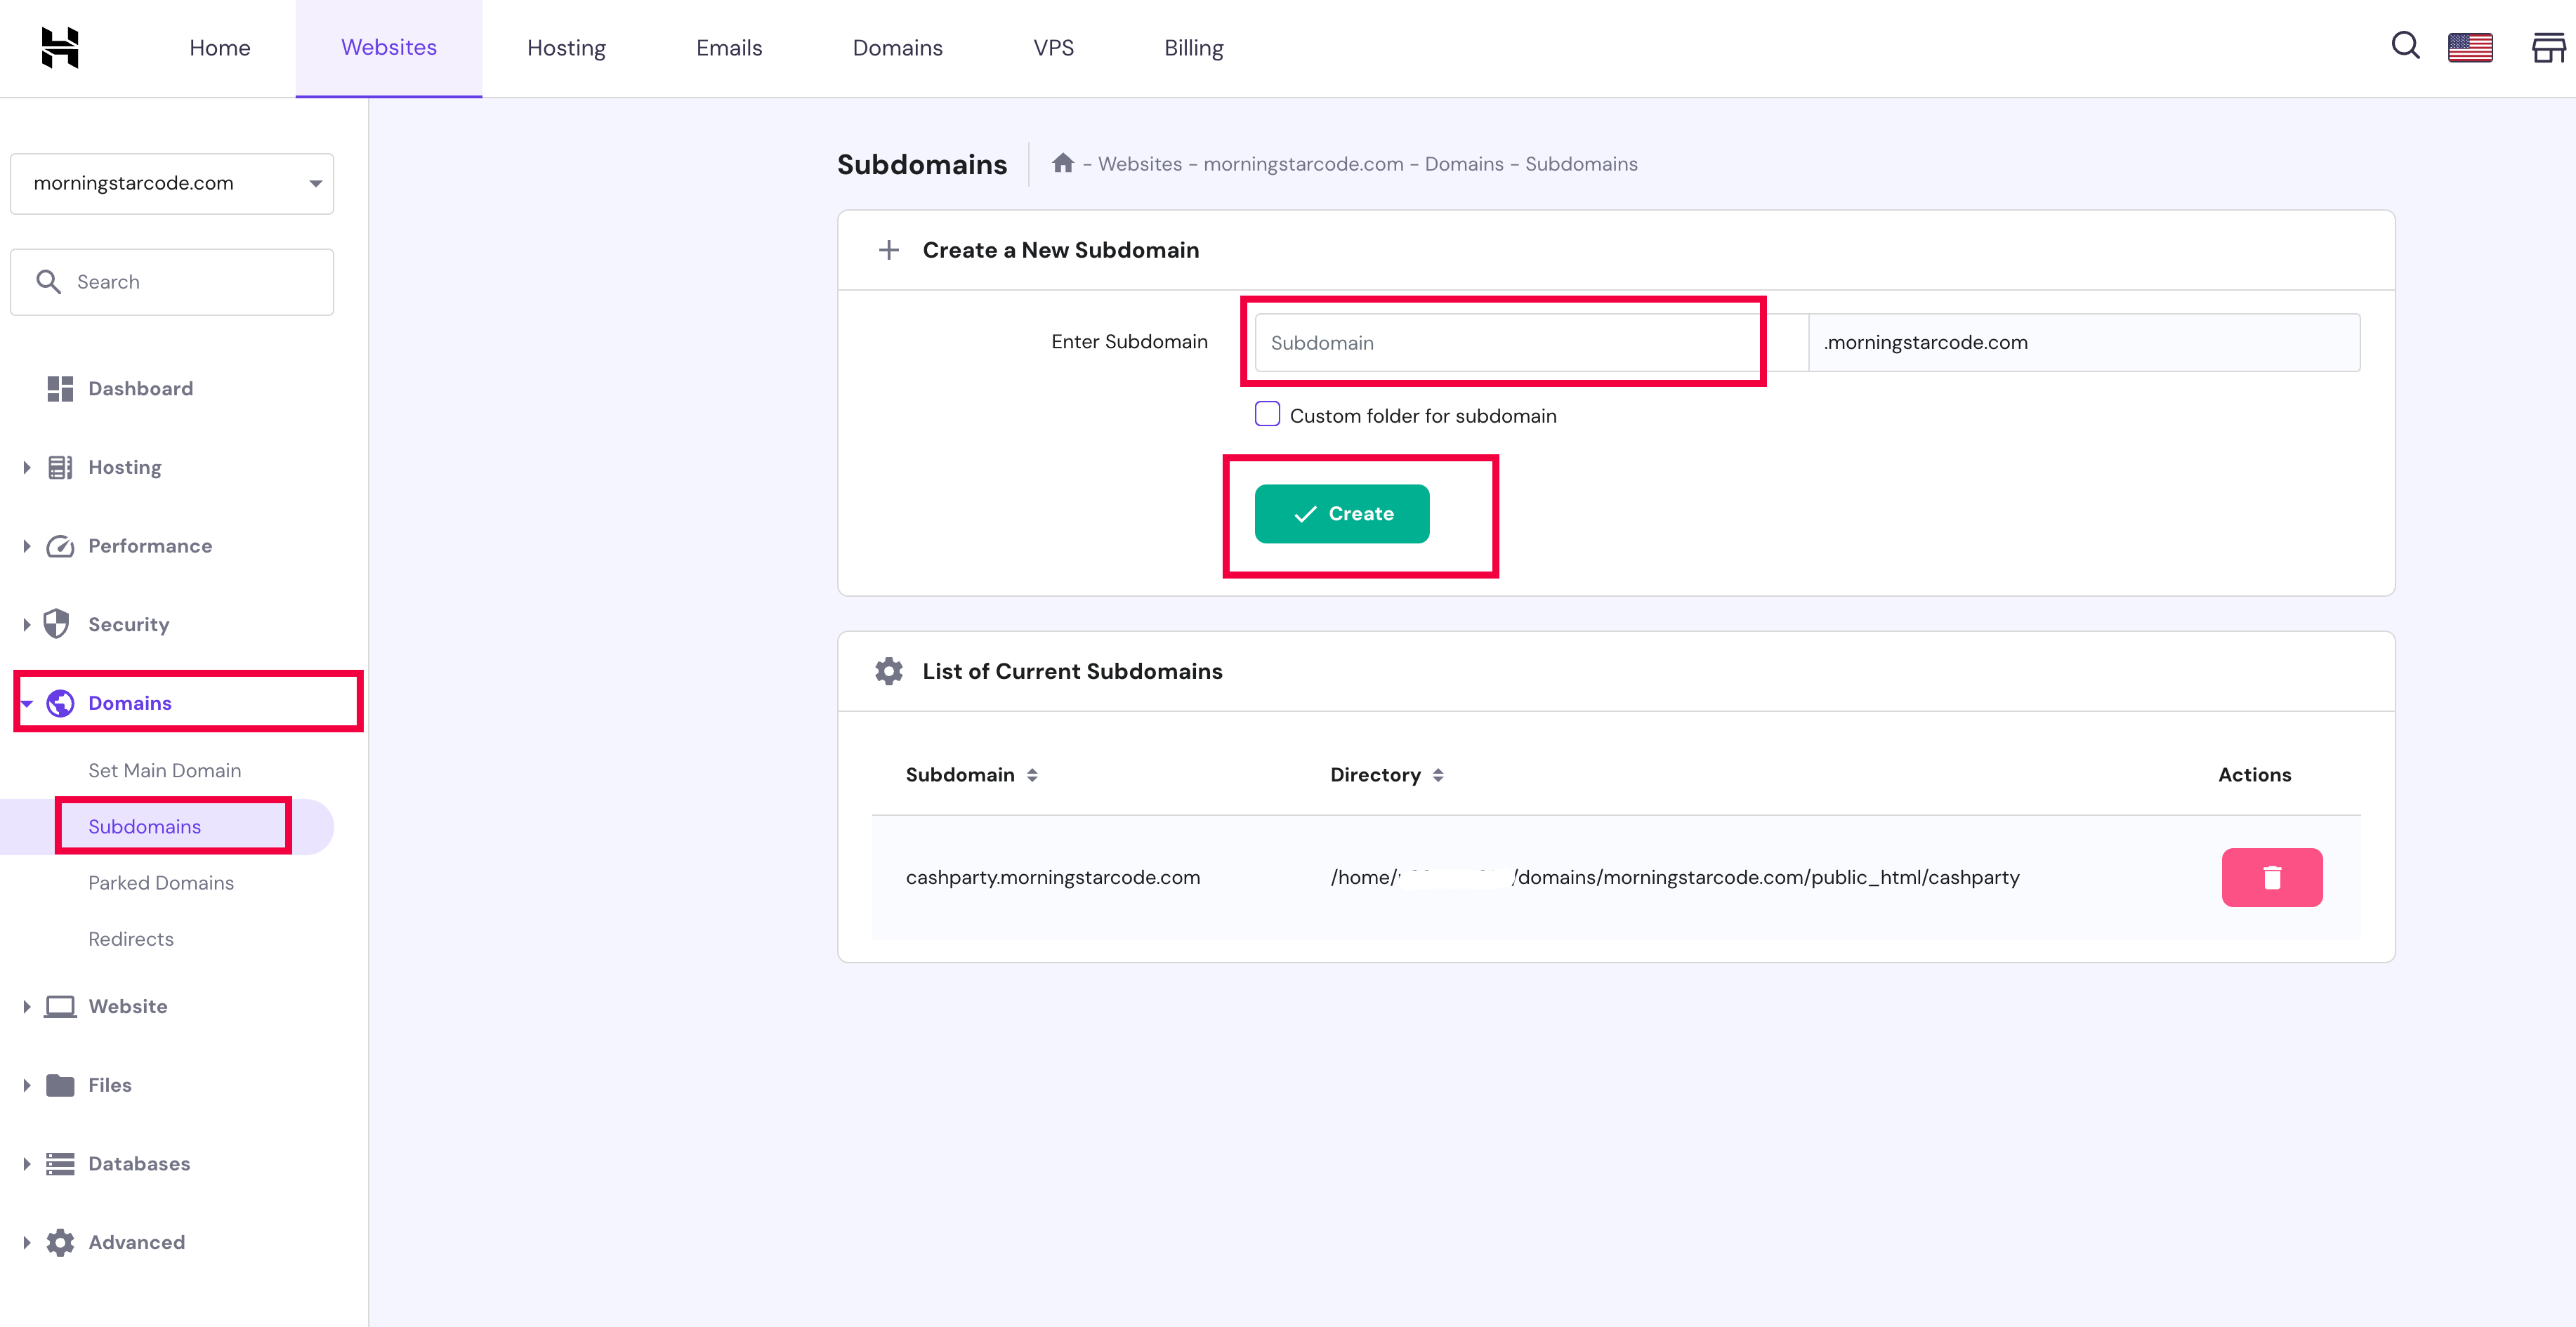
- Transfer Files to Shared Hosting:
- Create a domain or subdomain in your hosting panel:
- Compress your Laravel project into a .zip or .tar.gz archive.
- Using your shared hosting control panel (e.g., cPanel), navigate to the File Manager.
- Upload the compressed archive to the root or subdirectory.
- Extract the files.

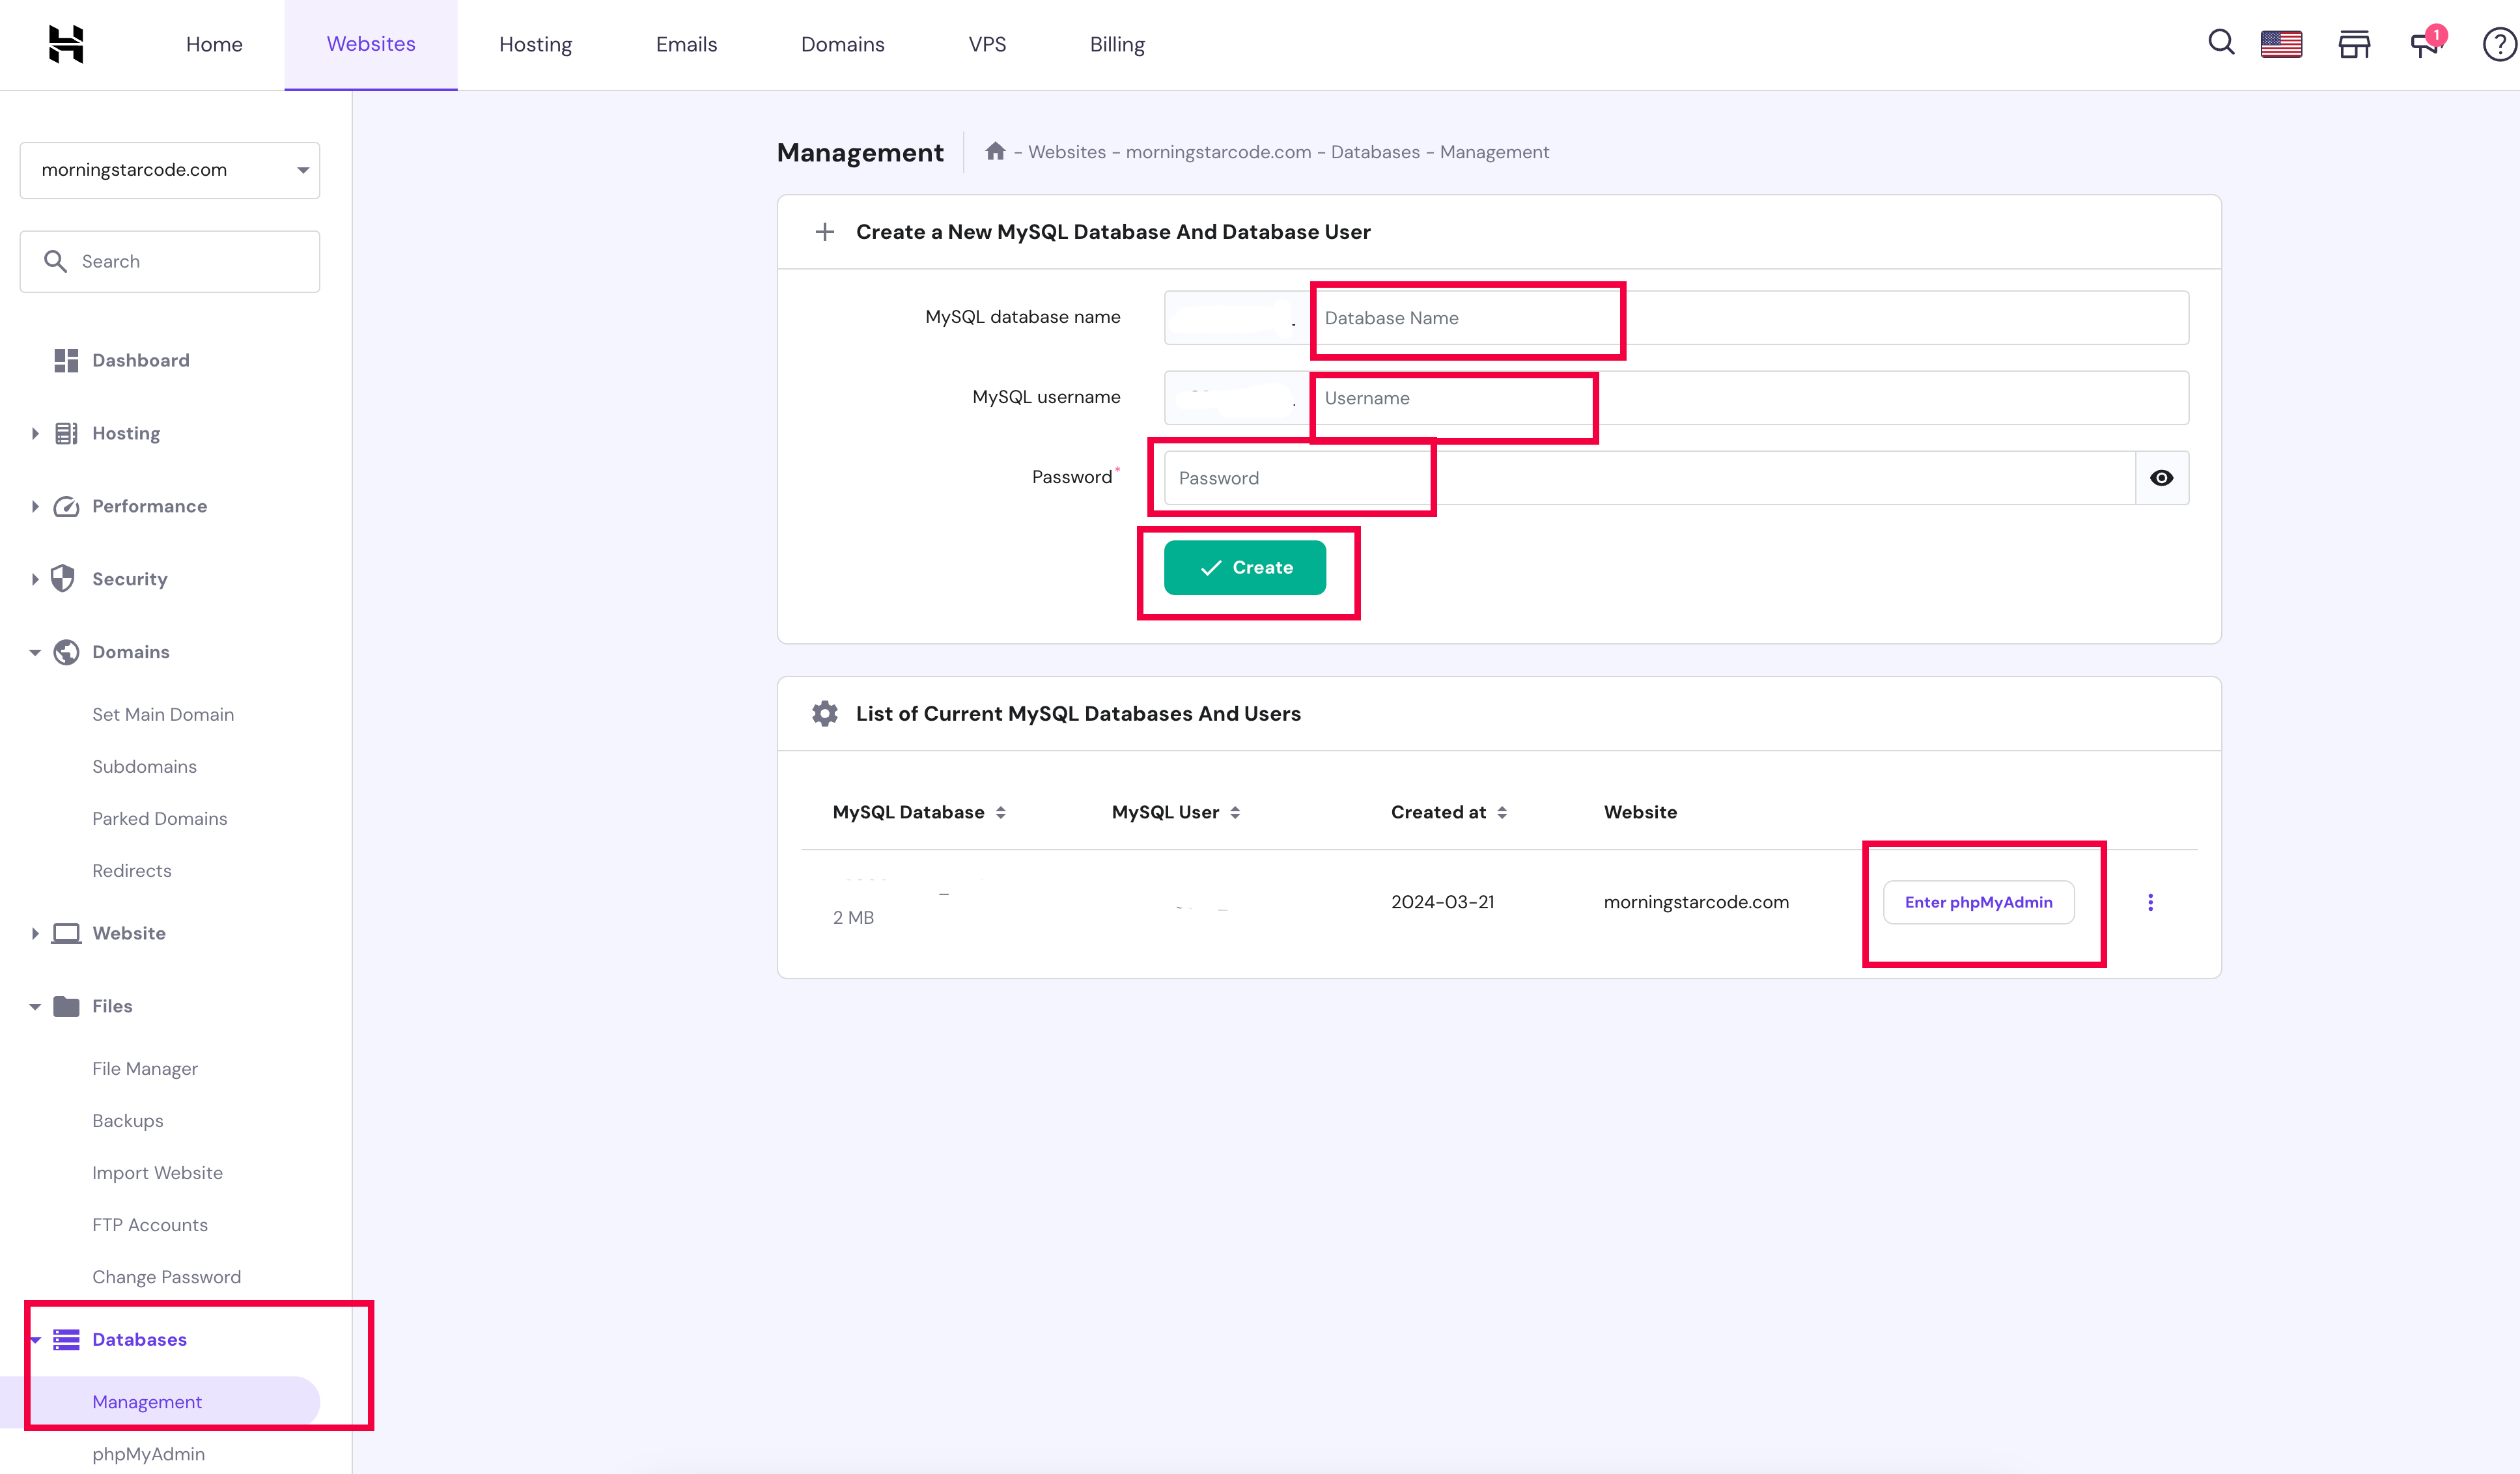
- Database Configuration:
- Create a new database and user using the cPanel database wizard (or another method).
-
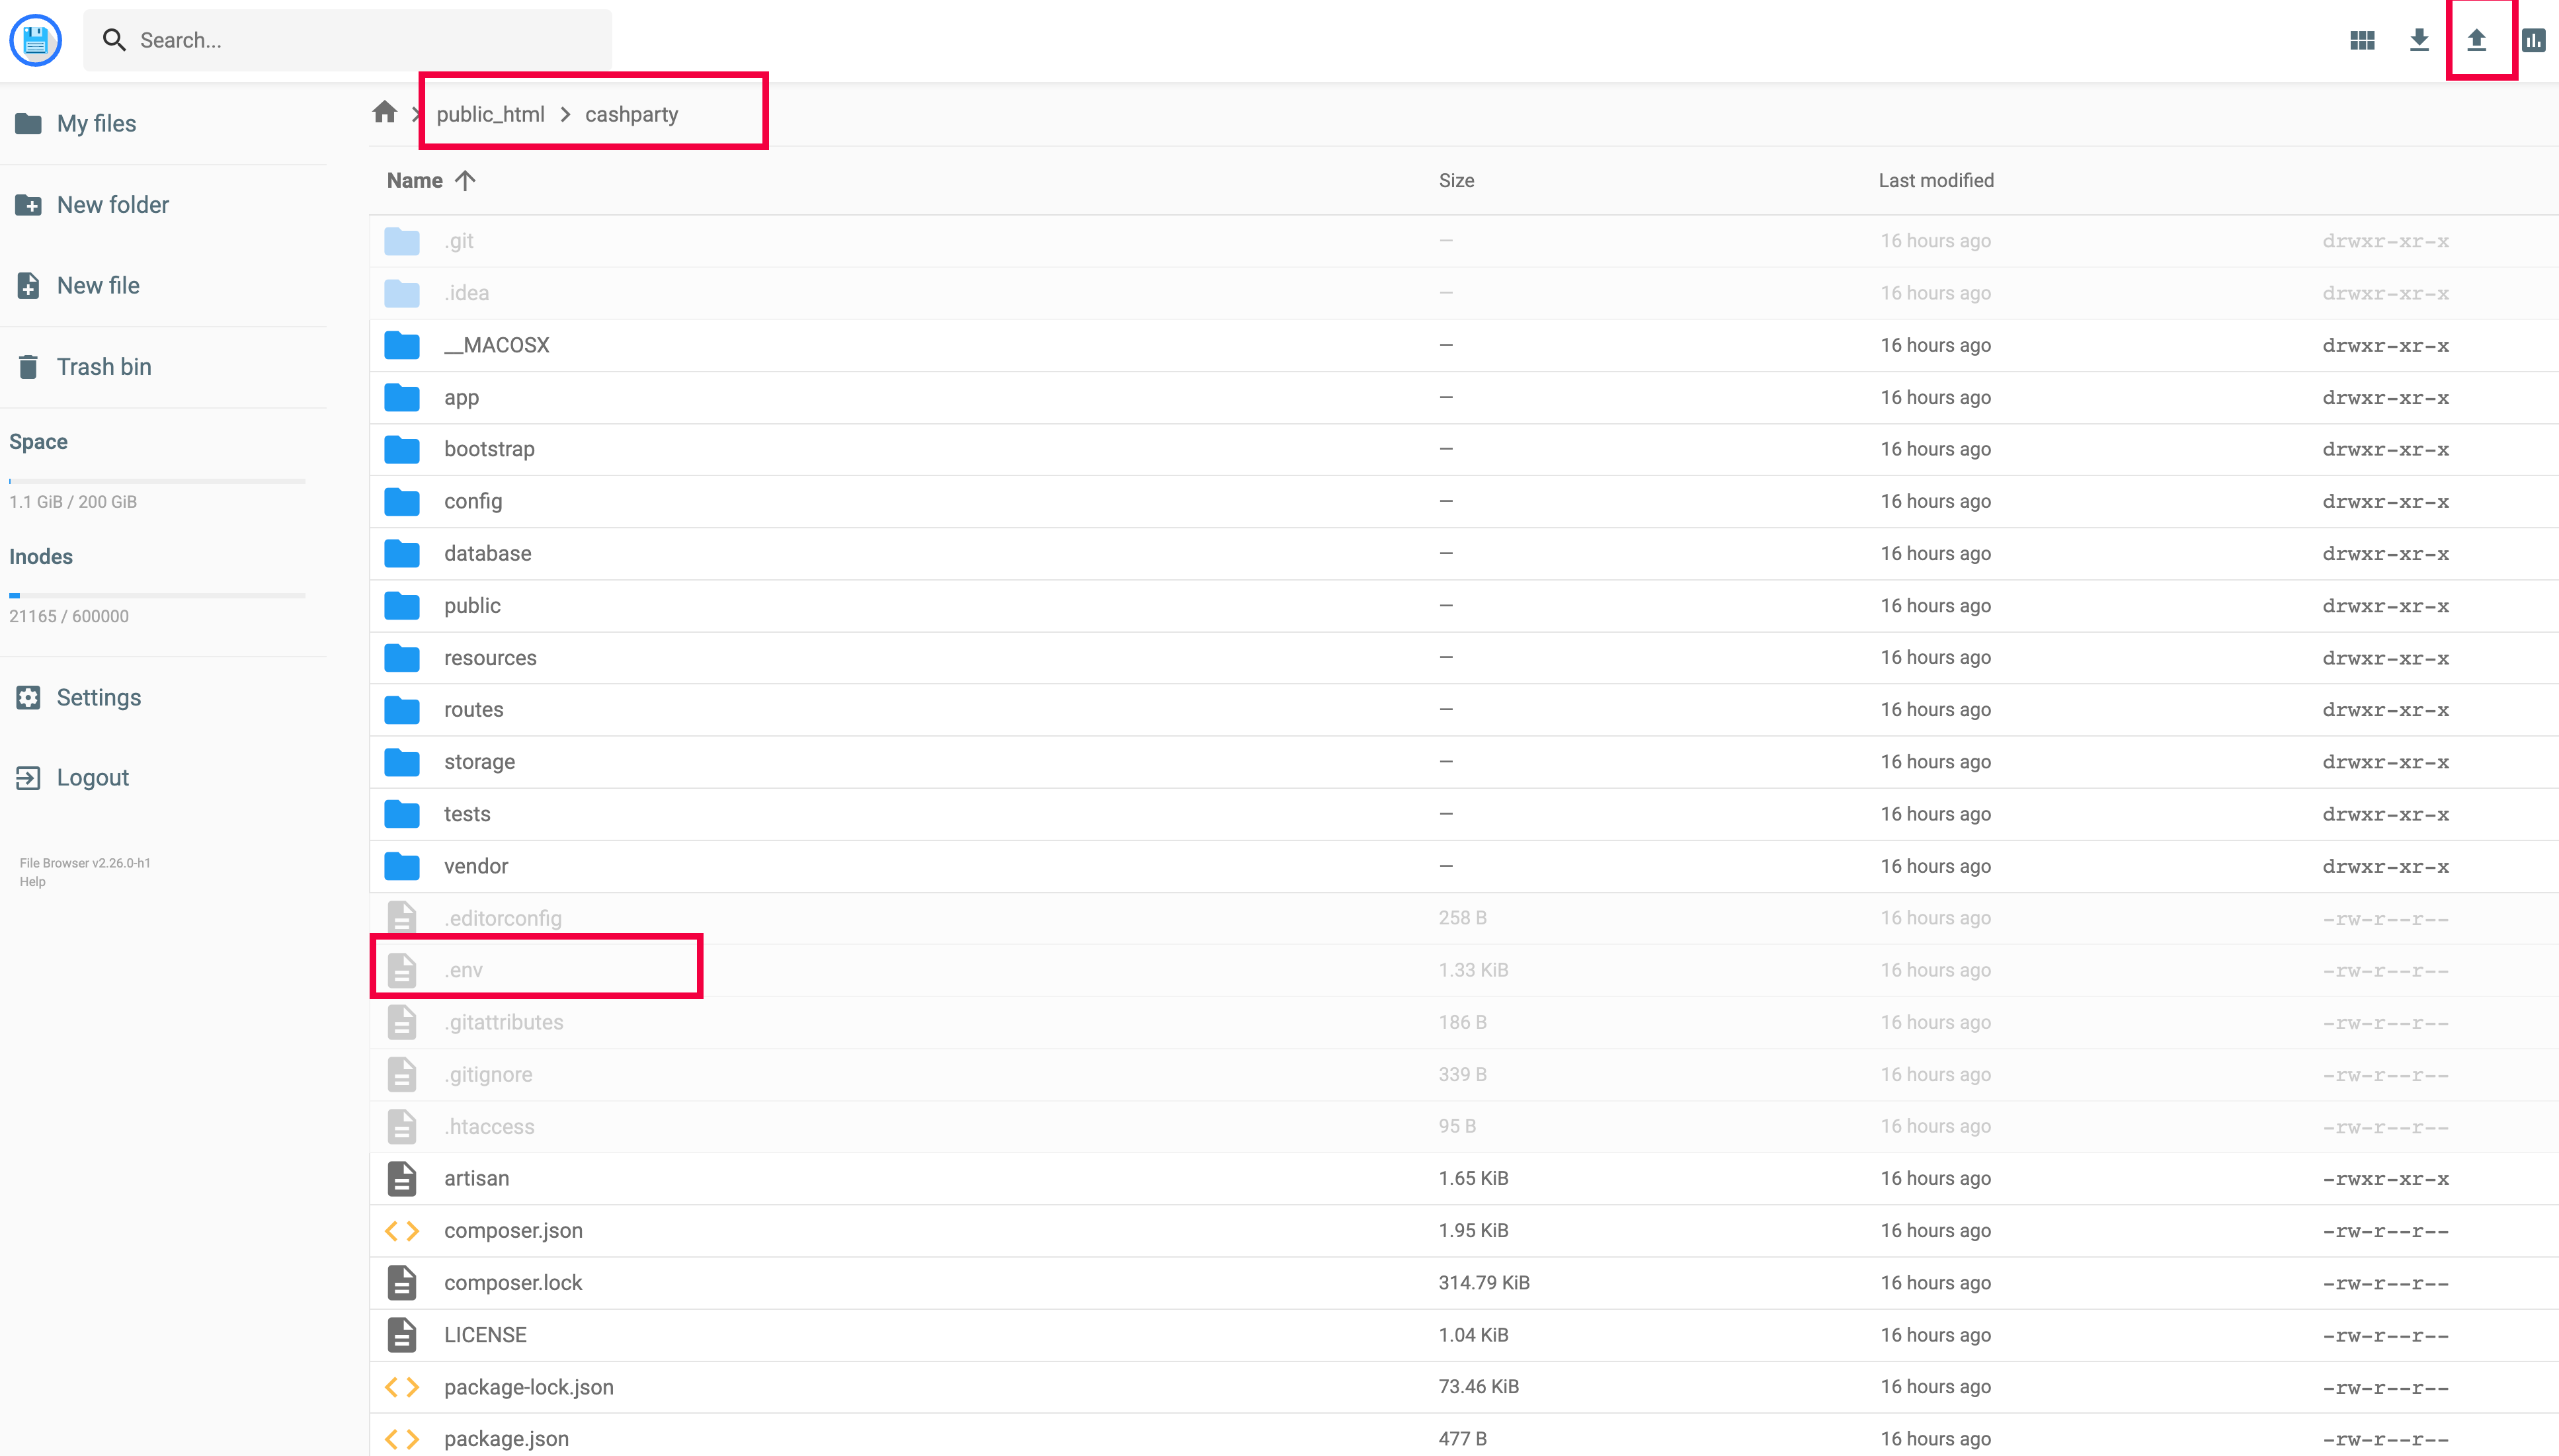
After creating the database, import the cashpartydb.sql file in phpmyadmin from the database folder in your downloaded directory. Same as local installation.
- Update the .env file with the appropriate database information.
- Connect to your server via SSH and run php artisan config:clear && php artisan route:clear && php artisan cache:clear && php artisan view:clear


- Update File Permissions:
- Directories within storage and bootstrap/cache should be writable by the server. You may need to adjust permissions to 755 or 777 (though 755 is generally safer).
- Deploy to Hostinger : https://www.youtube.com/watch?v=zmwdzDWtth0
- Test Your Website:
Now, visit your website's domain or URL to ensure everything works as expected.
Our demo website is https://charai.morningstarcode.com
Our demo admin panel website is https://charai.morningstarcode.com/dashboard. admin@admin.com : password
Deploying to Cloud Systems
After downloading the package from the marketplace, you will find a folder named 'char-ai'. This folder contains the Laravel project.
- AWS Elastic Beanstalk:
https://www.honeybadger.io/blog/laravel-php-elastic-beanstalk
- Install the AWS EB CLI and configure it with 'eb init'.
- Create a new environment with 'eb create'.
- Once the environment is set up, deploy your application using 'eb deploy'.
- DigitalOcean + Laravel Forge:
https://snapshooter.com/blog/how-to-deploy-laravel-on-digitalocean-with-forge
- Create a DigitalOcean Droplet.
- Sign up for Laravel Forge and link it to your DigitalOcean account.
- Through Forge, create a new server using your Droplet.
- Once the server is set up, link your Git repository with the Laravel application and deploy from the Forge dashboard.
- Heroku:
https://devcenter.heroku.com/articles/getting-started-with-laravel
- Install the Heroku CLI and run heroku login.
- Create a new app using heroku create.
- Add a database if required with Heroku Postgres.
- Set environment variables using heroku config:set KEY=VALUE.
- Commit your code and push it to Heroku using git push heroku master.
Prepare your GPT API Provider Keys
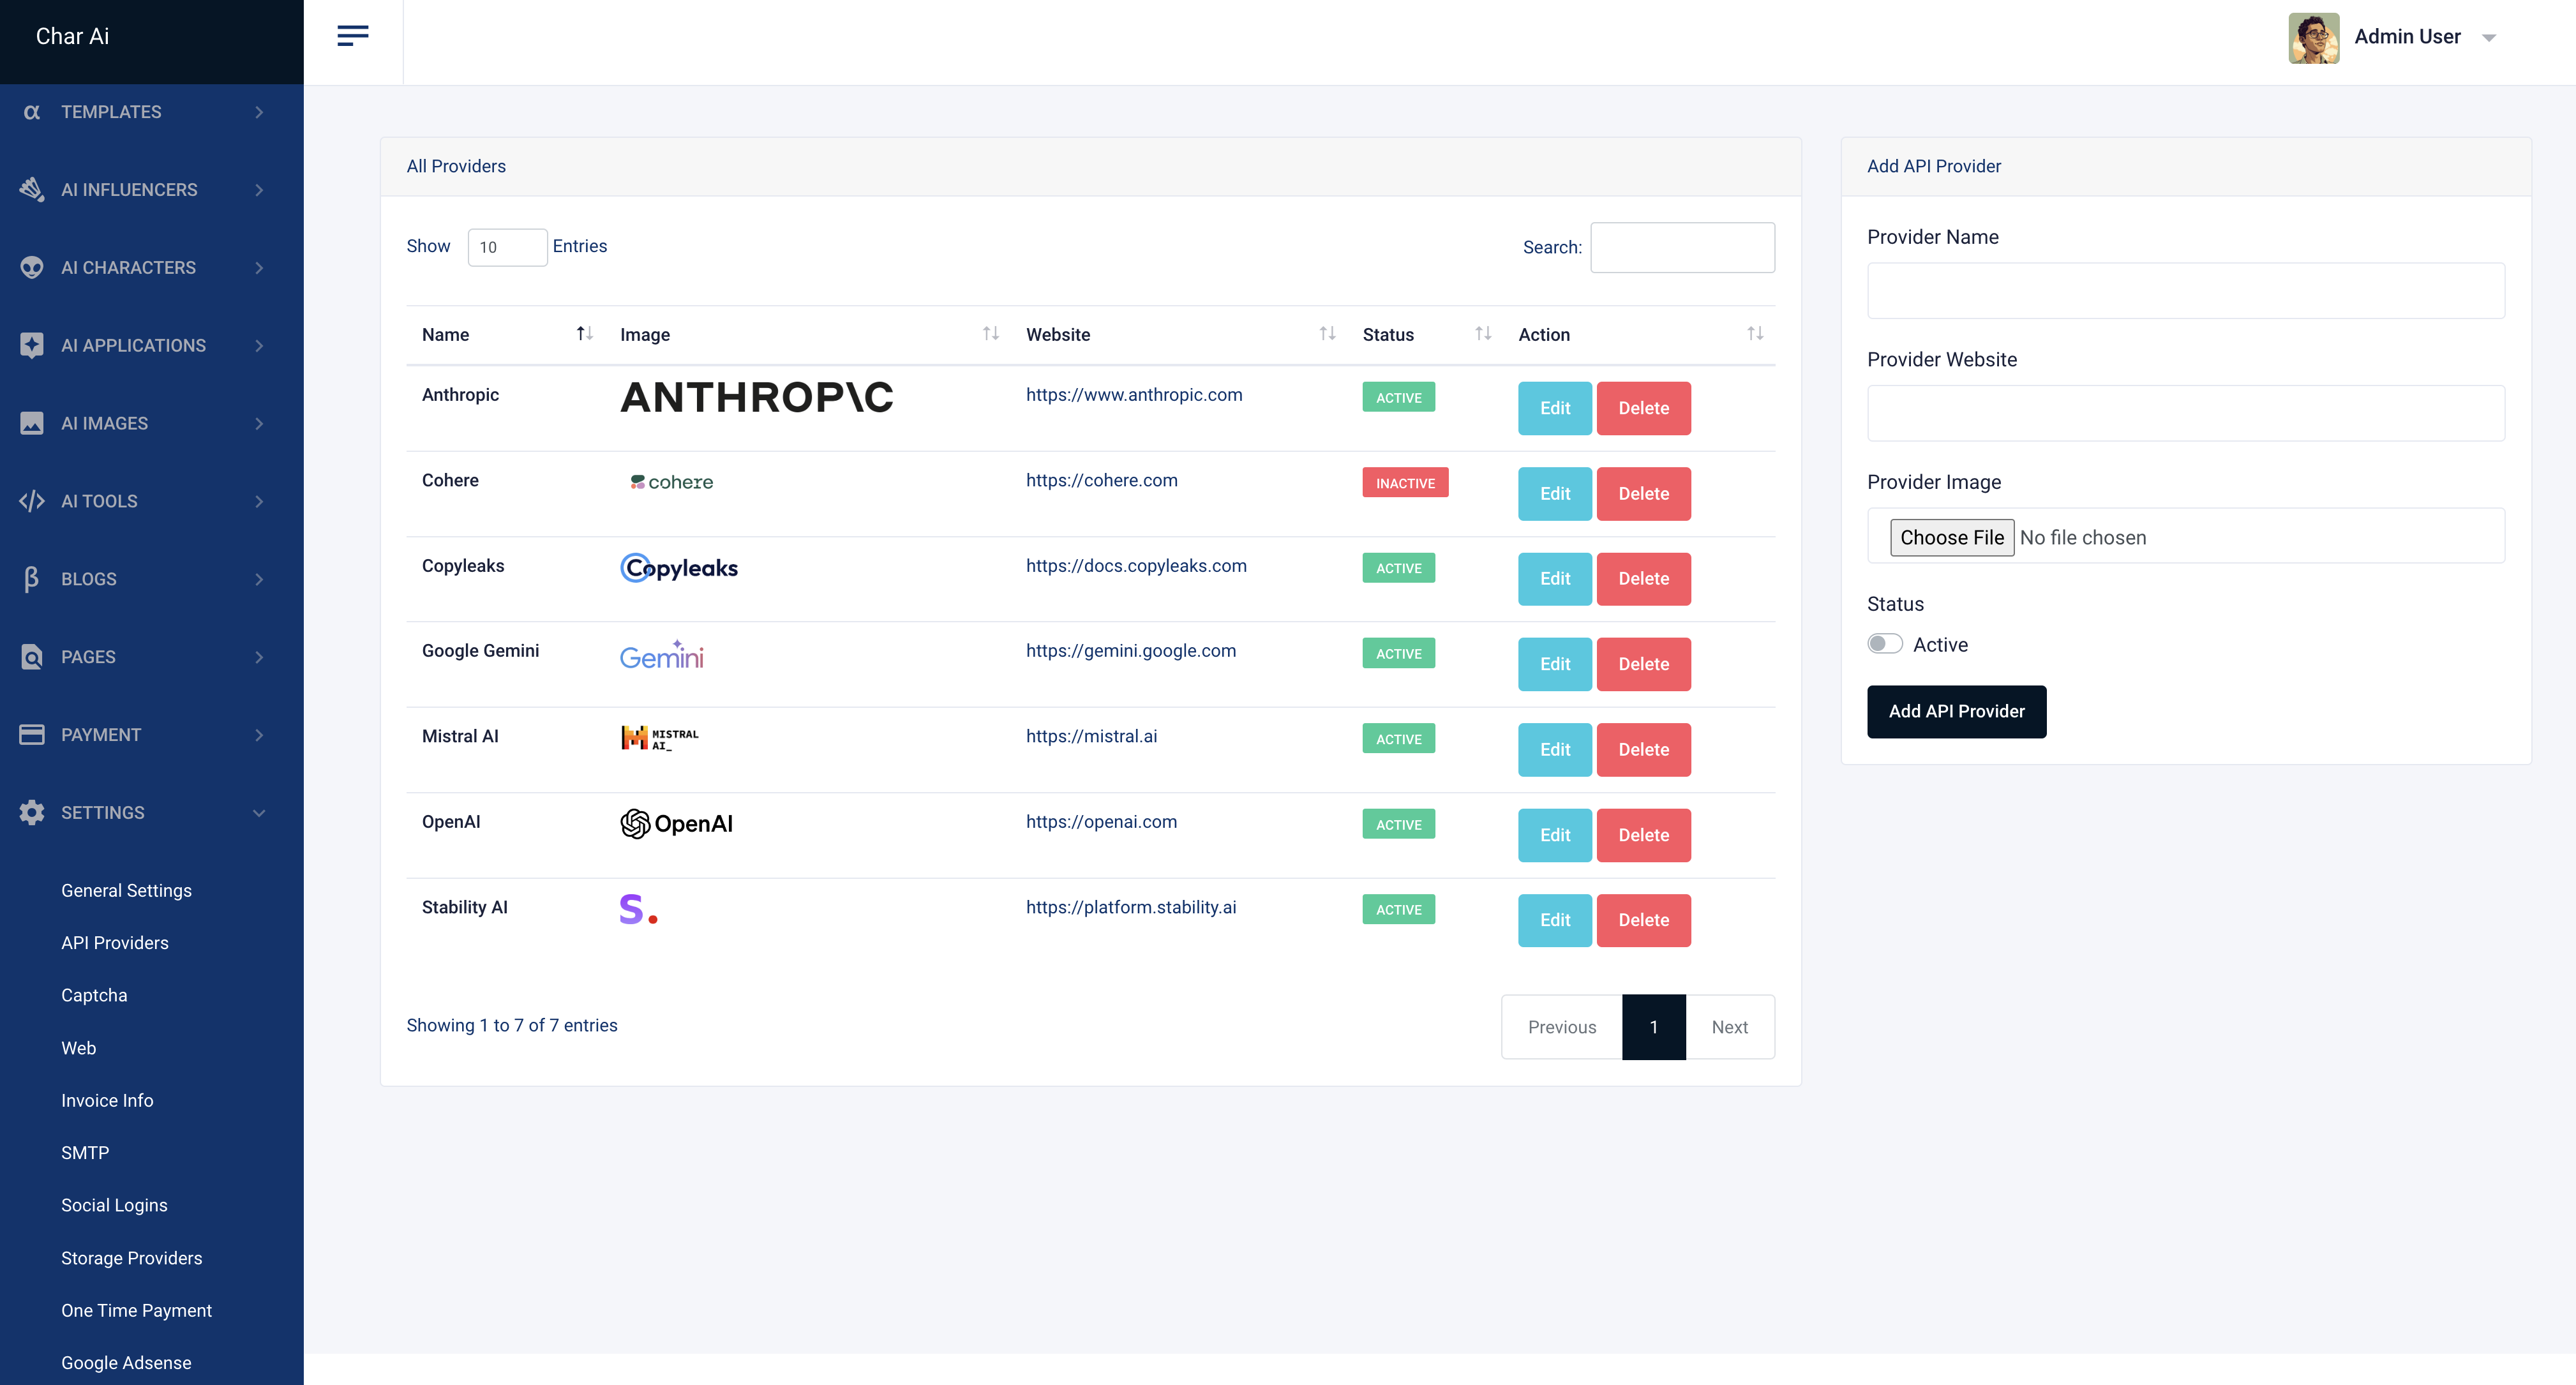
Our platform allows you to seamlessly integrate and manage multiple AI services by setting API keys and enabling your preferred services directly from an intuitive admin panel. Experience the flexibility and innovation of modern AI, tailored to your specific needs.
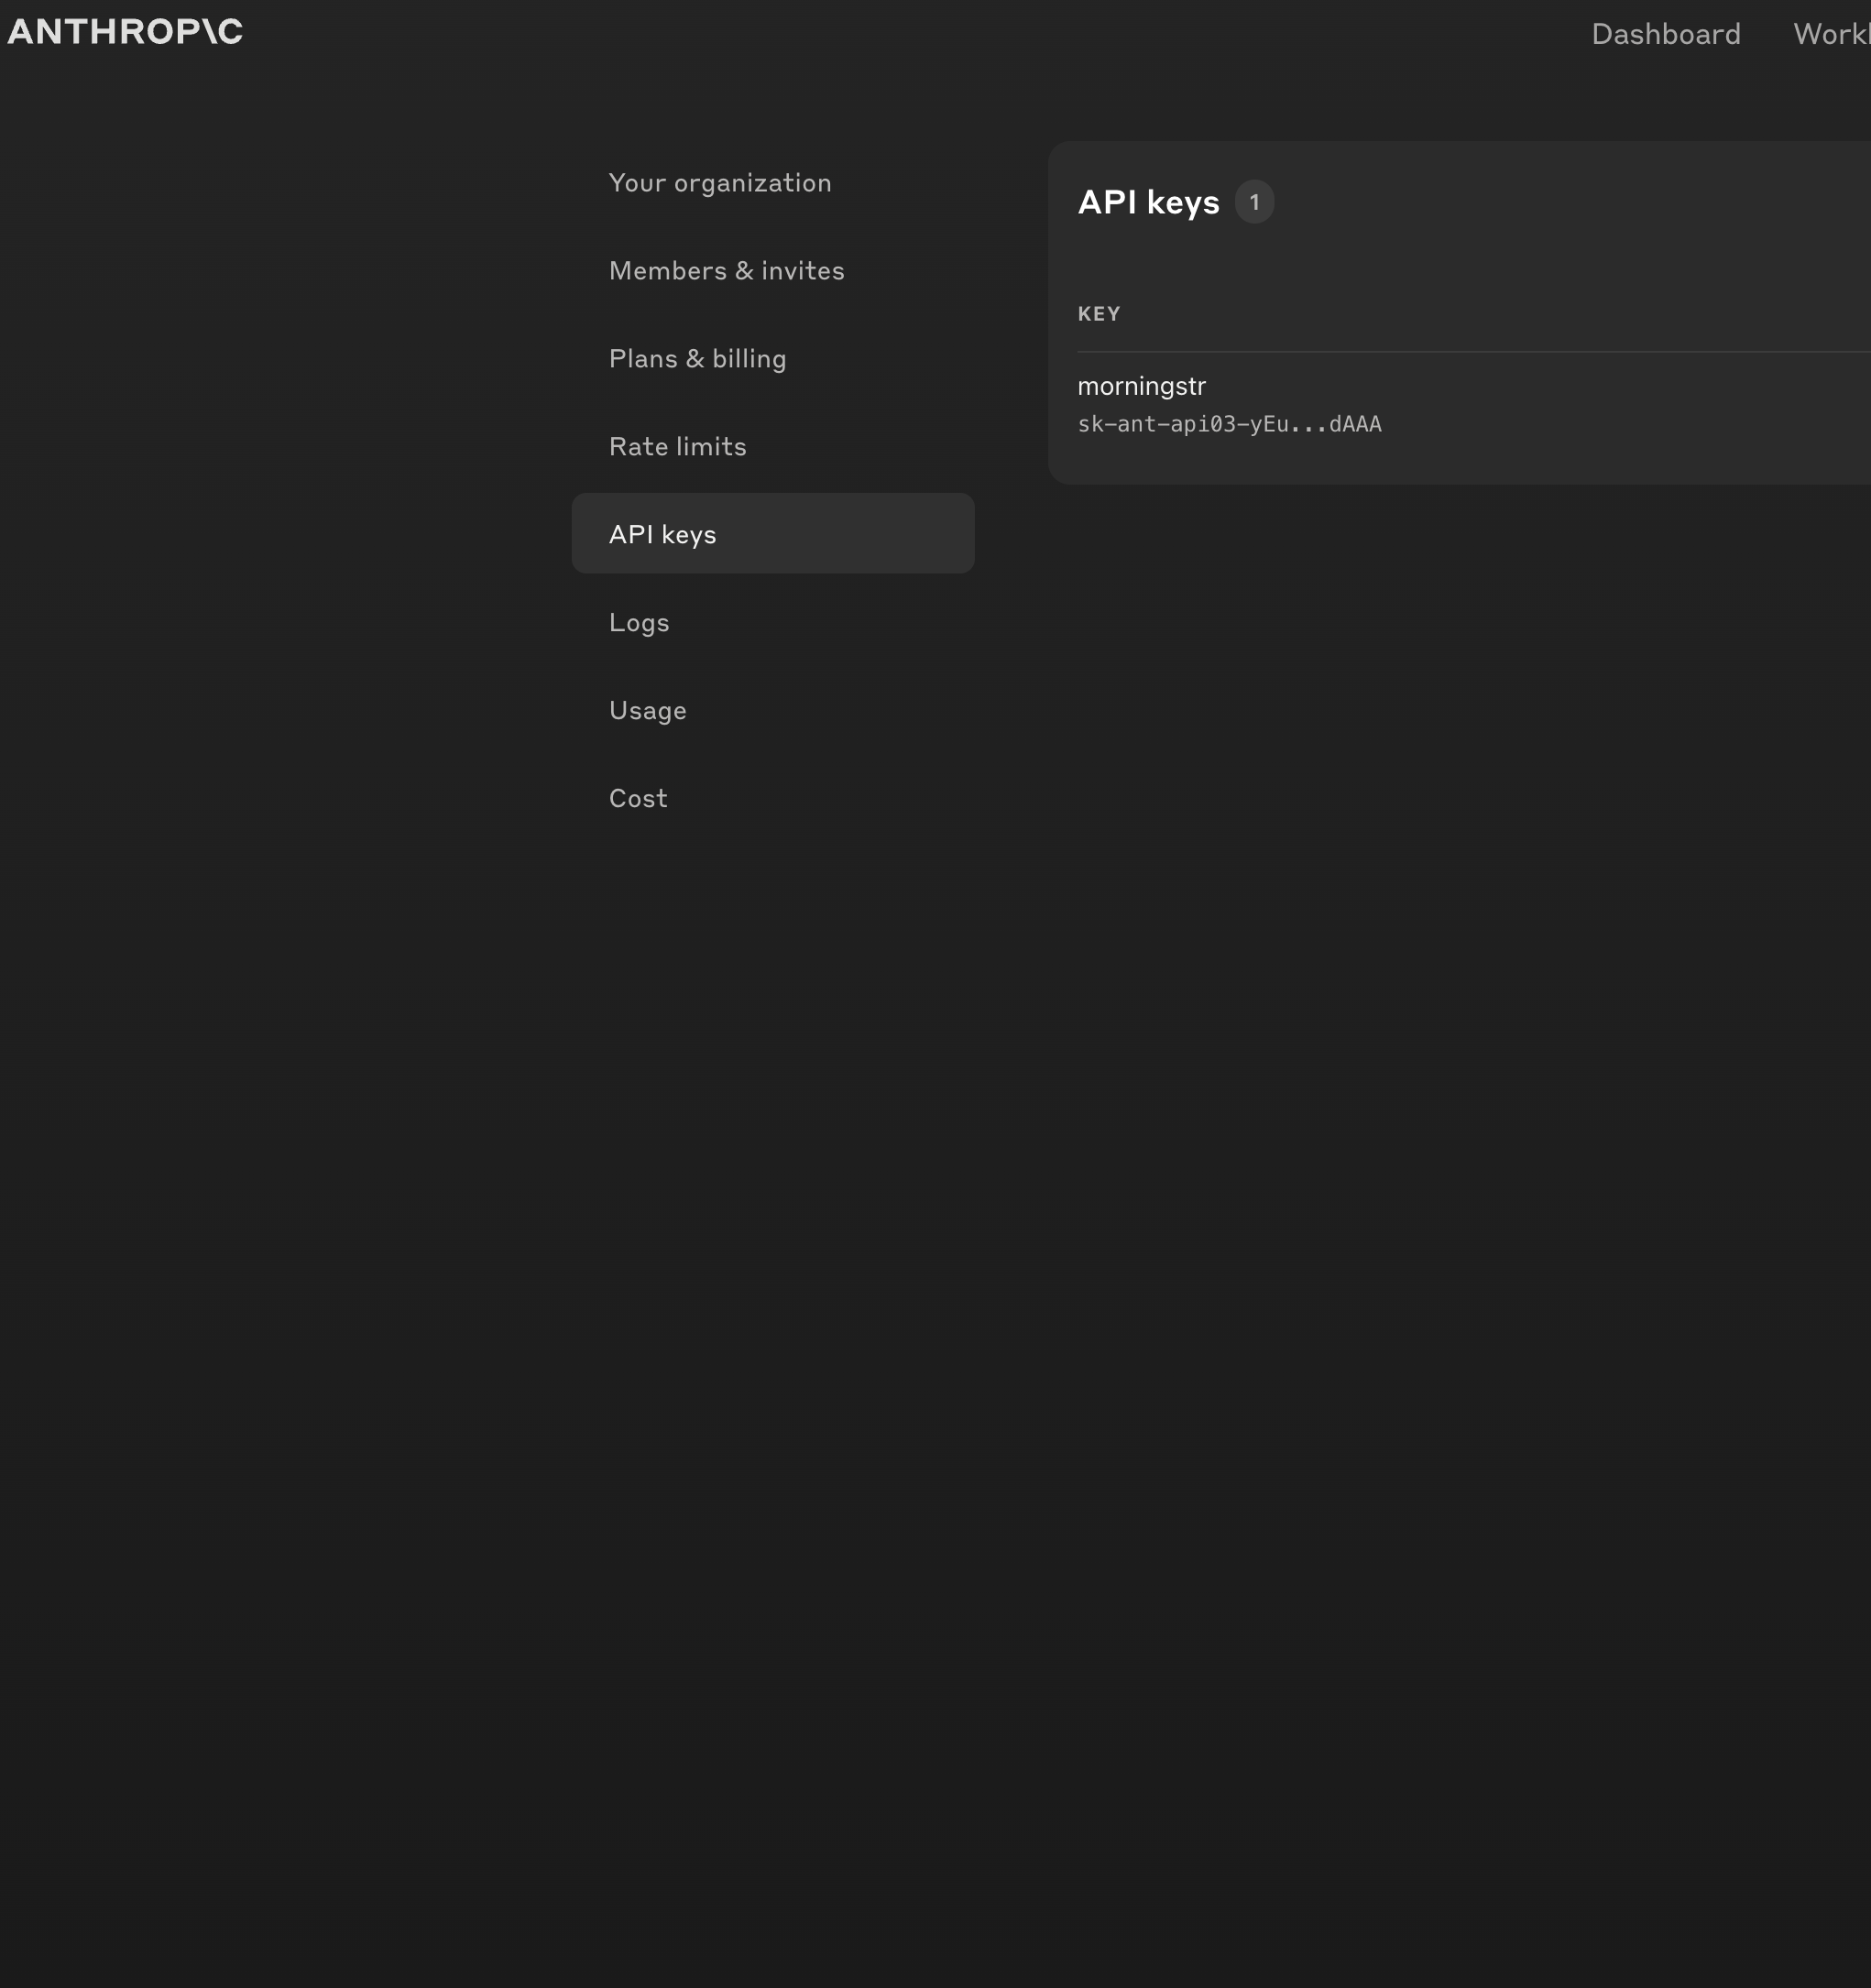
Anthropic
Important
Visit Anthropic's Website: Go to Anthropic's official website. https://www.anthropic.com
Sign Up: Click on the "Sign Up" button if you don't already have an account. Fill in the required details to create a new account.
Verify Email: After signing up, verify your email address by clicking on the verification link sent to your email.
API Dashboard: Navigate to the API section of your dashboard. This can usually be found in the account settings or a dedicated API section in the main menu.
Copy the Key: Copy the API key and store it in admin panel. You will need this key to authenticate your API requests.
Copyleaks
Important
Visit Copyleaks's Website: Go to Copyleaks's official website. https://copyleaks.com
Sign Up: Click on the "Sign Up" button if you don't already have an account. Fill in the required details to create a new account.
Verify Email: After signing up, verify your email address by clicking on the verification link sent to your email.
API Dashboard: Navigate to the API section of your dashboard. This can usually be found in the account settings or a dedicated API section in the main menu.
Copy the Key: Copy the API key and store it in admin panel. You will need this key to authenticate your API requests.

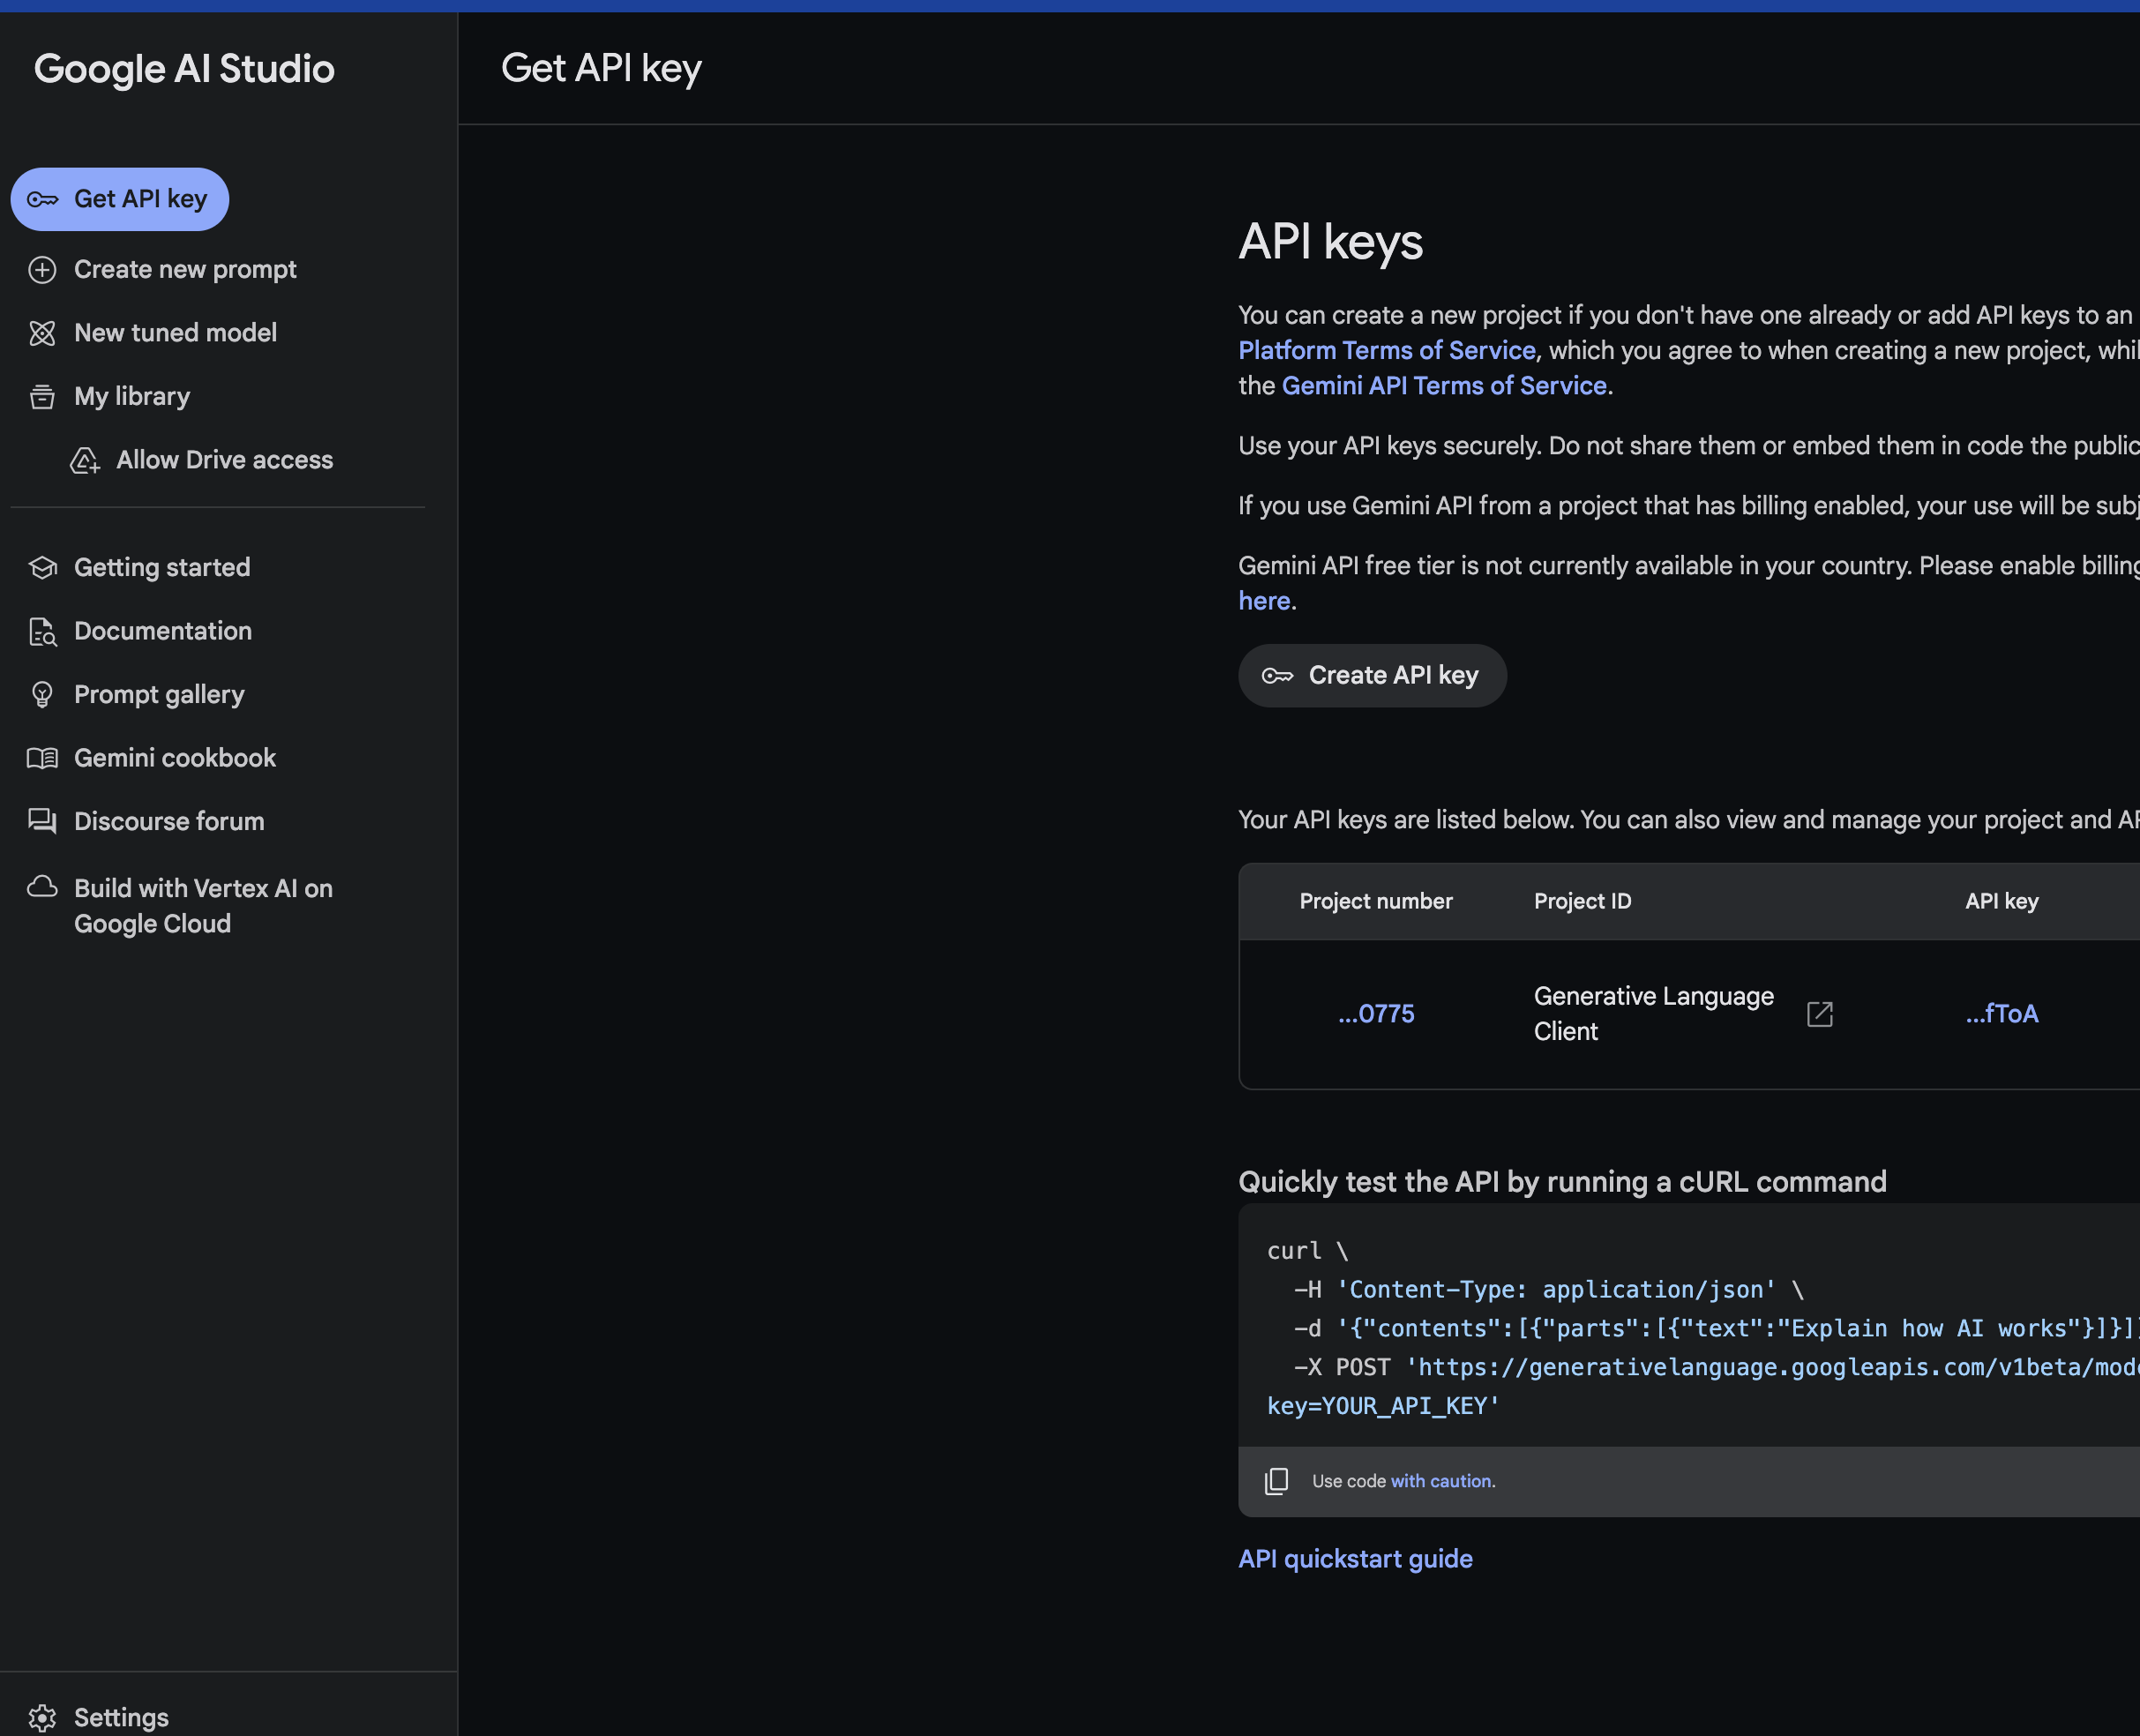
Google Gemini
Important
Visit Google Gemini's Website: Go to Google Gemini's official website. https://aistudio.google.com/app/apikey
Sign Up: Click on the "Sign Up" button if you don't already have an account. Fill in the required details to create a new account.
Verify Email: After signing up, verify your email address by clicking on the verification link sent to your email.
To use the Gemini API, you need an API key. You can create a key with one click in Google AI Studio.
Copy the Key: Copy the API key and store it in admin panel. You will need this key to authenticate your API requests.
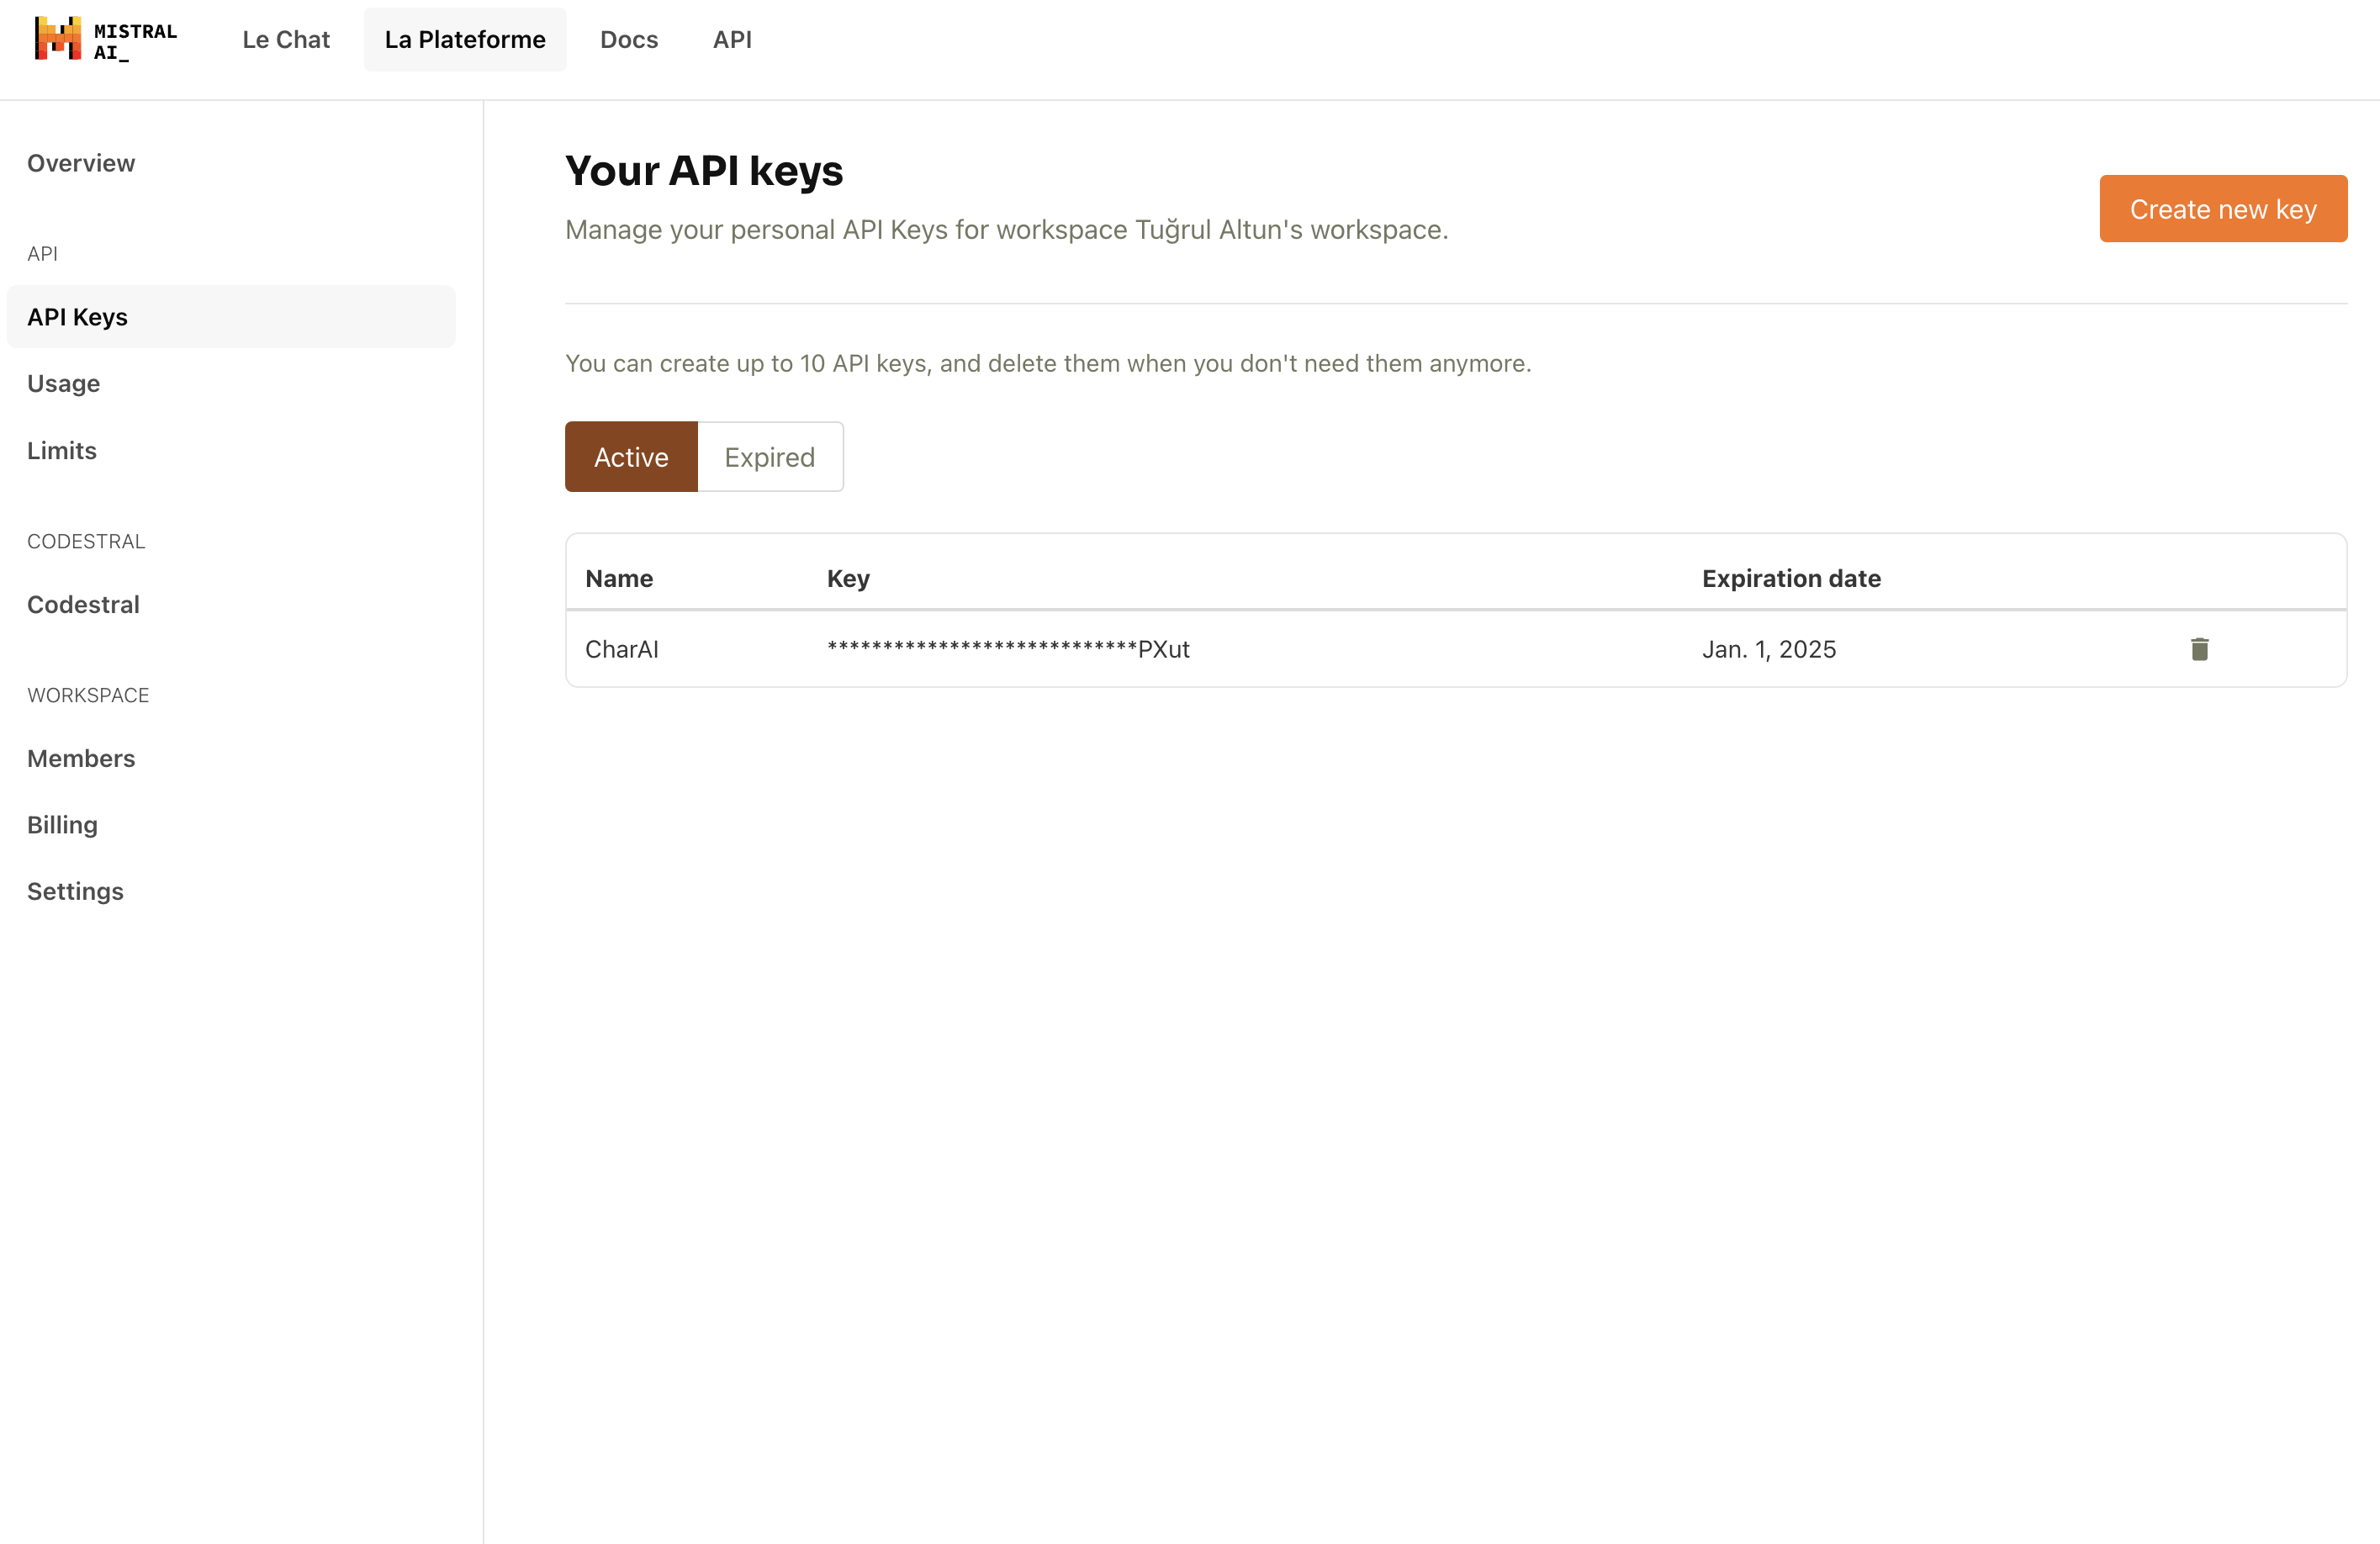
Mistral AI
Important
Visit Mistral AI's Website: Go to Mistral AI's official website. https://mistral.ai
Sign Up: Click on the "Sign Up" button if you don't already have an account. Fill in the required details to create a new account.
Verify Email: After signing up, verify your email address by clicking on the verification link sent to your email.
To use the Mistral AI API, you need an API key. You can create a key with one click in Mistral AI website.
Copy the Key: Copy the API key and store it in admin panel. You will need this key to authenticate your API requests.
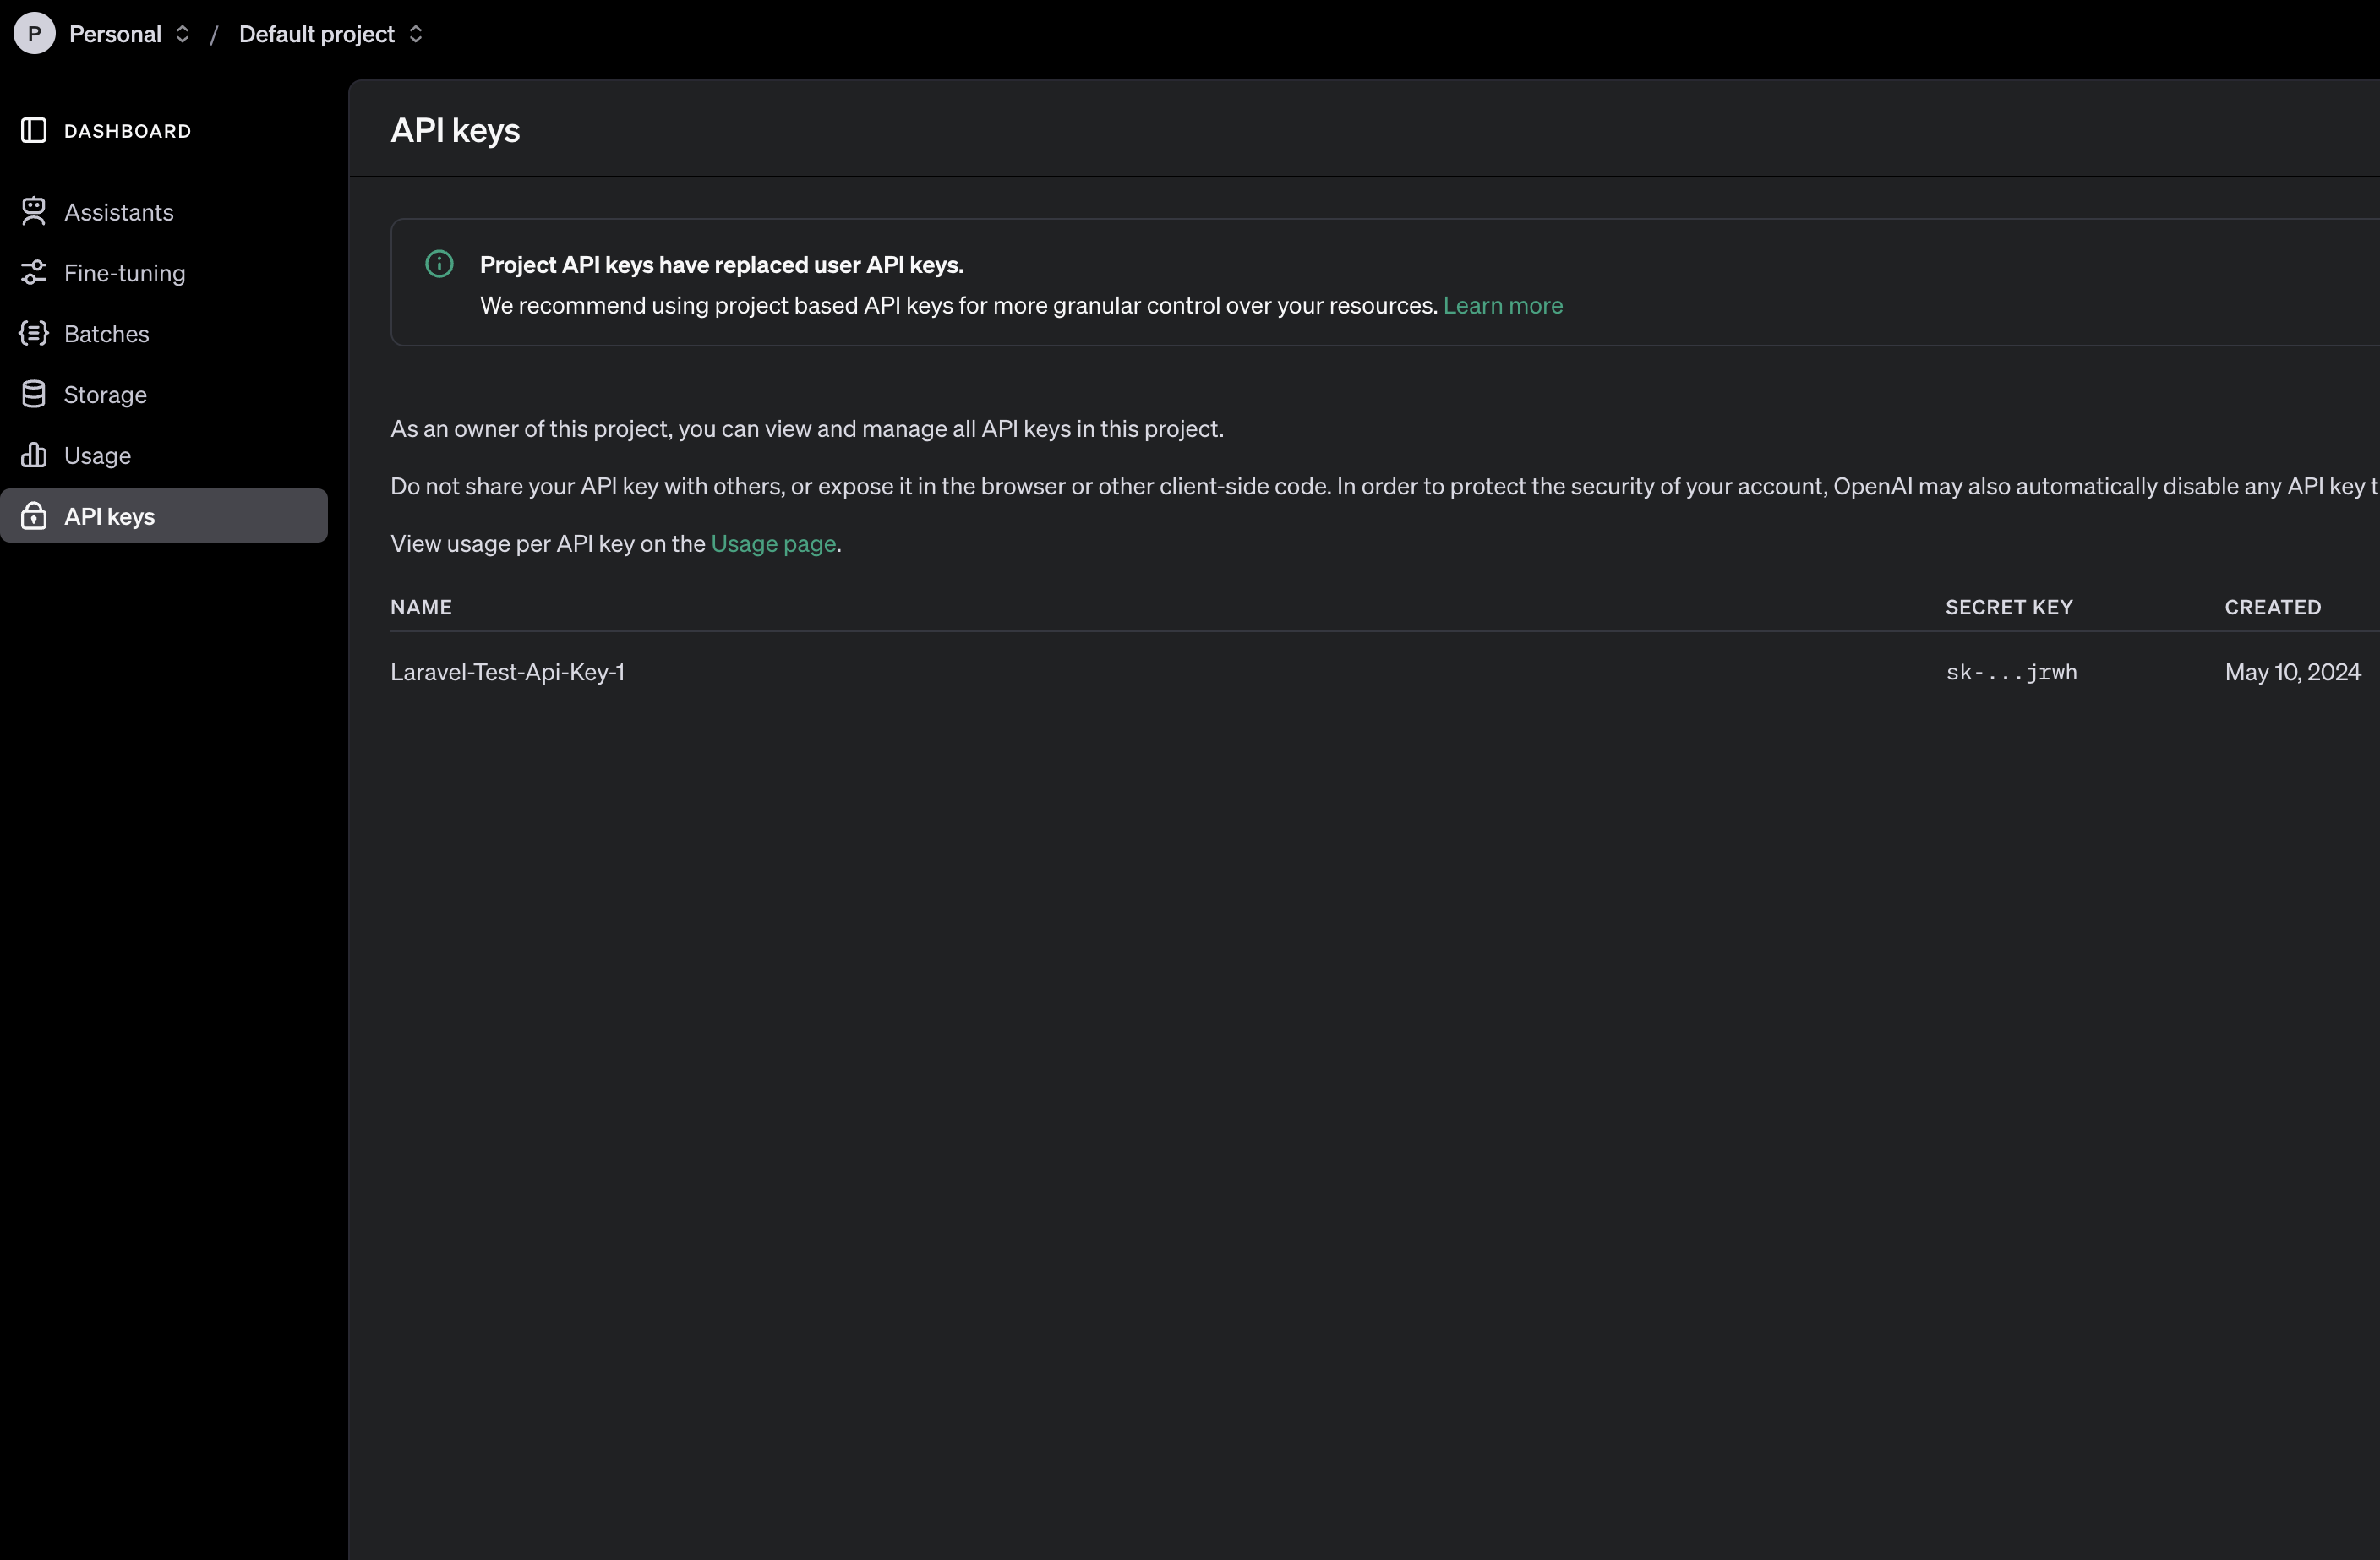
OpenAI
Important
Visit OpenAI's Website: Go to OpenAI's official website. https://platform.openai.com/api-keys
Sign Up: Click on the "Sign Up" button if you don't already have an account. Fill in the required details to create a new account.
Verify Email: After signing up, verify your email address by clicking on the verification link sent to your email.
To use the OpenAI API, you need an API key. You can create a key with one click in OpenAI website.
Copy the Key: Copy the API key and store it in admin panel. You will need this key to authenticate your API requests.
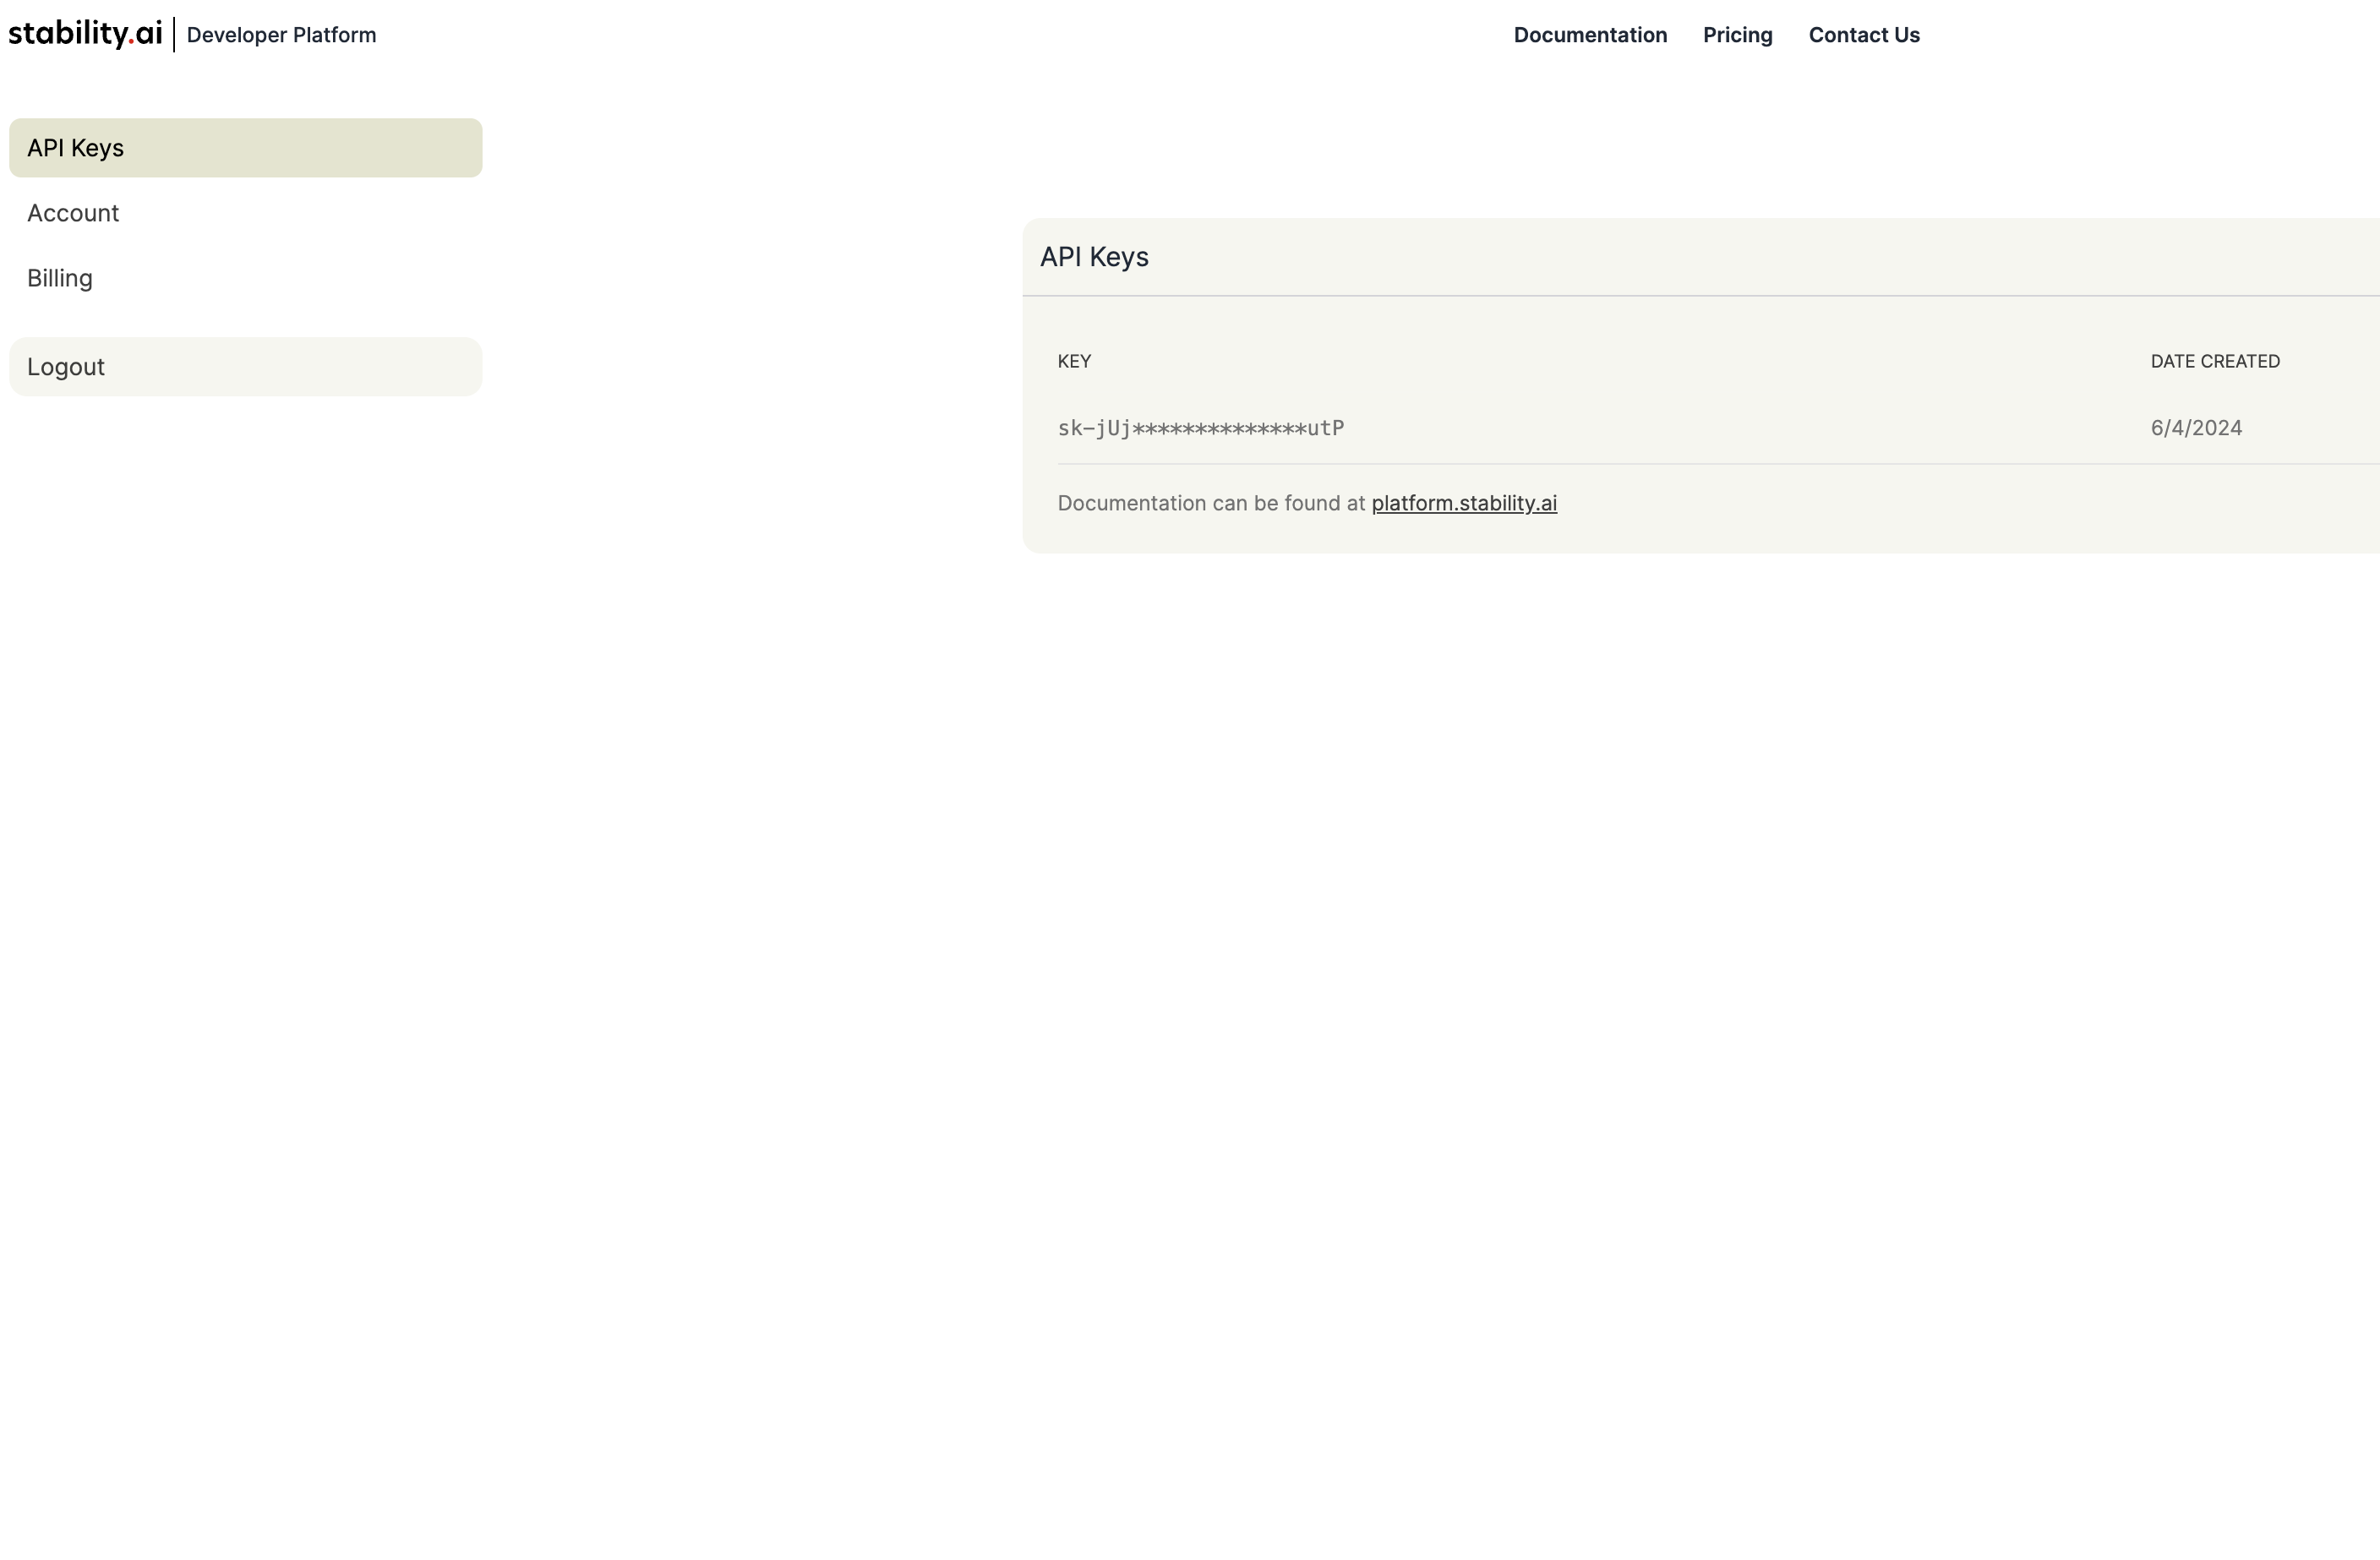
Stability AI
Important
Visit Stability AI's Website: Go to Stability AI's official website.https://platform.stability.ai
Sign Up: Click on the "Sign Up" button if you don't already have an account. Fill in the required details to create a new account.
Verify Email: After signing up, verify your email address by clicking on the verification link sent to your email.
To use the Stability AI API, you need an API key. You can create a key with one click in Stability AI website.
Copy the Key: Copy the API key and store it in admin panel. You will need this key to authenticate your API requests.
Prepare your Storage Provider Keys
Our platform allows you to seamlessly integrate and manage multiple storage services by setting API keys and enabling your preferred services directly from an intuitive admin panel. Experience the flexibility and innovation of modern storage, tailored to your specific needs.

AWS S3
Important
Sign Up for AWS: Go to AWS Signup Page and follow the instructions to create a new AWS account.https://portal.aws.amazon.com/billing/signup
Login to AWS: Once your account is created and verified, log in to the AWS Management Console. https://aws.amazon.com/console
Navigate to IAM: In the AWS Management Console, search for "IAM" and go to the IAM service.
- Create a New User: In the IAM dashboard, click on "Users" and then "Add User".
- Set User Permissions: Assign the user "Programmatic access" and attach the "AmazonS3FullAccess" policy.
- Select "Programmatic access" to enable access via the AWS CLI and SDKs.
Set Permissions:
- Click "Next: Permissions".
- Choose "Attach existing policies directly".
- Search for S3, select AmazonS3FullAccess, and click "Next: Tags".
- Click "Next: Review" and then "Create user".
- Click "Create user" to finalize.
Download Credentials: After the user is created, you will see the Access Key ID and Secret Access Key. Download the CSV file containing these credentials or copy them to a secure place.
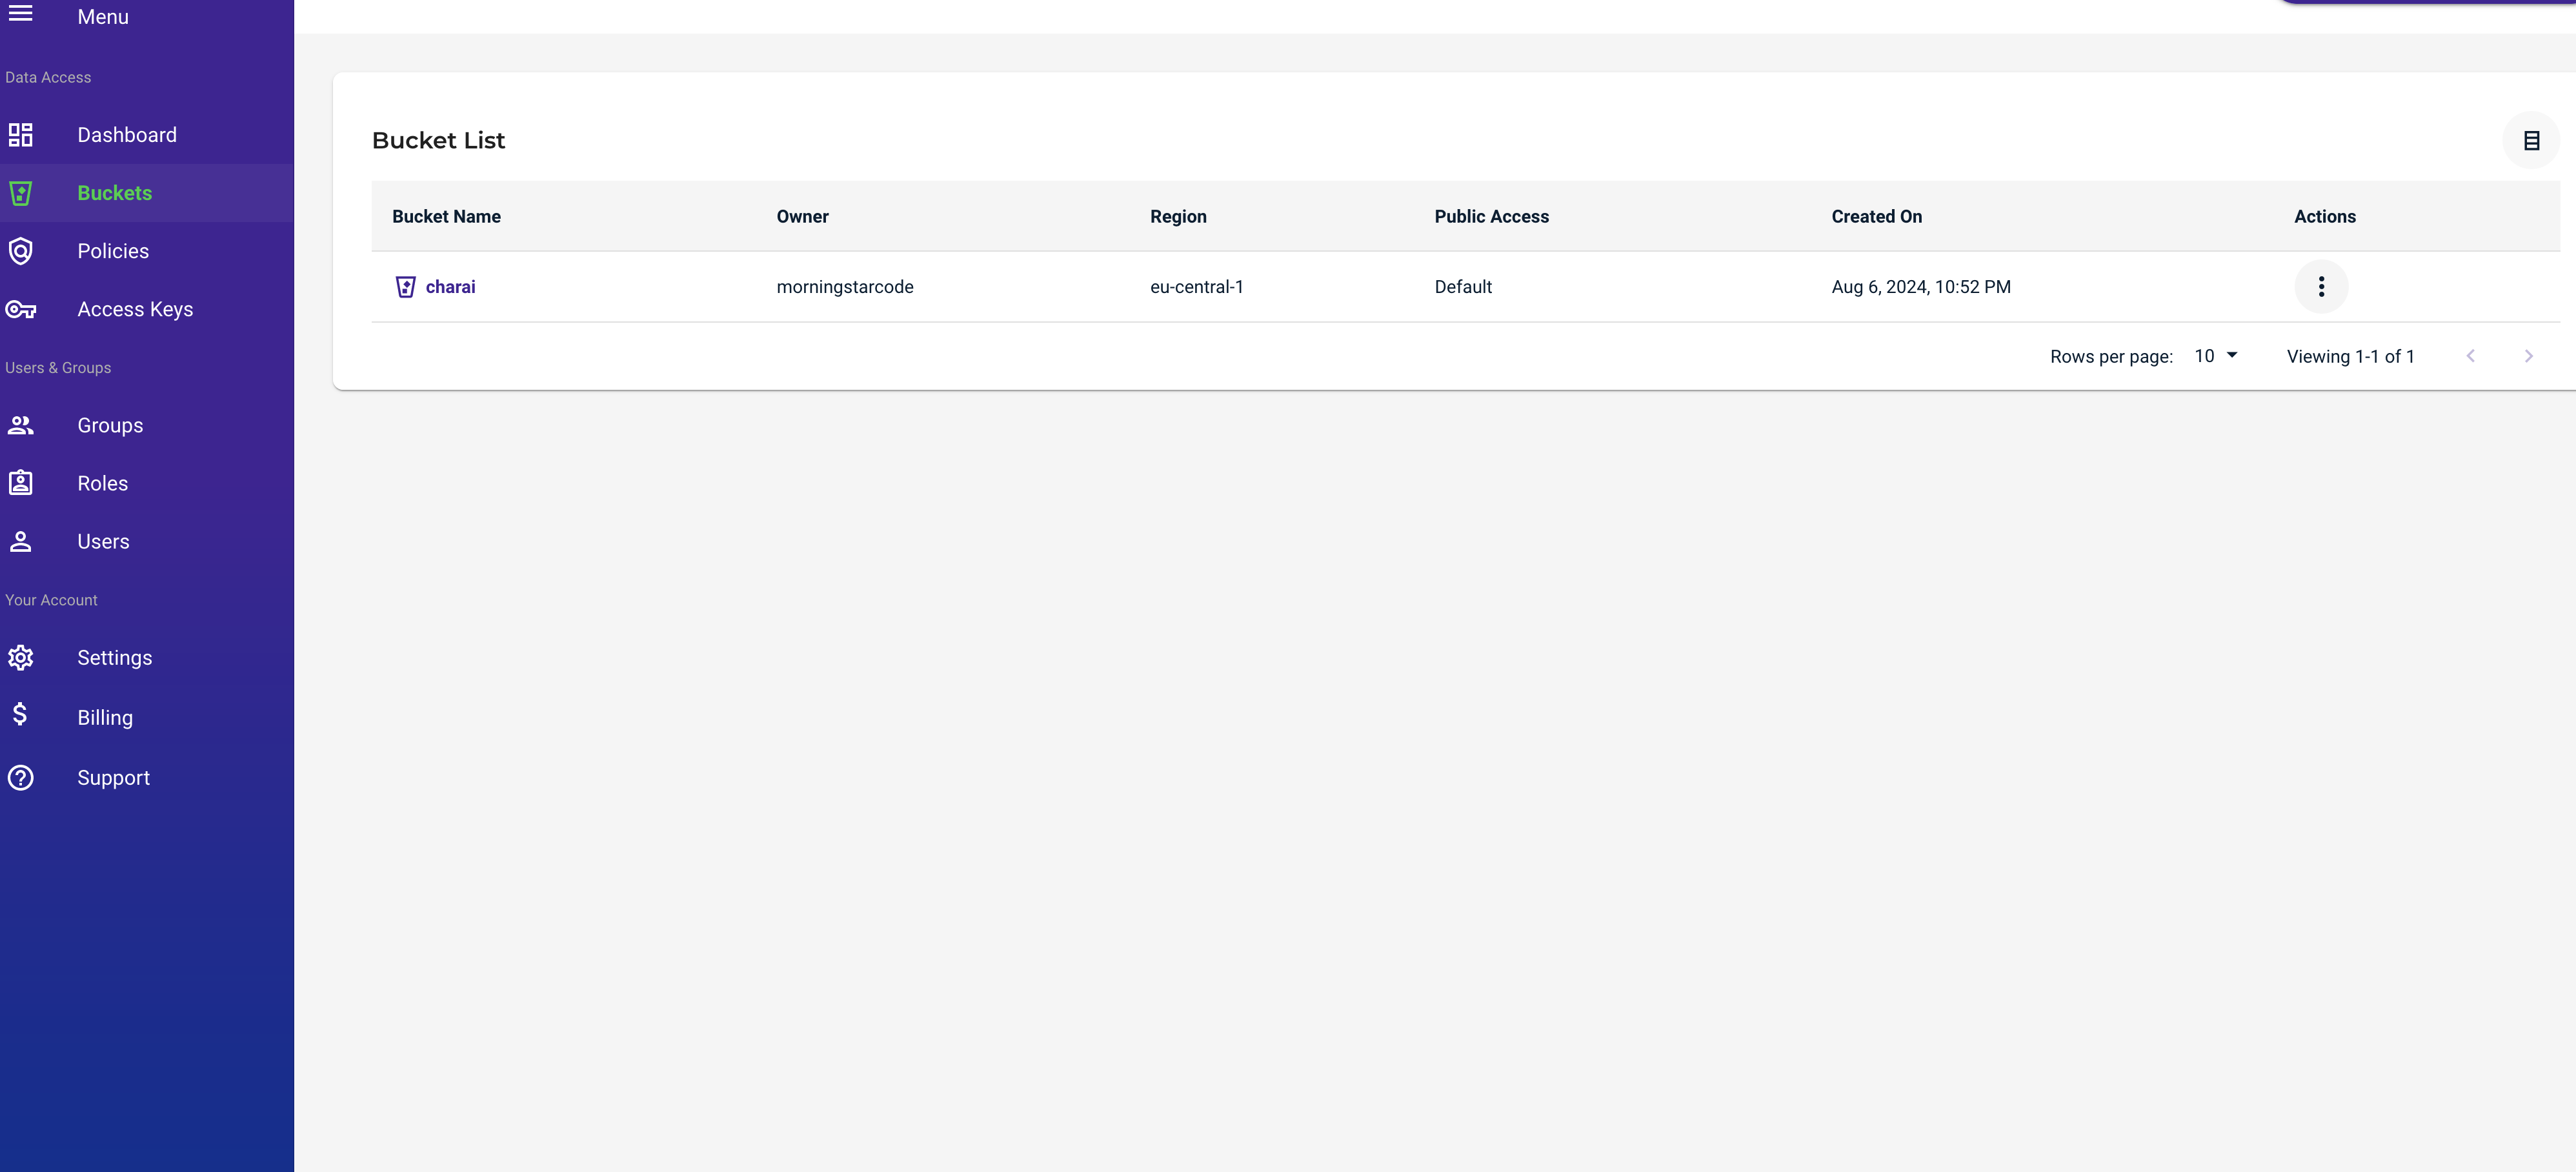
Create an S3 Bucket. Navigate to S3: In the AWS Management Console, search for "S3" and go to the S3 service.
- Click "Create bucket".
- Enter a unique bucket name and select a region.
- Click "Create bucket".
Full detail on how to create an S3 bucket can be found here.

Wasabi
Important
Sign Up for Wasabi: Go to the Wasabi Sign-Up Page and create a new account.https://wasabi.com
Log In: Once your account is created, log in to the Wasabi Management Console.
Create New Access Key:
- Click "Create New Access Key".
- Choose "Root User" or "Sub-user" based on your requirements (Root User is typically for administrative purposes).
- Click "Create".
Download Credentials: After creating the access key, download the CSV file containing your Access Key ID and Secret Access Key, or copy them to a secure place.
Navigate to Buckets: In the Wasabi Management Console, click on "Buckets" in the left sidebar.
- Click "Create Bucket".
- Enter a unique bucket name (e.g., my-laravel-wasabi-bucket).
- Select the region closest to you or where your application is hosted.
- Click "Create Bucket".
Full detail on how to create an Wasabi bucket can be found here.
Google Cloud
Important
Sign Up for Google Cloud: Go to the Google Cloud Platform (GCP) sign-up page and create a new account if you don't already have one. https://cloud.google.com
Login to Google Cloud Console: Once your account is created and verified, log in to the Google Cloud Console.
Create a Project and Enable the Cloud Storage API. Create a New Project:
- In the Google Cloud Console, click on the project dropdown at the top of the page and select "New Project".
- Enter a project name and click "Create".
Enable the Cloud Storage API:
- In the left-hand menu, go to "APIs & Services" > "Library".
- Search for "Cloud Storage" and click on "Google Cloud Storage JSON API".
- Click "Enable" to enable the API for your project.
Create a Service Account:
- In the left-hand menu, go to "IAM & Admin" > "Service Accounts".
- Click "Create Service Account".
- Enter a name and ID for the service account and click "Create".
- Assign the "Storage Admin" role to the service account and click "Continue".
Generate a Key:
- In the "Service Account" list, find the service account you just created.
- Click on the three dots under "Actions" and select "Manage keys".
- Click "Add Key" > "Create new key".
- Select "JSON" as the key type and click "Create". A JSON file containing your key will be downloaded.
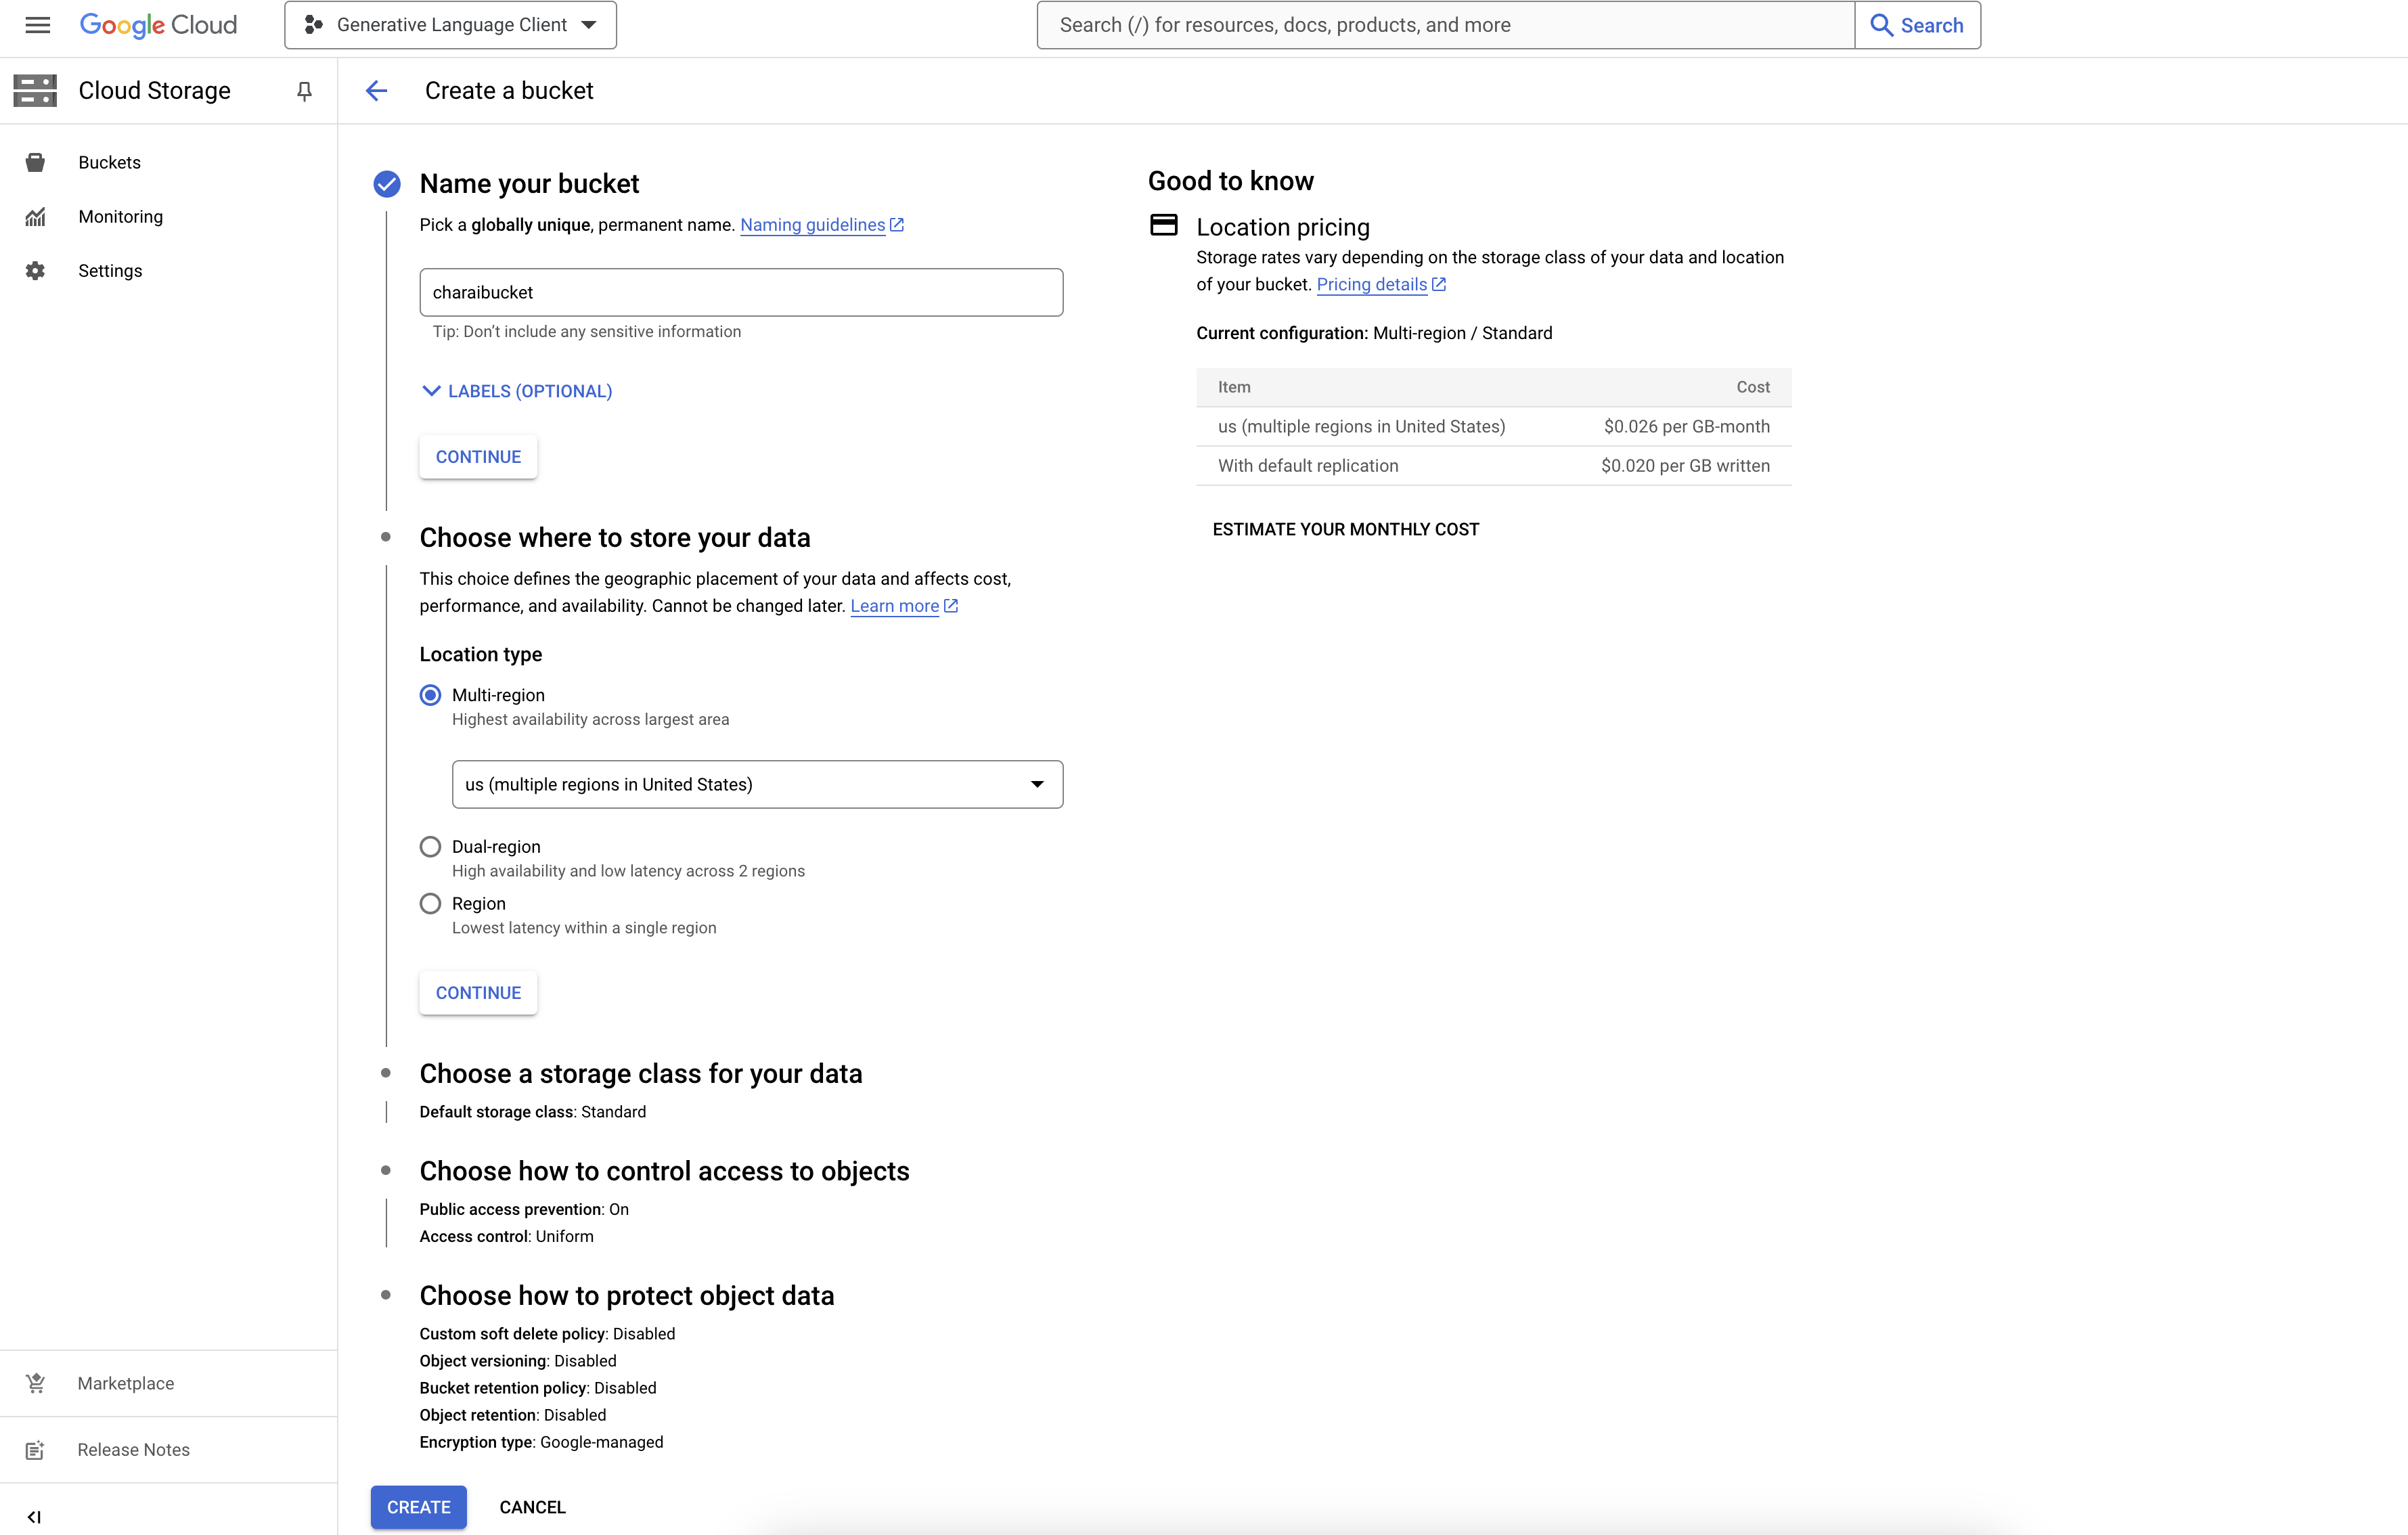
Create a New Bucket:
- In the left-hand menu, go to "Storage" > "Browser".
- Click "Create Bucket".
- Enter a unique name for your bucket and select a location.
- Choose a default storage class and access control settings based on your needs.
- Click "Create".
Full detail on how to create an Google Cloud storage bucket can be found here or here.
Backblaze B2
Important
Sign Up for Backblaze B2: Go to the Backblaze B2 sign-up page and create a new account. https://www.backblaze.com
Log In: Once your account is created, log in to the Backblaze B2 Cloud Storage.
Create a New Bucket:
- In the Backblaze B2 Cloud Storage, click on "Buckets" in the left sidebar.
- Click "Create a Bucket".
- Enter a unique bucket name (e.g., my-laravel-b2-bucket).
- Choose the bucket type (Private or Public).
- Click "Create a Bucket".
Navigate to Application Keys:
- Click on "App Keys" in the left sidebar.
- Click "Add a New Application Key".
Create Application Key:
- Enter a name for the key (e.g., LaravelAppKey).
- EChoose the bucket you created earlier.
- Set the key's permissions according to your needs.
- Click "Create New Key".
Save the Key: After the key is created, save the KeyID and ApplicationKey to a secure location. You will need these keys for your Laravel configuration.
Full detail on how to create an Backblaze B2 storage bucket can be found here.

Storj
Important
Sign Up for Storj: Go to the Storj sign-up page and create a new account. https://www.storj.io
Log In: Once your account is created, log in to the Storj Console.
Navigate to Access Grants: In the Storj Satellite Console, go to the "Access Grants" section.
- Click on "Create Access Grant".
- Follow the steps to generate an Access Grant, including creating an encryption passphrase.
- Download the Access Grant when prompted. This grant will be used as your credentials.
Set Up an S3-Compatible Gateway
- Navigate to Gateways: In the Storj Satellite Console, go to the "Gateways" section.
-
Create a New Gateway:
- Click on "Create Gateway".
- Select the "S3 Compatible" option and follow the instructions to create it.
- SNote the Gateway URL, Access Key ID, and Secret Access Key provided by Storj.

DigitalOcean Spaces
Important
Sign Up for DigitalOcean: Go to the DigitalOcean sign-up page and create a new account. https://www.digitalocean.com/products/spaces
Log In: Once your account is created, log in to the DigitalOcean Control Panel.
Create a Space. Navigate to Spaces:
- In the DigitalOcean Control Panel, click on "Spaces" in the left sidebar.
Create a New Space:
- Click "Create a Space".
- Enter a name for your space.
- Select a region where your space will be located.
- Choose access settings (Public or Private).
- Click "Create a Space".
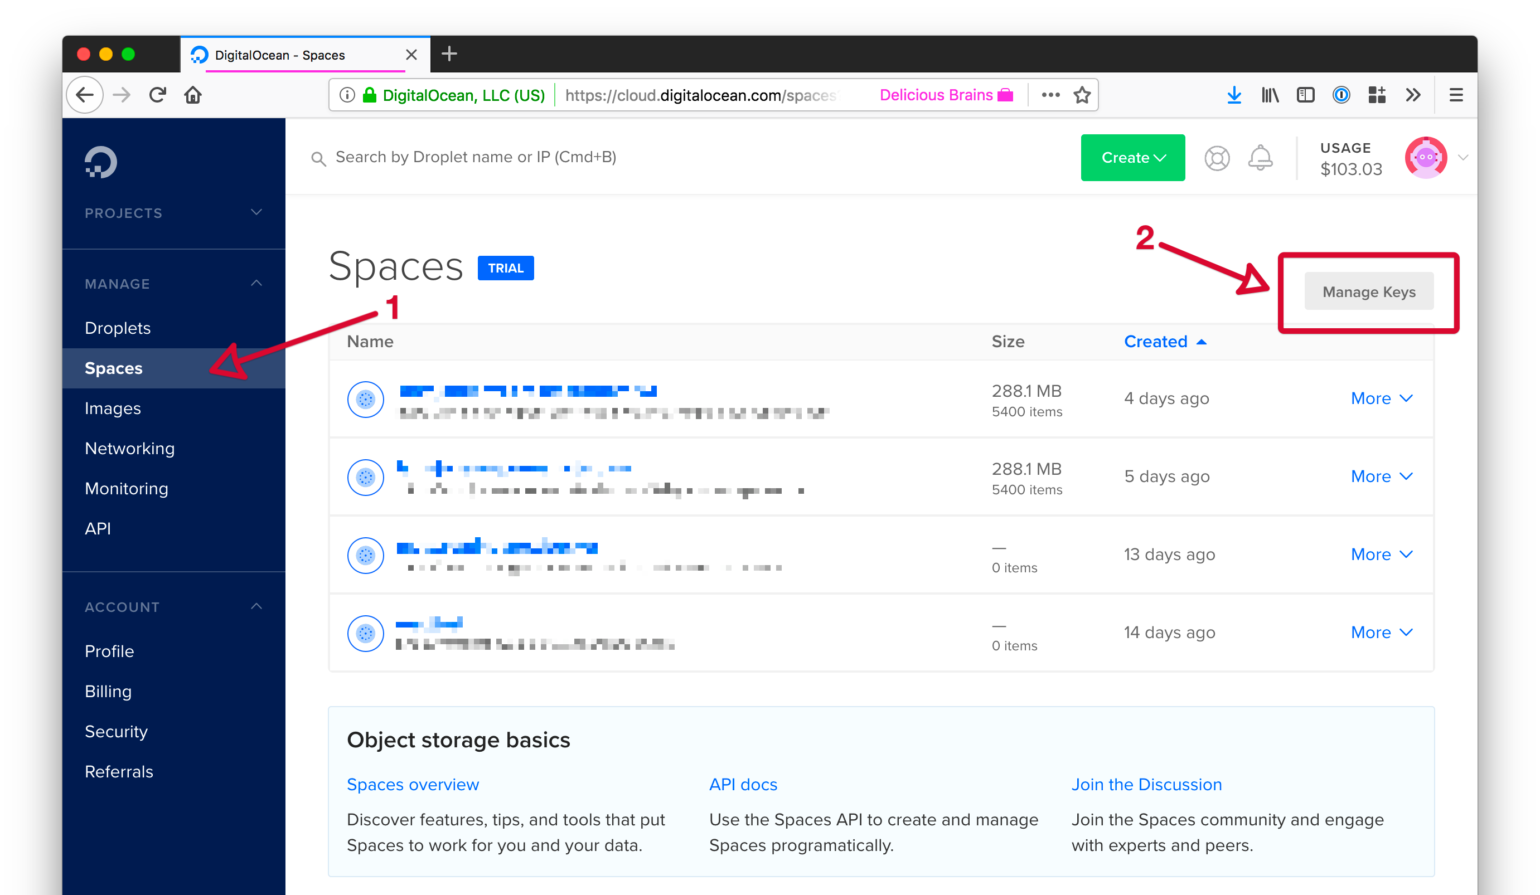
Generate API Keys:
- In the DigitalOcean Control Panel, click on "API" in the left sidebar.
Create a New Key:
- Under "Spaces access keys", click "Generate New Key".
- Enter a name for your key (e.g., LaravelSpacesKey).
- Click "Generate Key".
- Save the generated Access Key and Secret Key to a secure location.
Full detail on how to create an DigitalOcean Space storage bucket can be found here.
Prepare your Payment Provider Keys
Our platform allows you to seamlessly integrate and manage multiple payment services by setting API keys and enabling your preferred services directly from an intuitive admin panel. Experience the flexibility and innovation of modern payment, tailored to your specific needs.

PayPal
Important
Sign Up for PayPal Developer: Go to the PayPal Developer website and sign up for an account if you don't already have one. https://www.paypal.com/signin
Log In: Once your account is created, log in to the PayPal Developer Dashboard. https://developer.paypal.com/dashboard
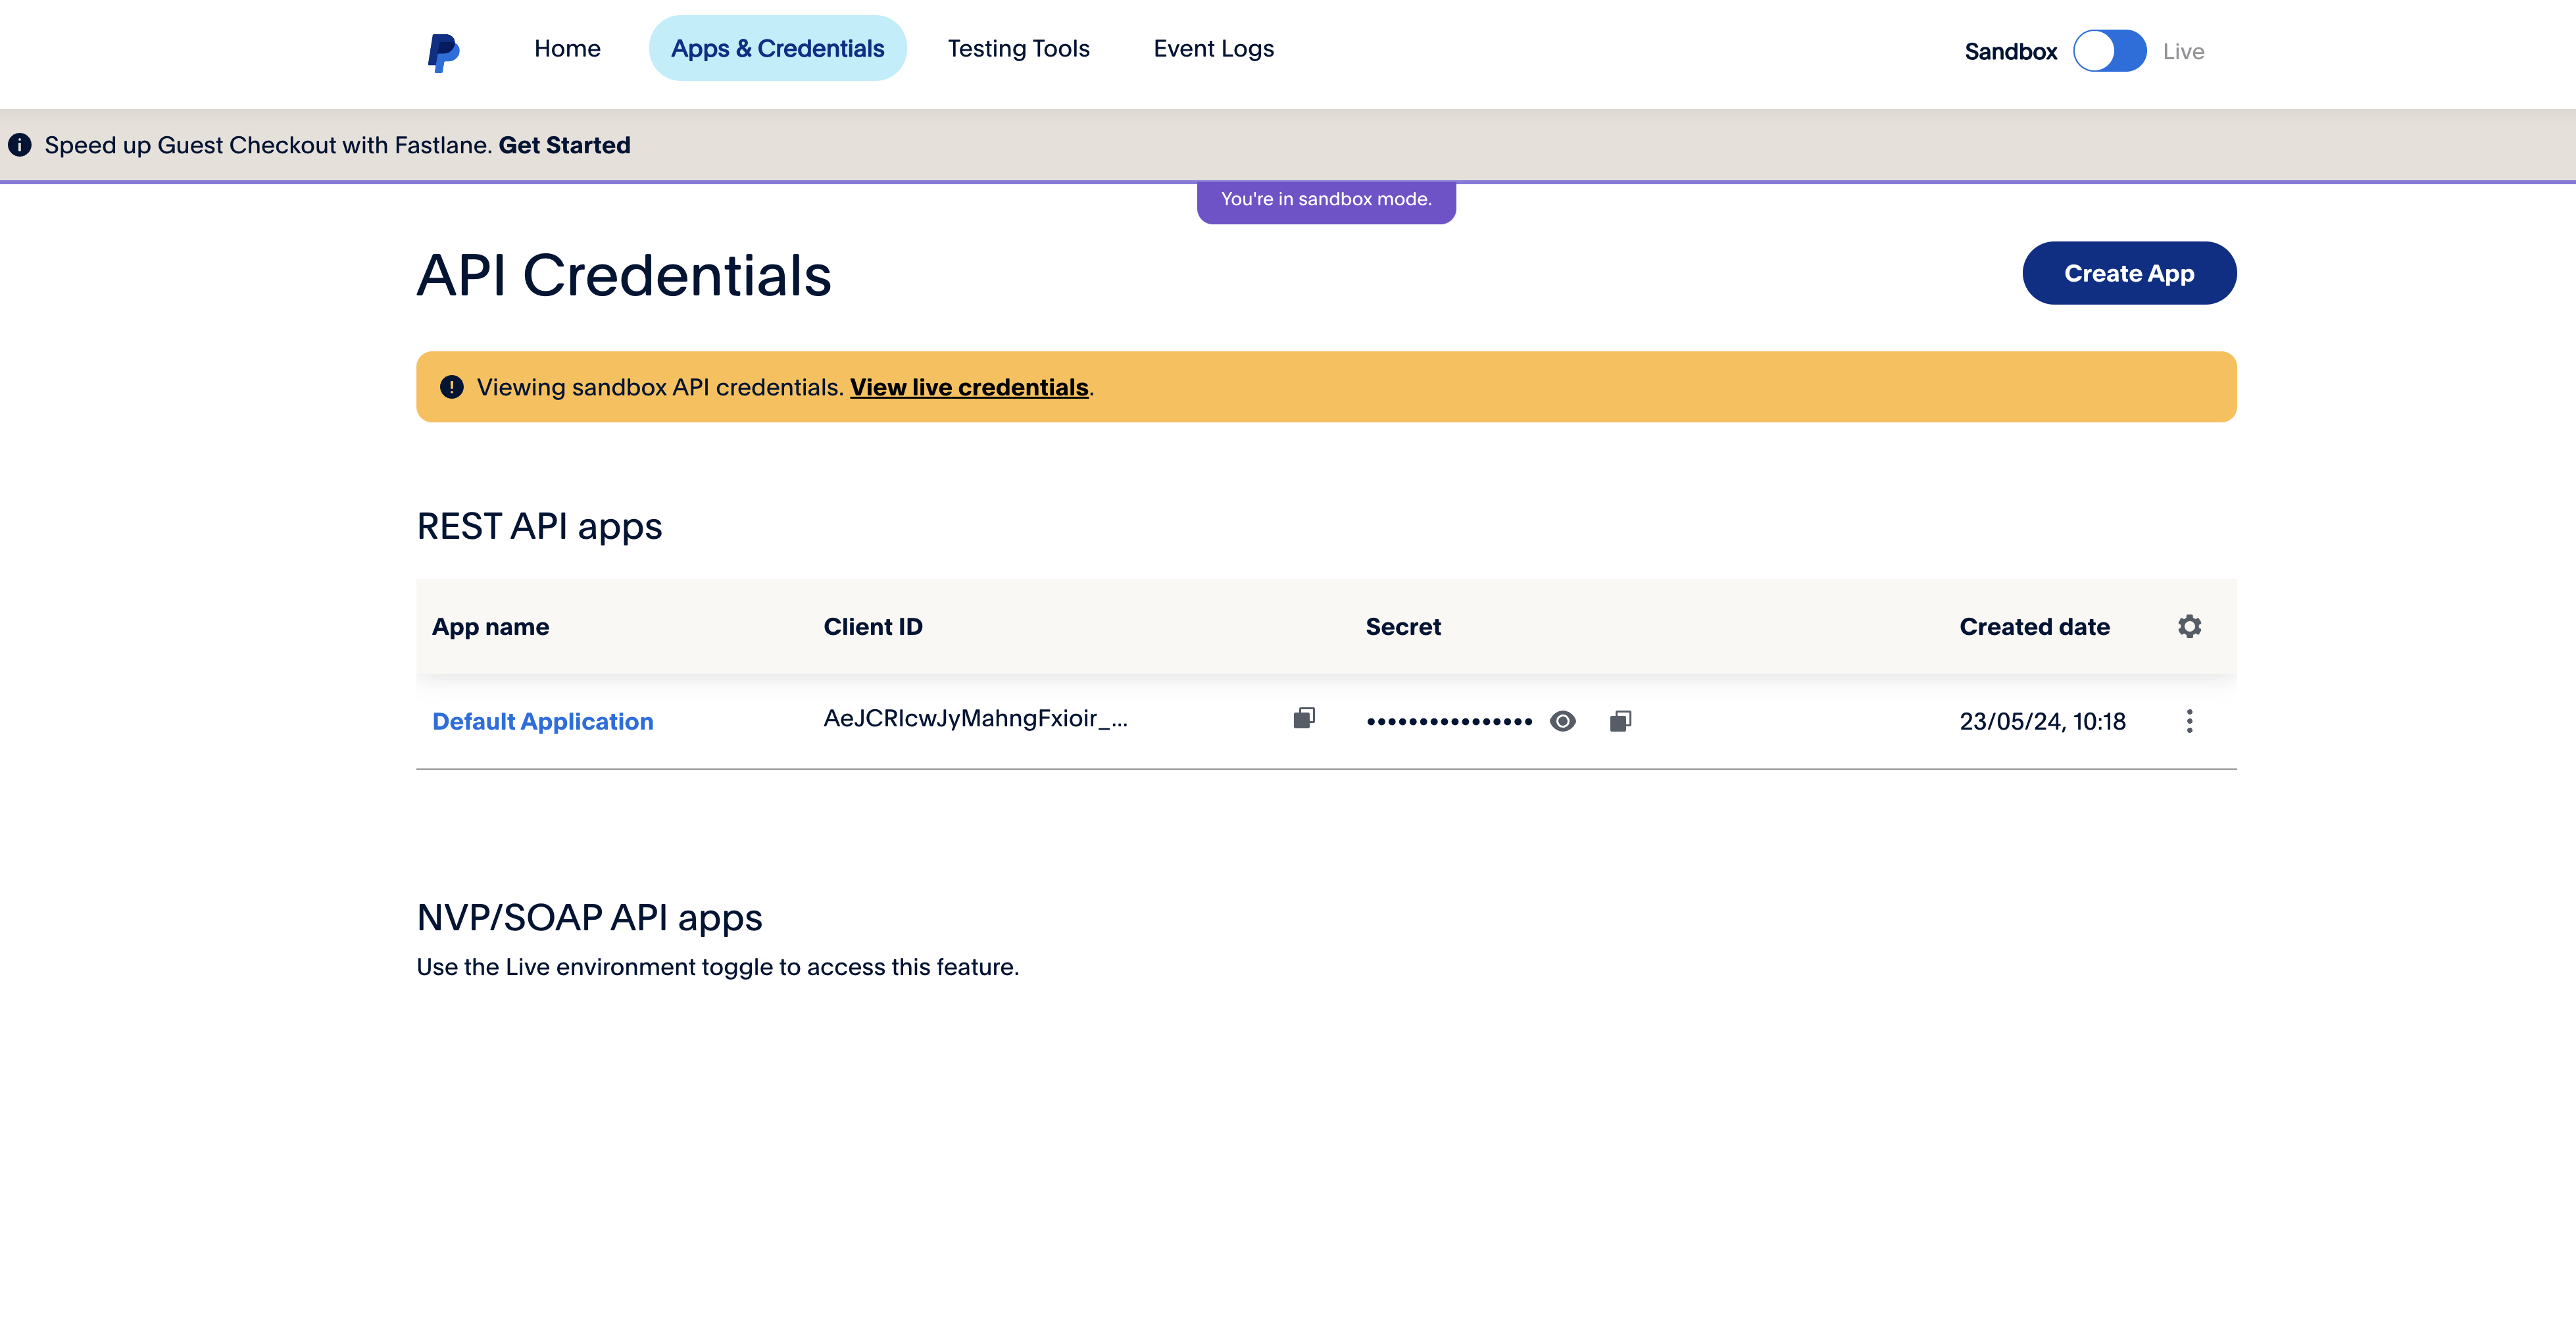
Create a PayPal App
- In the PayPal Developer Dashboard, click on "Dashboard" in the top menu.
- Click on "My Apps & Credentials" in the left sidebar.
- Under the "REST API apps" section, click "Create App".
- Enter an app name (e.g., LaravelApp) and select the sandbox or live account.
- Click "Create App".
Get API Credentials:
- After the app is created, you will see the "Client ID" and "Secret". These credentials will be used to integrate PayPal with your Laravel application.
- Make sure to switch between "Sandbox" and "Live" mode as per your environment.
Navigate to Webhook Settings:
- In the PayPal Developer Dashboard, go to "My Apps & Credentials".
- Select the app you created earlier (e.g., LaravelApp).
Create a Webhook:
- Scroll down to the "Sandbox Webhooks" or "Live Webhooks" section (depending on your environment).
- Click "Add Webhook".
- Enter your webhook URL (https://yourdomain.com/api/webhook/paypal).
- Select the events to receive:
PAYMENT.SALE.COMPLETED
CHECKOUT.ORDER.APPROVED
PAYMENT.CAPTURE.COMPLETED
BILLING.SUBSCRIPTION.ACTIVATED
BILLING.SUBSCRIPTION.CANCELLED
BILLING.SUBSCRIPTION.RE-ACTIVATED
- Click "Save".
Save the Webhook ID:
- After the webhook is created, save the Webhook ID. This ID is needed for verifying webhook signatures.
- Update this webhook id in admin panel.

Full detail on how to create an PayPal developer account can be found here.
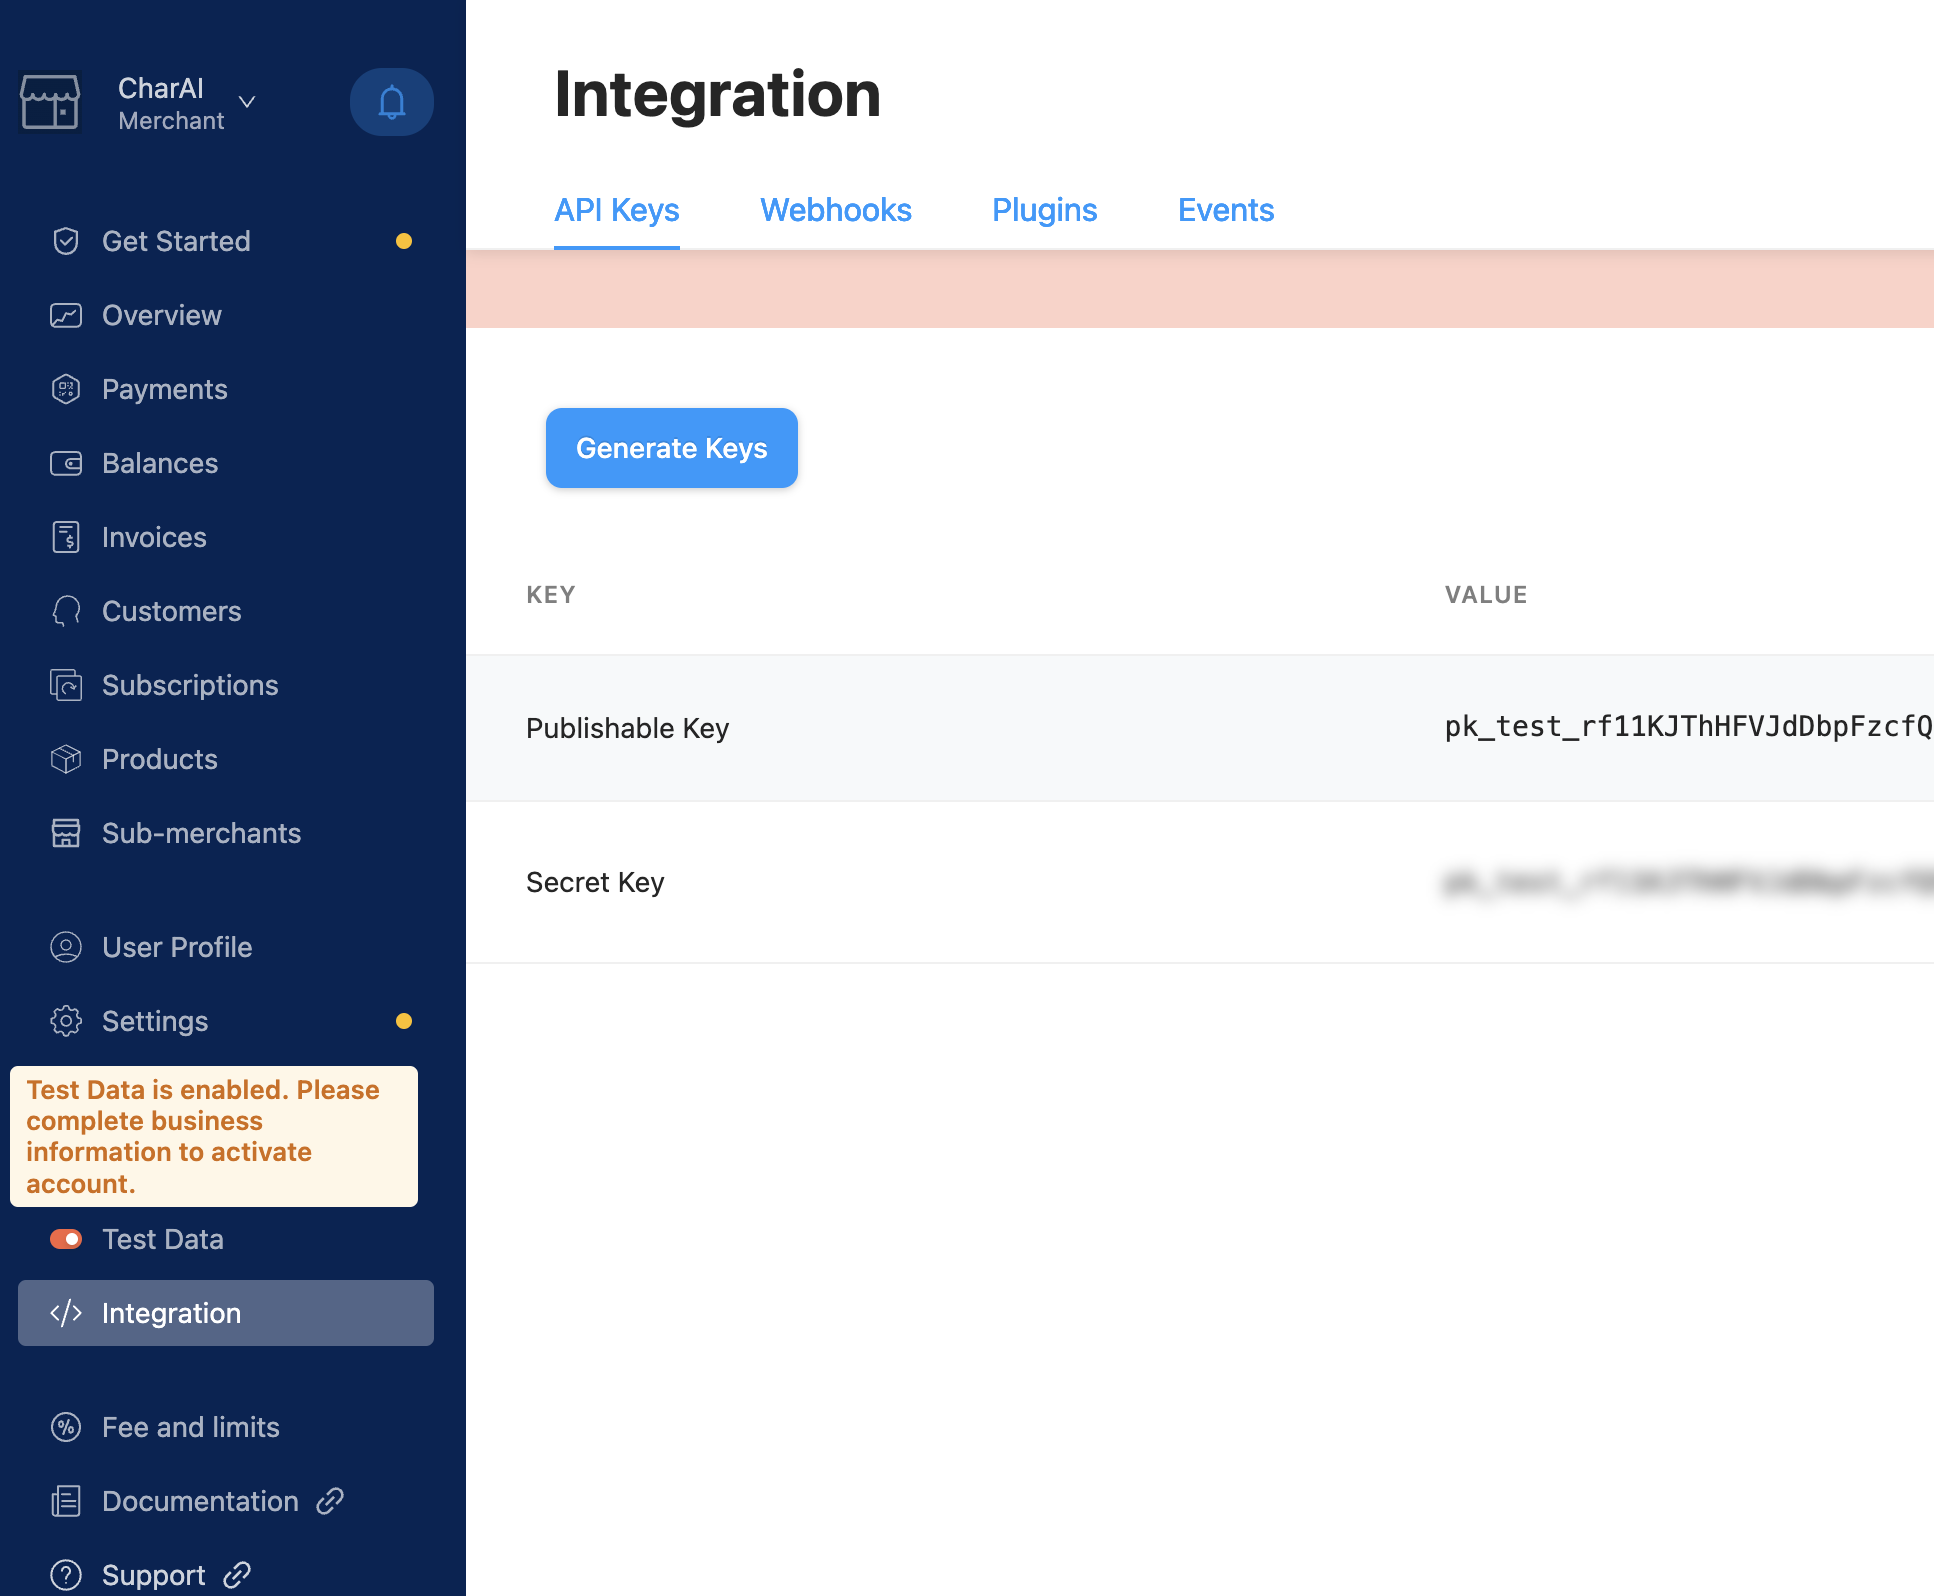
Stripe
Important
Sign Up for Stripe: Go to the Stripe sign-up page and create a new account. https://dashboard.stripe.com/register
Log In: Once your account is created, log in to the Stripe Dashboard. https://dashboard.stripe.com/login
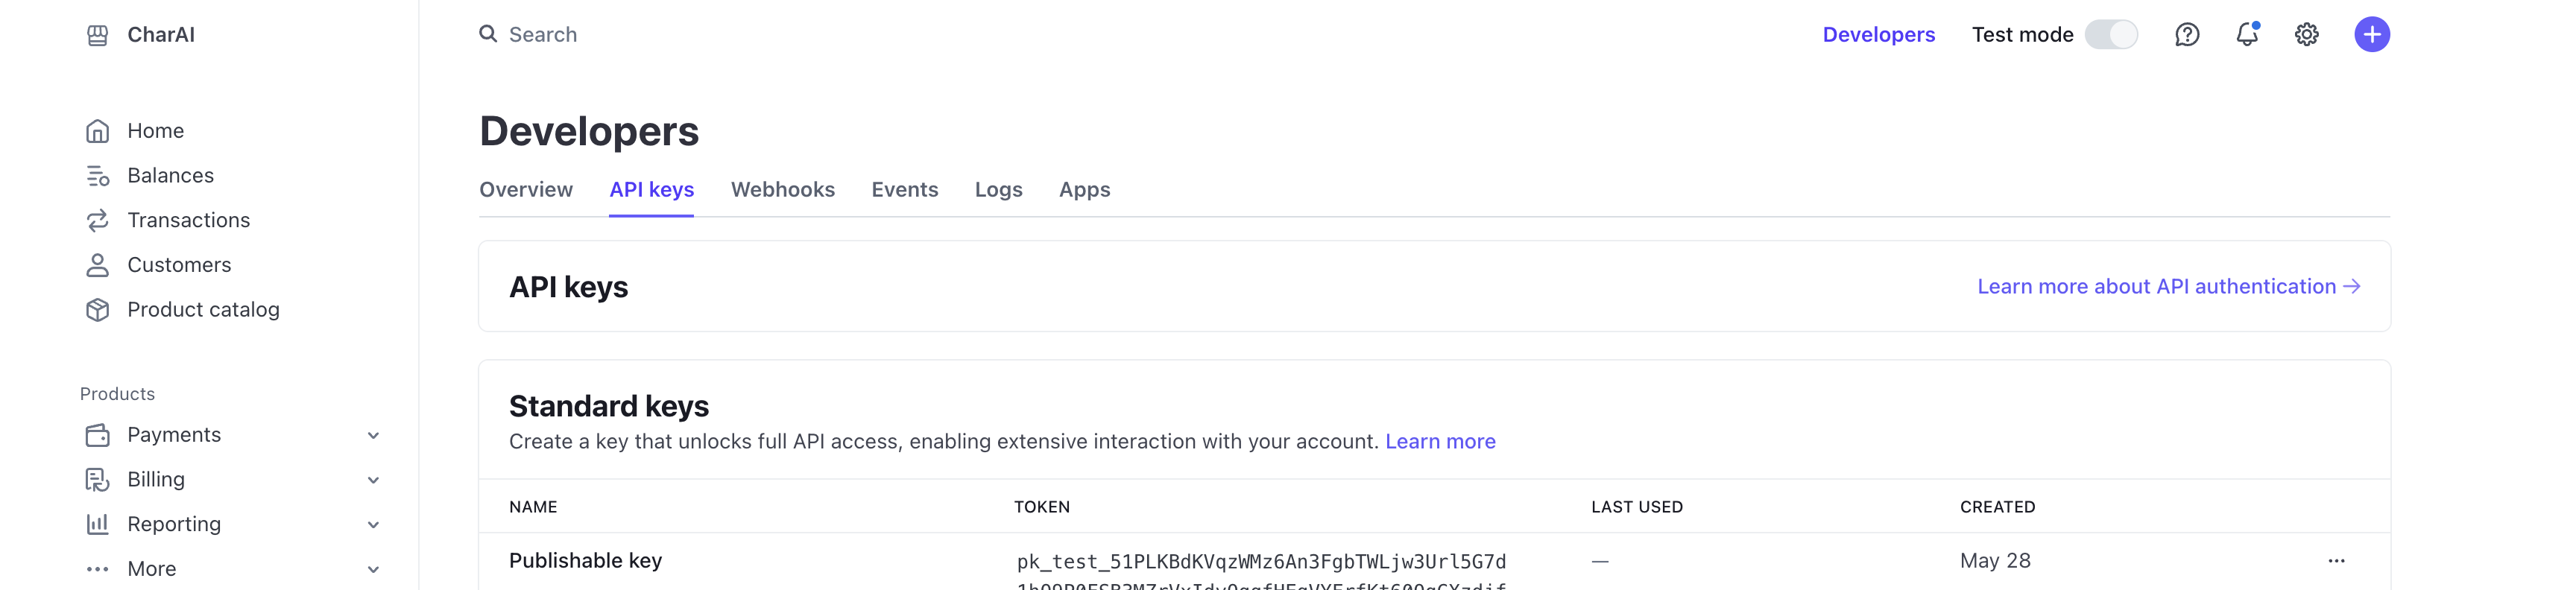
Get Stripe API Keys
- In the Stripe Dashboard, click on "Developers" in the left sidebar.
- Click on "API keys".
- You will see your "Publishable key" and "Secret key". Use the "Secret key" for your server-side operations.
Save API Keys:
- Save these keys in a secure location. You will use them to configure Stripe in admin panel.
Navigate to Webhook Settings:
- In the Stripe Dashboard, go to "Developers" -> "Webhooks".
- Click "Add endpoint".
Create a Webhook:
- Enter your webhook URL (https://yourdomain.com/api/webhook/stripe).
- Select the events to receive:
checkout.session.completed
payment_intent.succeeded
payment_intent.payment_failed
invoice.paid
invoice.payment_failed
customer.subscription.created
customer.subscription.deleted
customer.subscription.updated
Save the Webhook Secret:
- After the webhook is created, save the Webhook Secret. This secret is needed for verifying webhook signatures.

Full detail on how to create an Stripe integration can be found here.
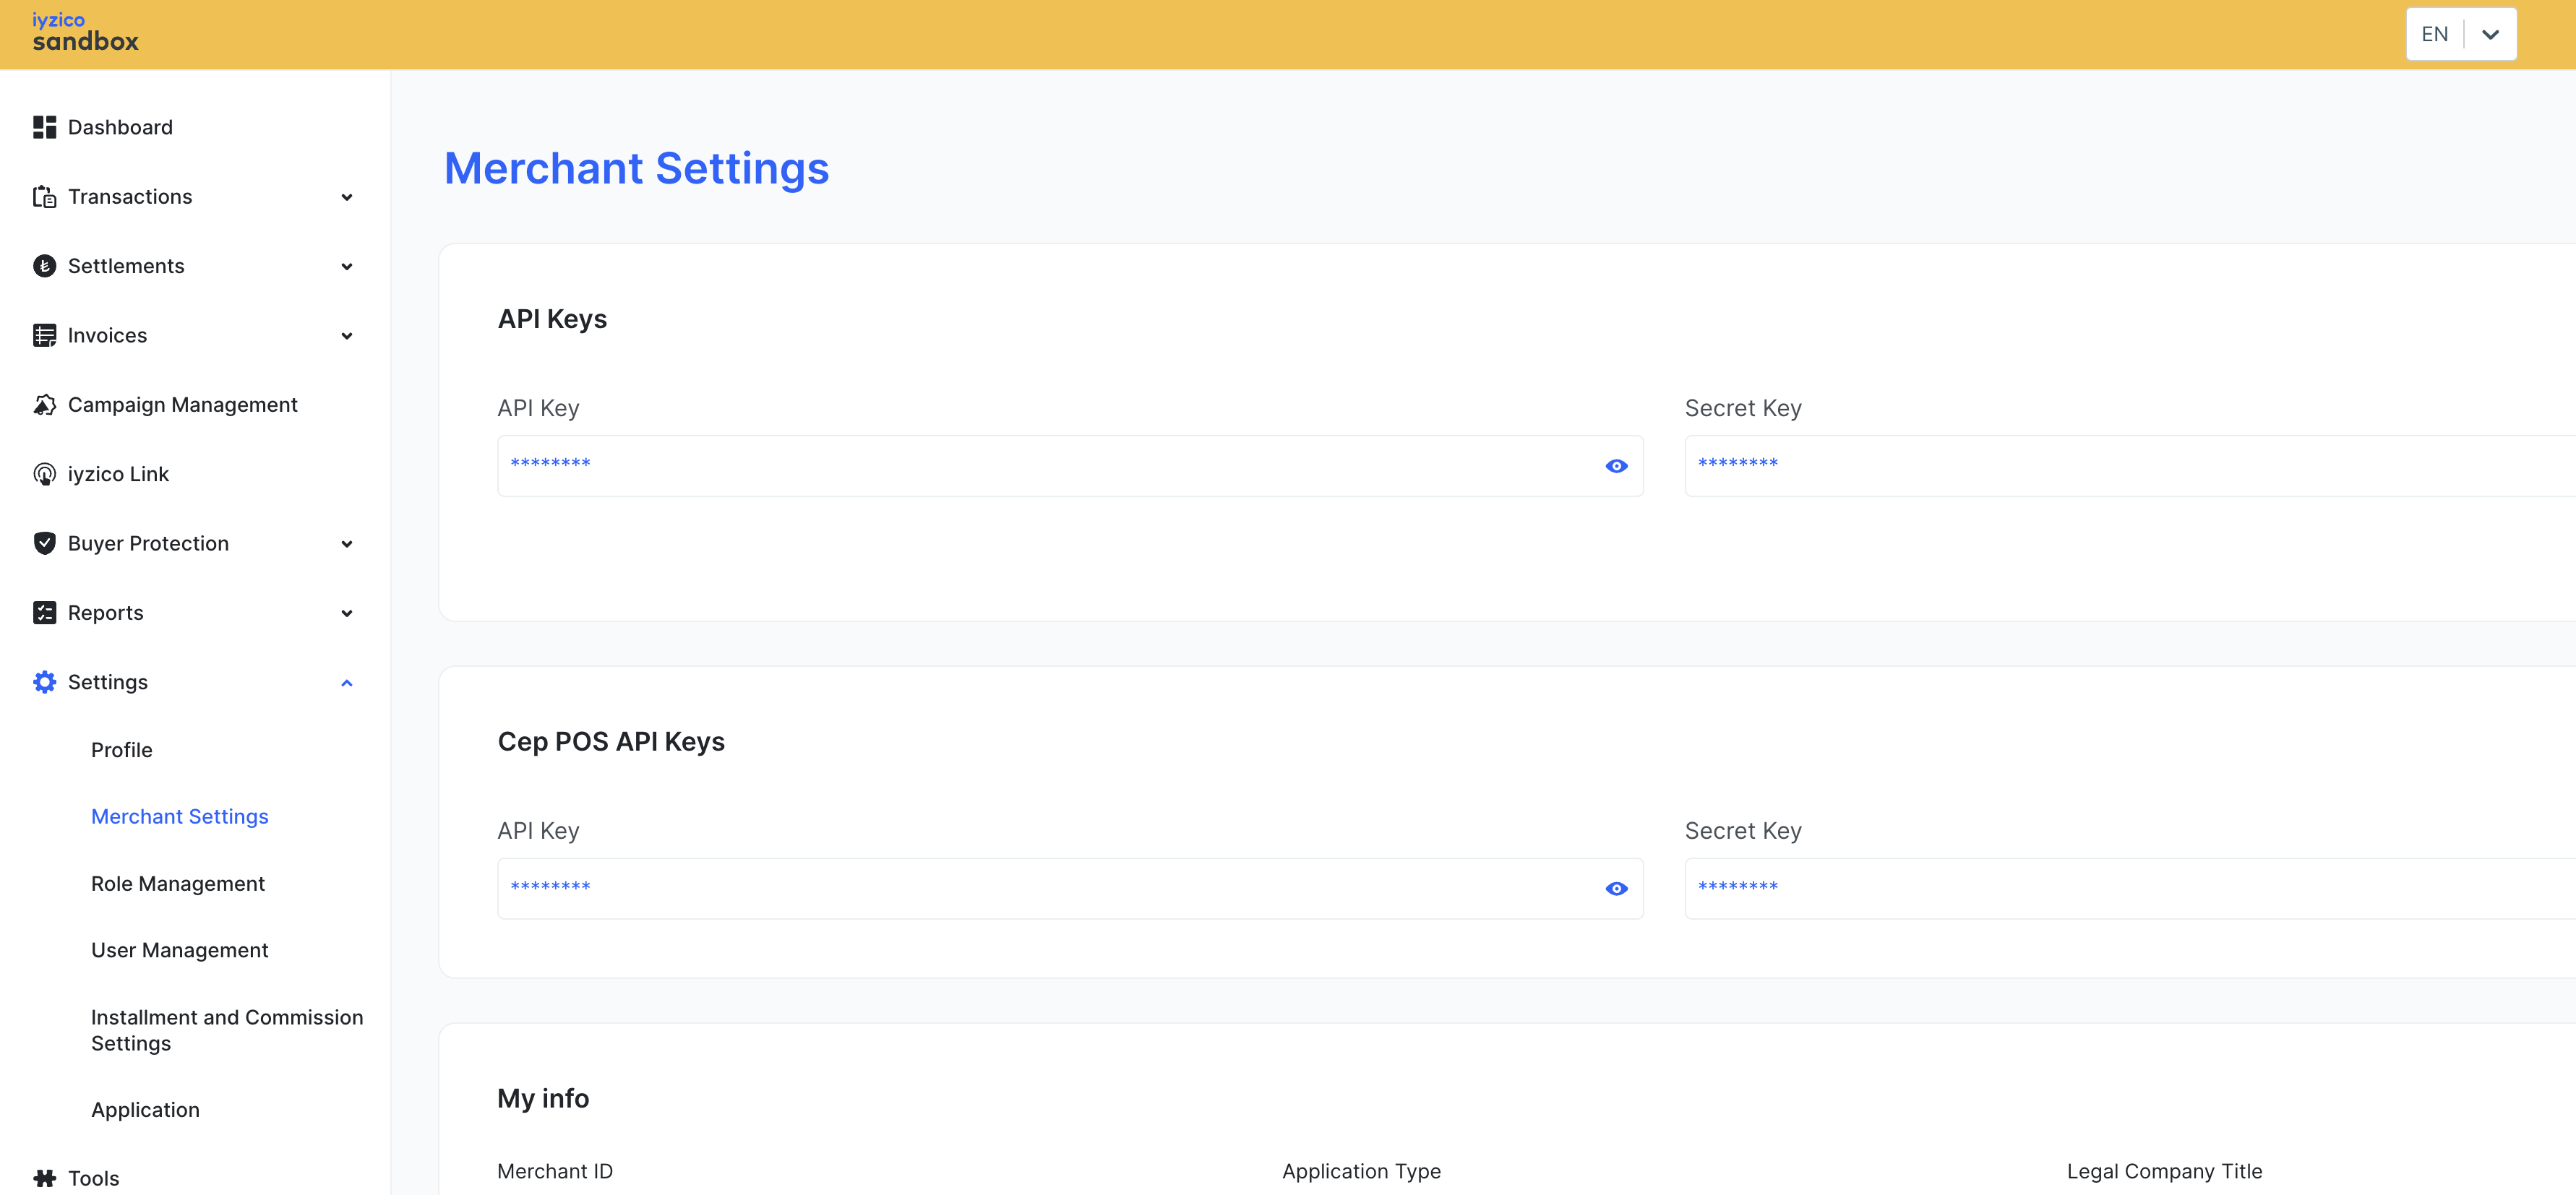
Iyzico
Important
Sign Up for Iyzico: Go to the Iyzico sign-up page and create a new account. https://www.iyzico.com/en/business/signup
Log In: Once your account is created, log in to the Iyzico Merchant Dashboard. https://merchant.iyzipay.com/auth/login
Navigate to API Keys:
- In the Iyzico Merchant Dashboard, click on "Settings" in the left sidebar.
- Click on "API Keys".
Get API Credentials:
- You will see your "API Key" and "Secret Key". Use these credentials to integrate Iyzico with your admin panel.
- Save these keys in a secure location.
Navigate to Webhook Settings:
- In the Iyzico Merchant Dashboard, go to "Settings" -> "Webhooks".
- Click "Add Webhook".
Create a Webhook:
- Enter your webhook URL (https://yourdomain.com/api/webhook/iyzico).
Save the Webhook Secret:
- After the webhook is created, save the Webhook Secret. This secret is needed for verifying webhook signatures.

Full detail on how to create an Iyzico integration can be found here.
Razorpay
Important
Sign Up for Razorpay: Go to the Razorpay sign-up page and create a new account. https://razorpay.com
Log In: Once your account is created, log in to the Razorpay Dashboard. https://dashboard.razorpay.com/app/dashboard
Navigate to API Keys:
- In the Razorpay Dashboard, click on "Settings" in the left sidebar.
- Click on "API Keys".
Get API Credentials:
- Click "Generate Key" to create a new key pair. You will get a "Key ID" and a "Key Secret".
- Save these keys securely. You will use them to configure Razorpay in your Laravel project.
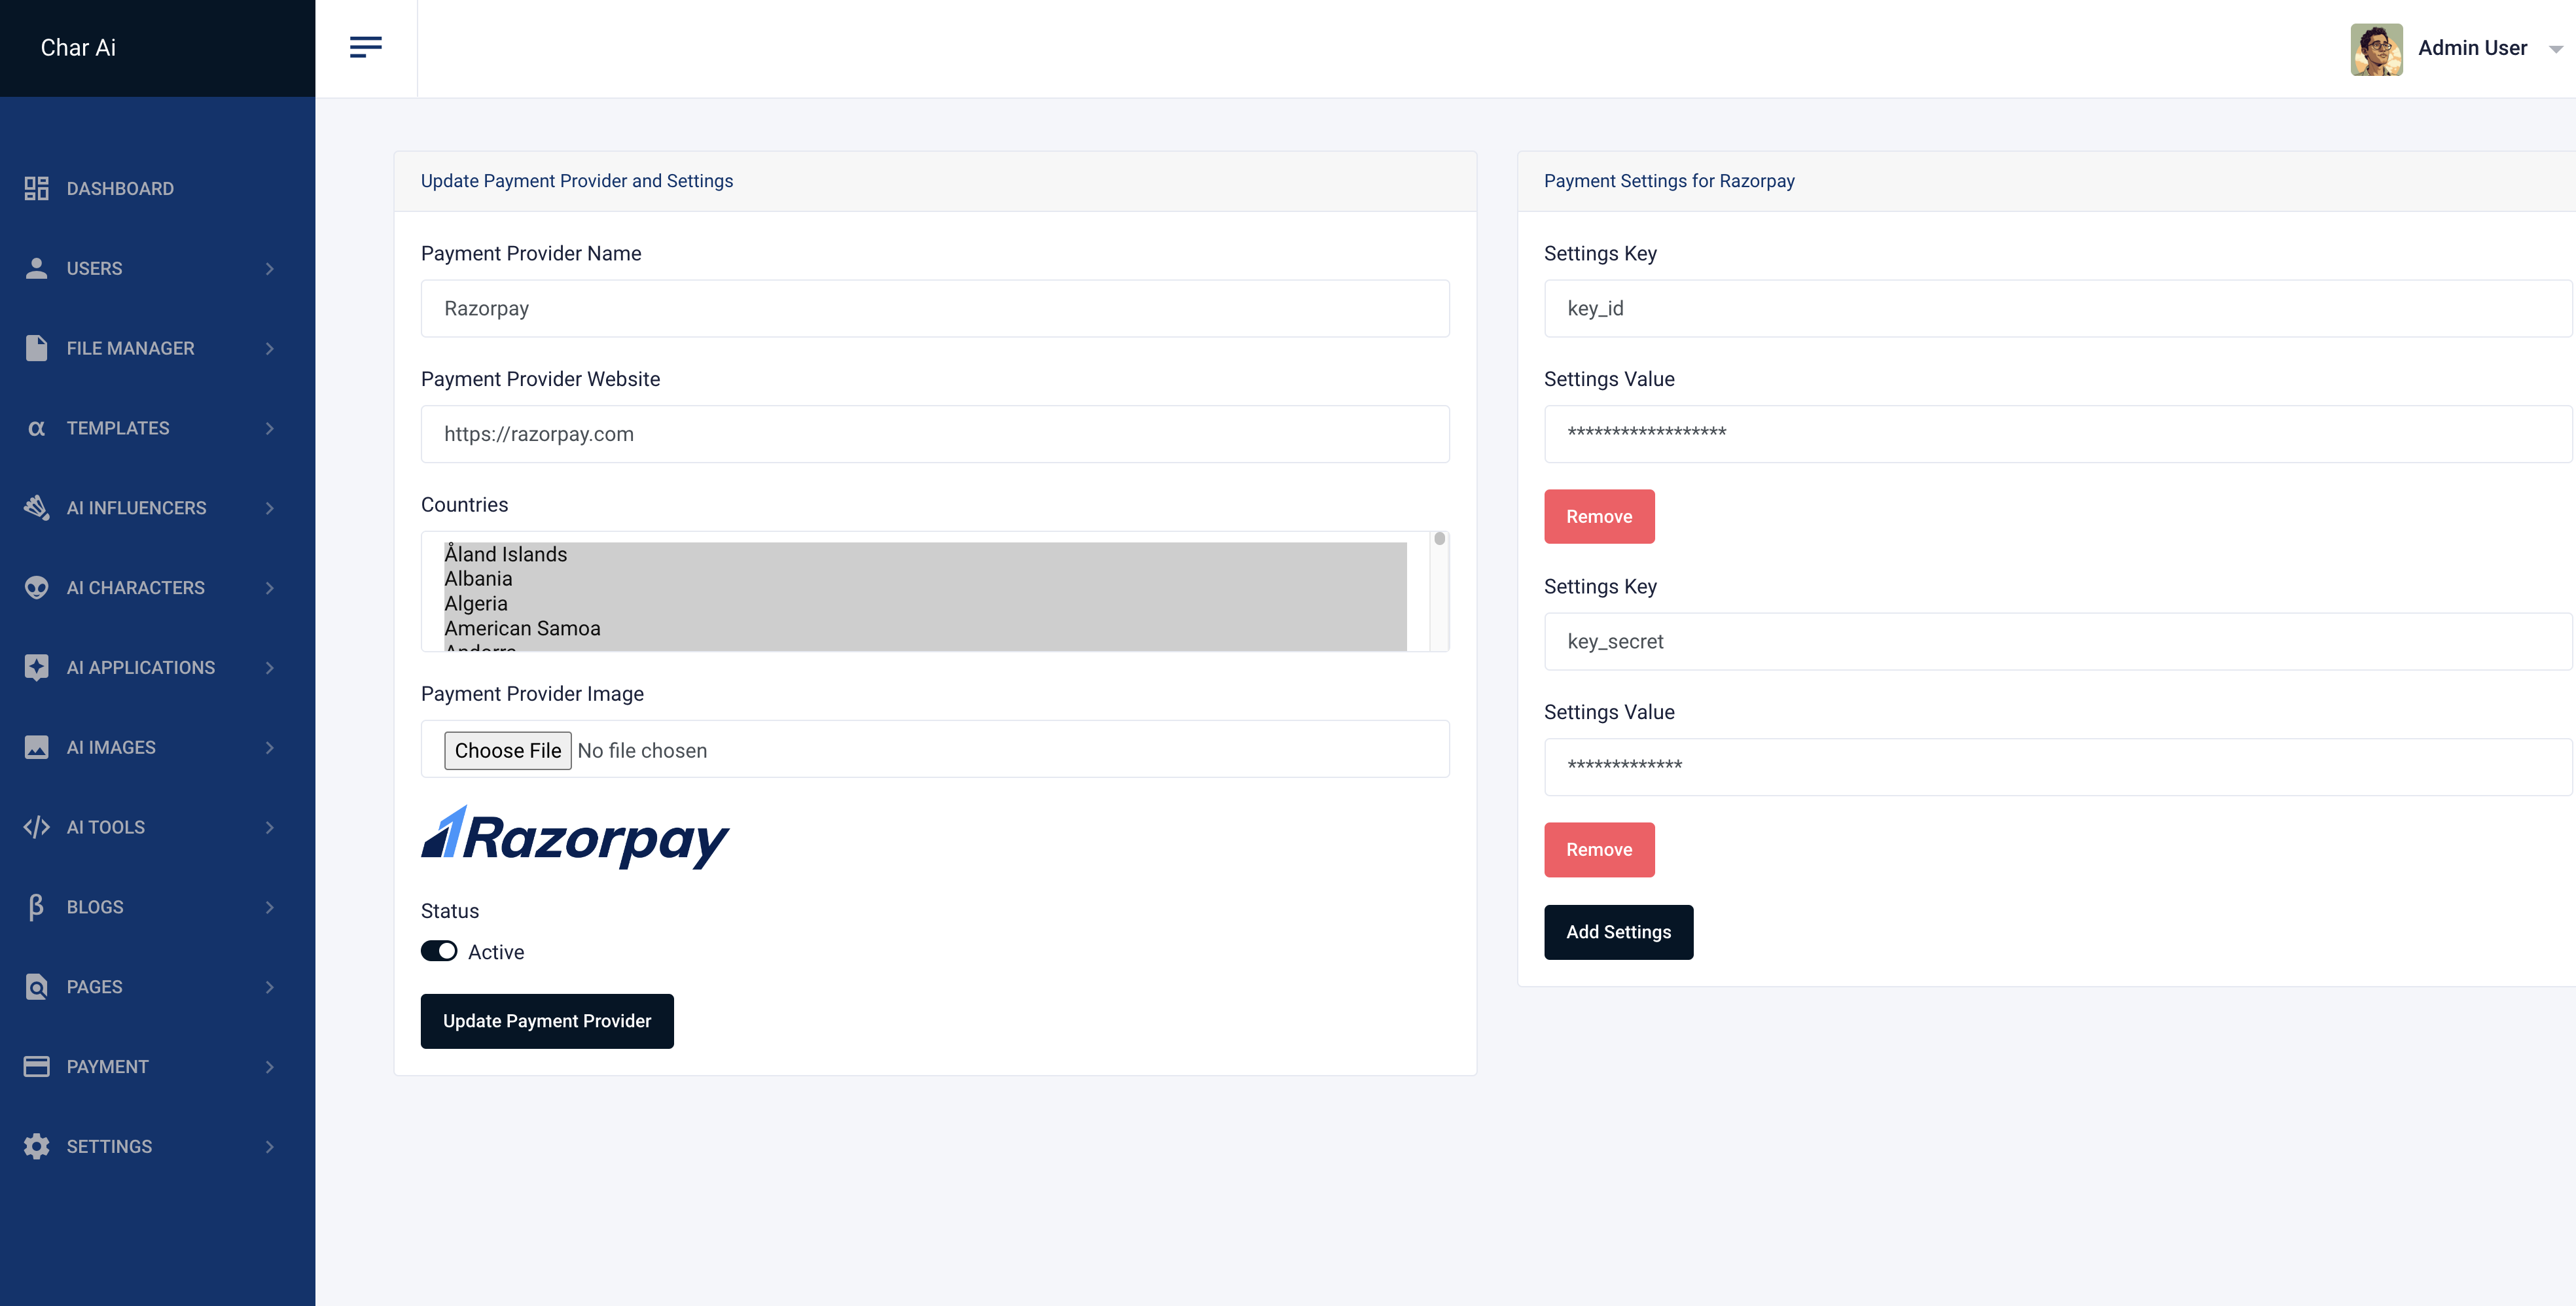
Full detail on how to create an Razorpay integration can be found here or here.

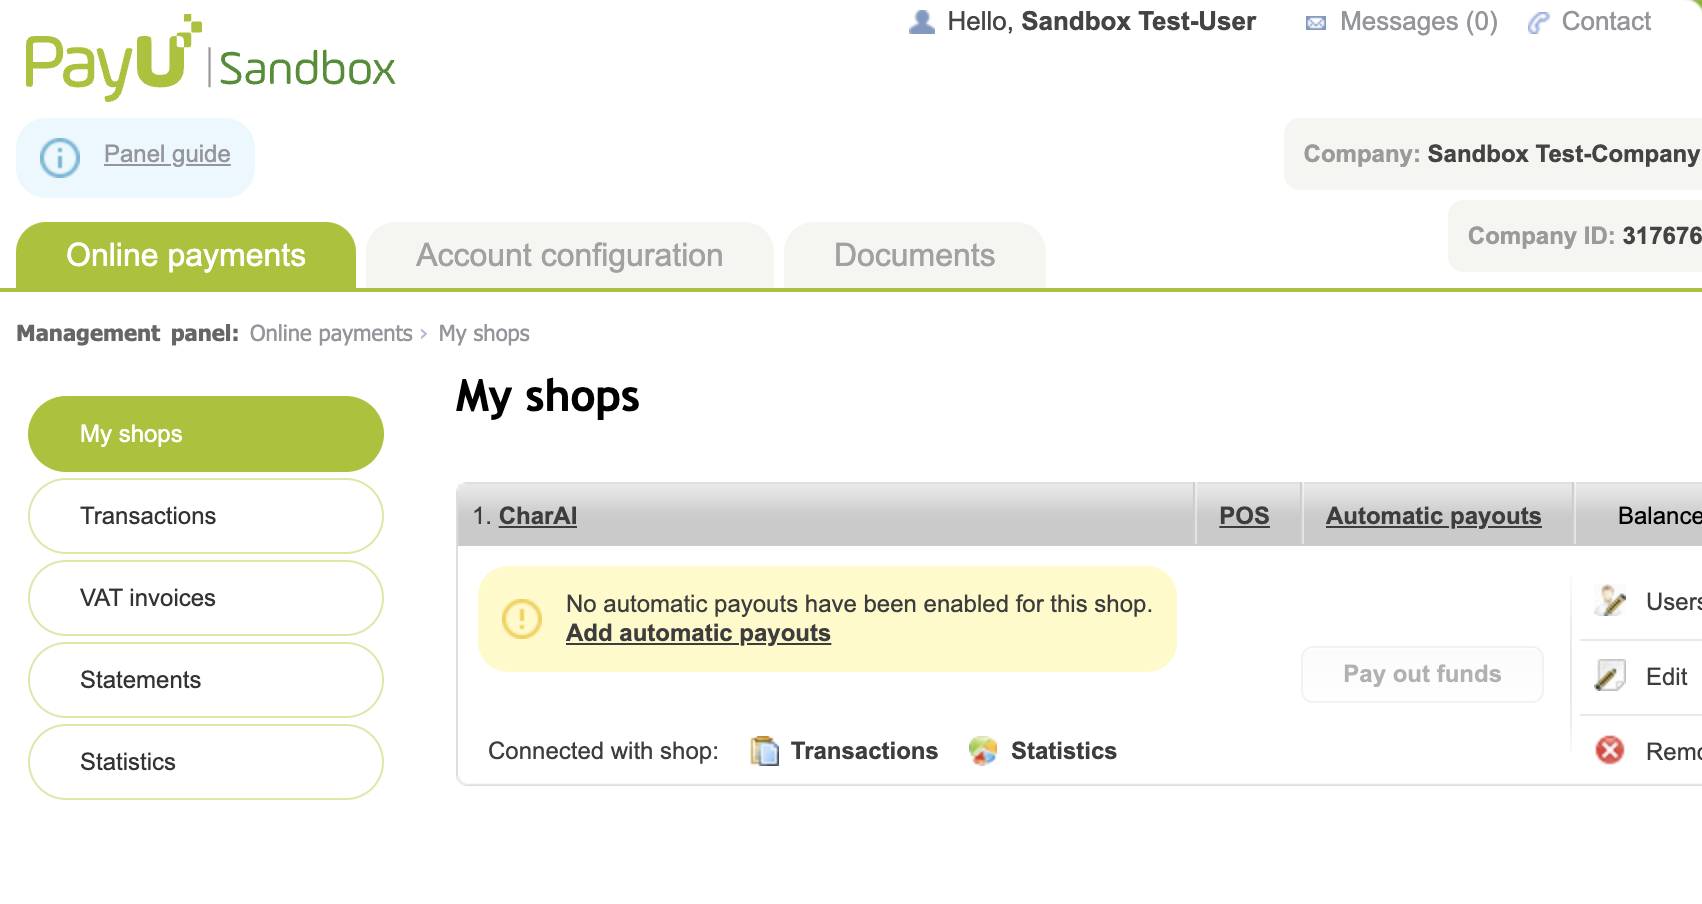
PayU
Important
Sign Up for PayU: Go to the PayU sign-up page and create a new account. https://registration.payu.com
Log In: Once your account is created, log in to the PayU Dashboard. https://merchants.payulatam.com/login/auth
Get PayU API Keys:
- In the PayU Dashboard, go to "Settings".
- Click on "API Keys".
Get API Credentials:
- You will see your "Merchant Key" and "Merchant Salt". Use these credentials to integrate PayU with your Laravel application.
- Save these keys in a secure location.

Full detail on how to create an PayU integration can be found here.
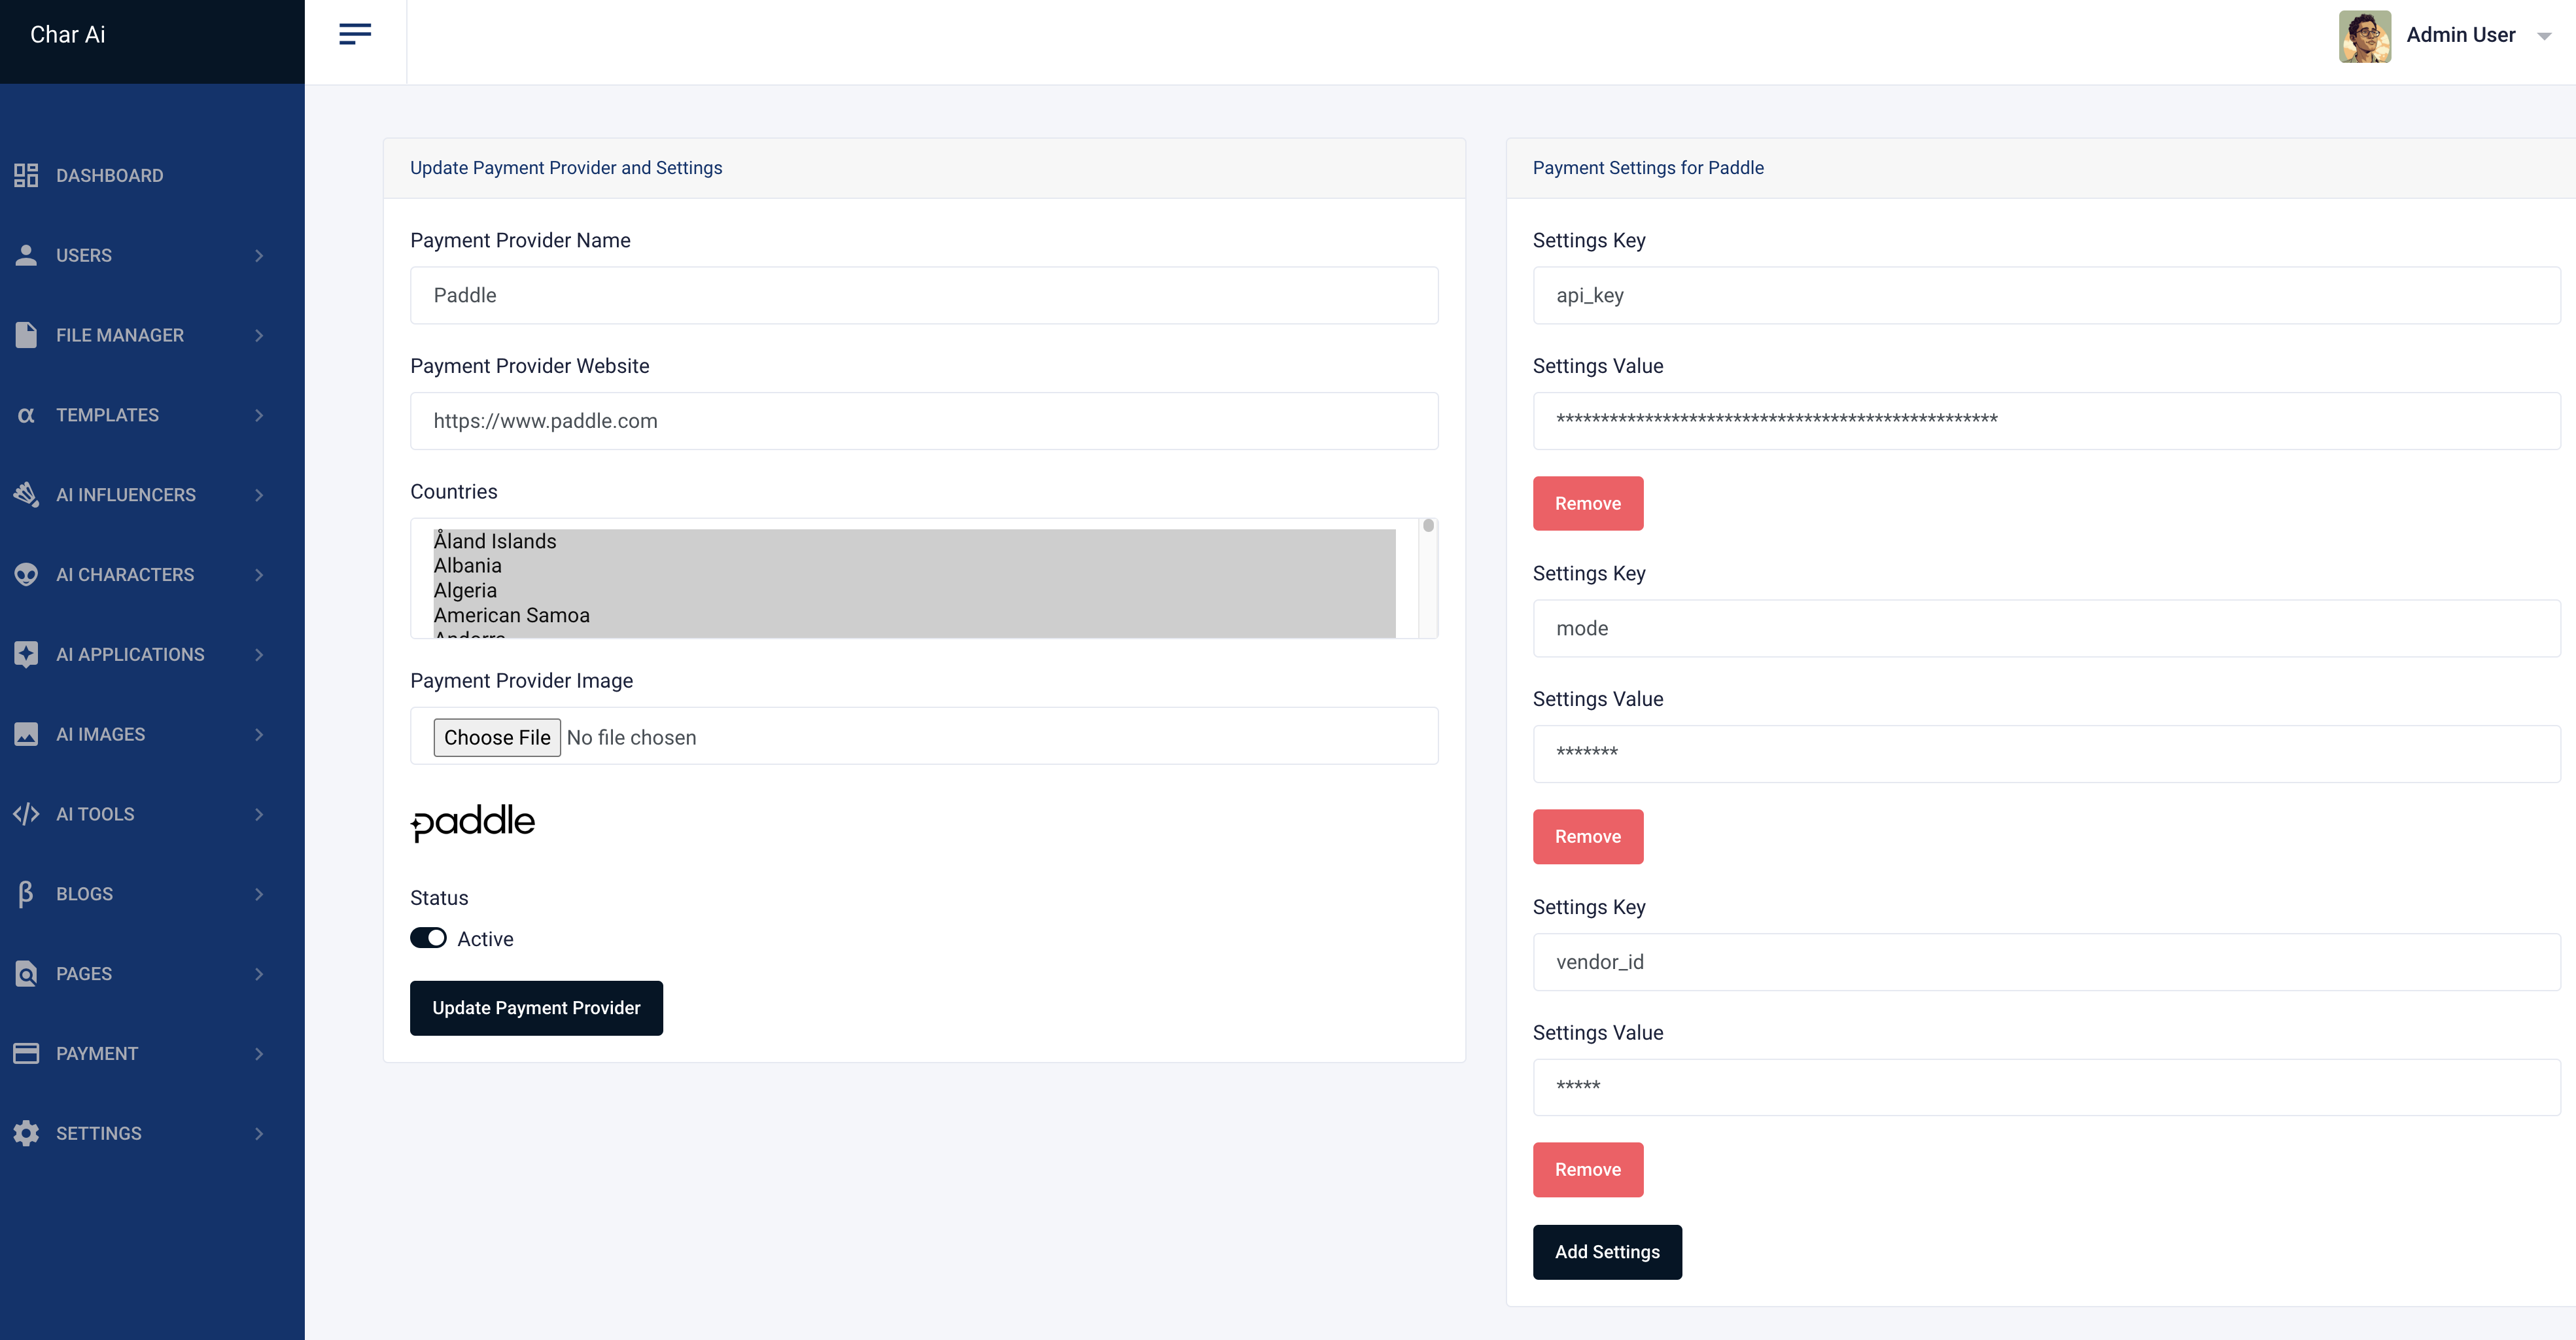
Paddle
Important
Sign Up for Paddle: Go to the Paddle sign-up page and create a new account. https://login.paddle.com/signup
Log In: Once your account is created, log in to the Paddle Dashboard. https://login.paddle.com/login
Get Paddle API Credentials:
- In the Paddle Dashboard, click on "Developer Tools" in the left sidebar.
- Go to the "Authentication" tab.
Get API Credentials:
- You will see your "Vendor ID", "API Key", and "Public Key". Use these credentials to integrate Paddle with your Laravel application.
- Save these keys in a secure location.
Full detail on how to create an Paddle integration can be found here.

Flutterwave
Important
Sign Up for Flutterwave: Go to the Flutterwave sign-up page and create a new account. https://dashboard.flutterwave.com/signup
Log In: Once your account is created, log in to the Flutterwave Dashboard. https://app.flutterwave.com/login
Navigate to API Keys:
- In the Flutterwave Dashboard, click on "Settings".
- Go to the "API" tab.
Get API Credentials:
- You will see your "Public Key", "Secret Key", and "Encryption Key". Use these credentials to integrate Flutterwave with your Laravel application.
- Save these keys in a secure location.
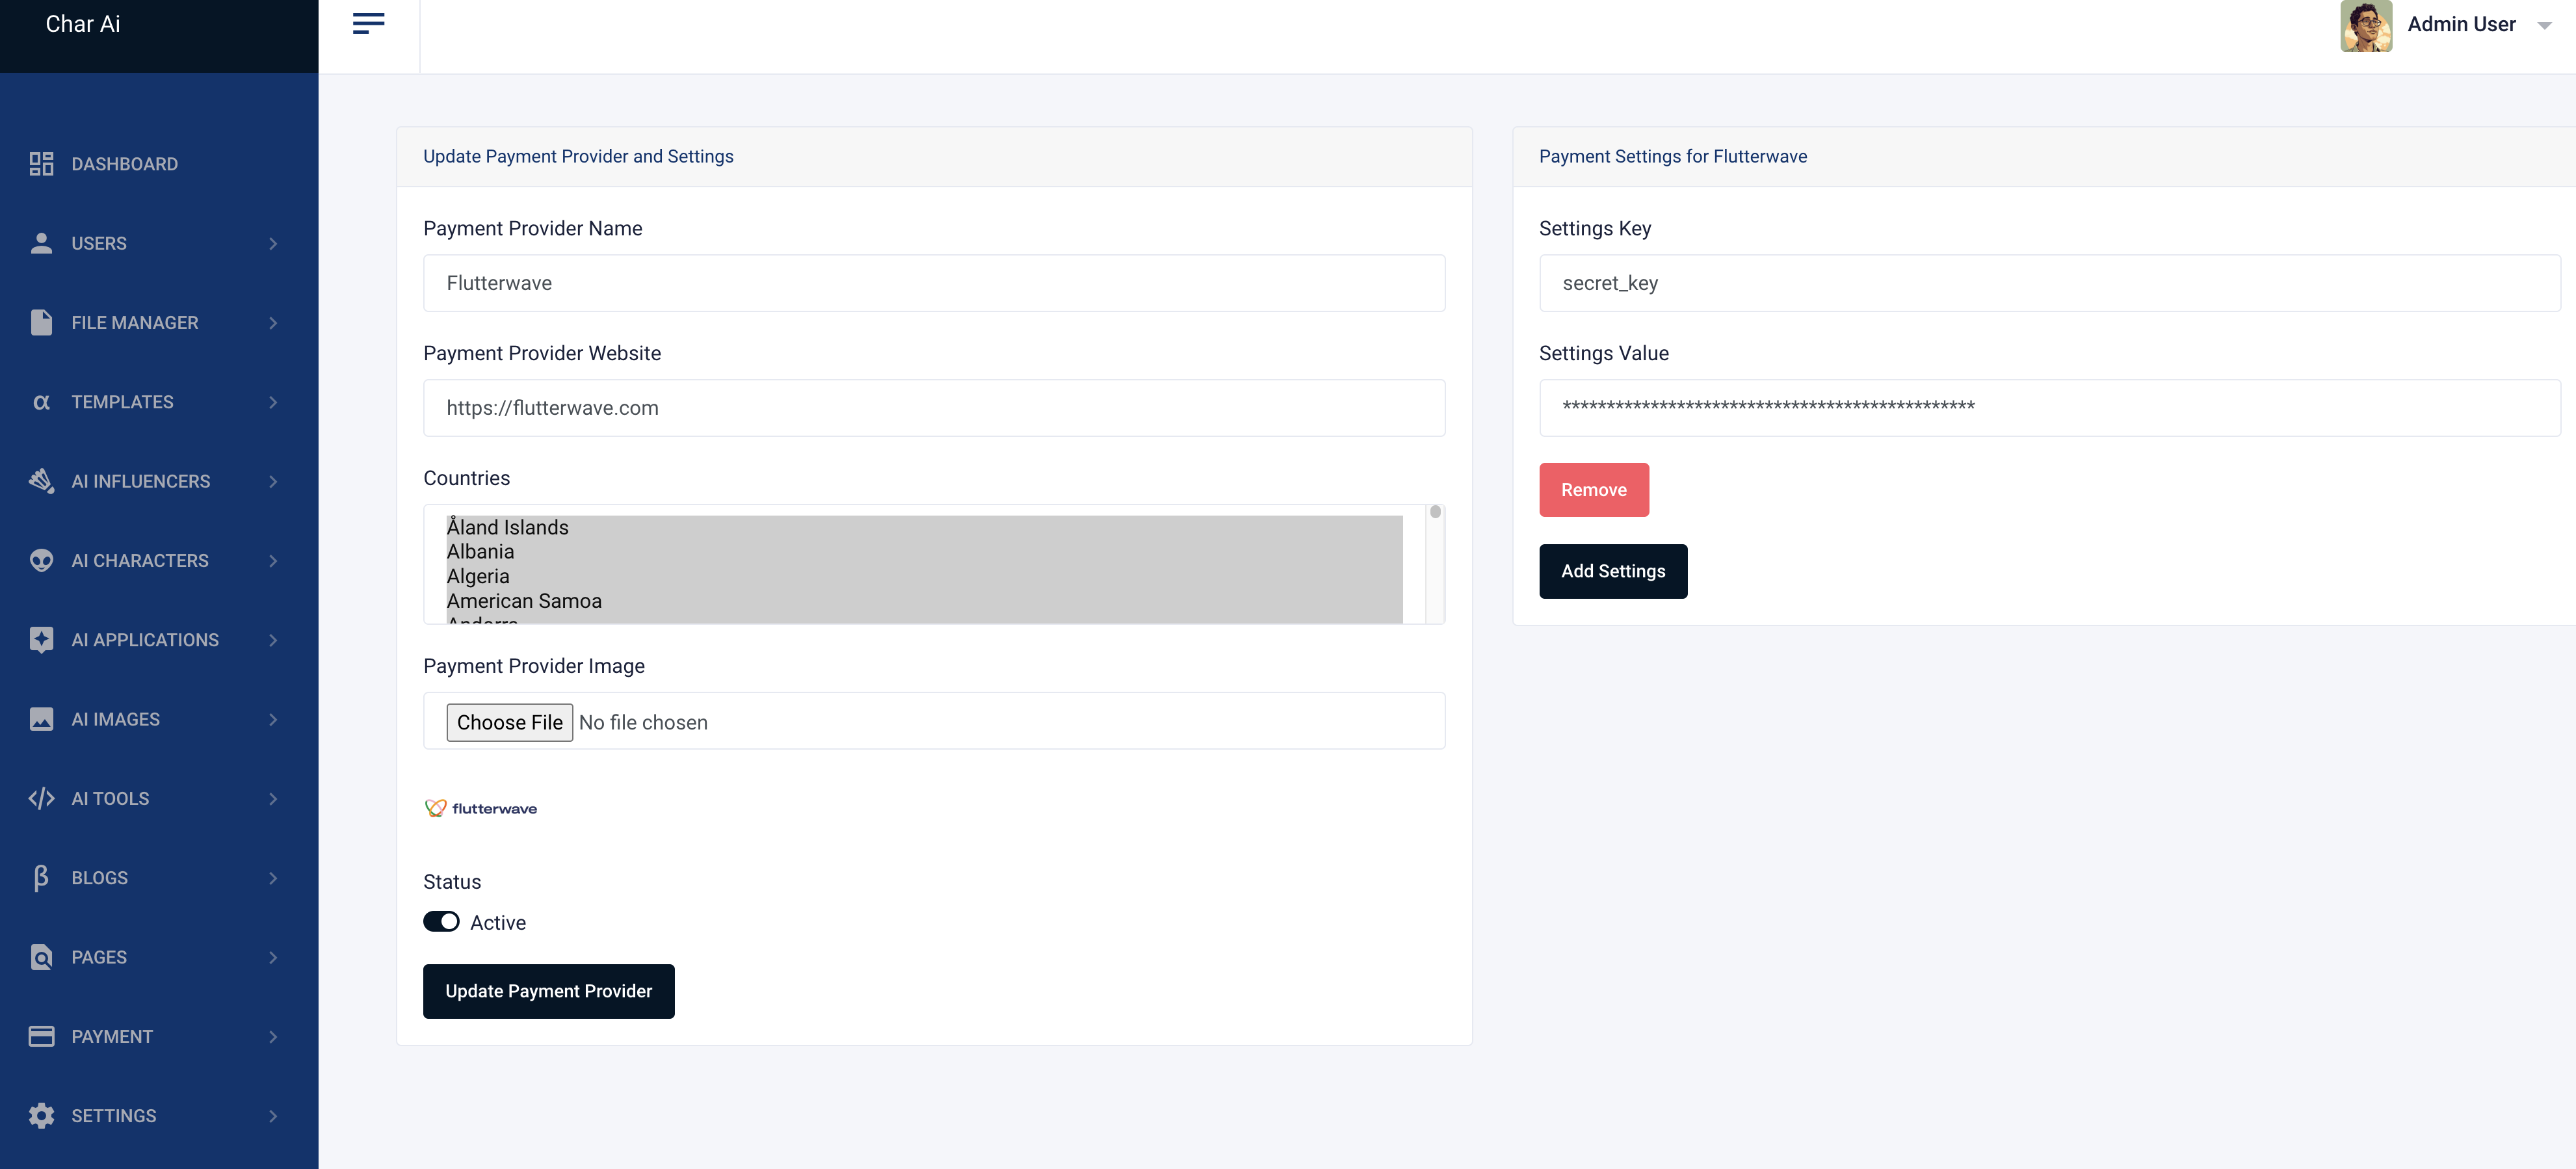
Full detail on how to create an Flutterwave integration can be found here.

Coinbase
Important
Sign Up for Coinbase Commerce: Go to the Coinbase Commerce sign-up page and create a new account. https://accounts.coinbase.com/pick-your-account
Log In: Once your account is created, log in to the Coinbase Commerce Dashboard. https://login.coinbase.com/signin
Get Coinbase Commerce API Credentials
- In the Coinbase Commerce Dashboard, click on "Settings".
- Go to the "API Keys" tab.
Get API Credentials:
- Click on "Create an API Key" if you haven't already.
- Copy the generated API Key. Use this key to integrate Coinbase Commerce with your Laravel application.
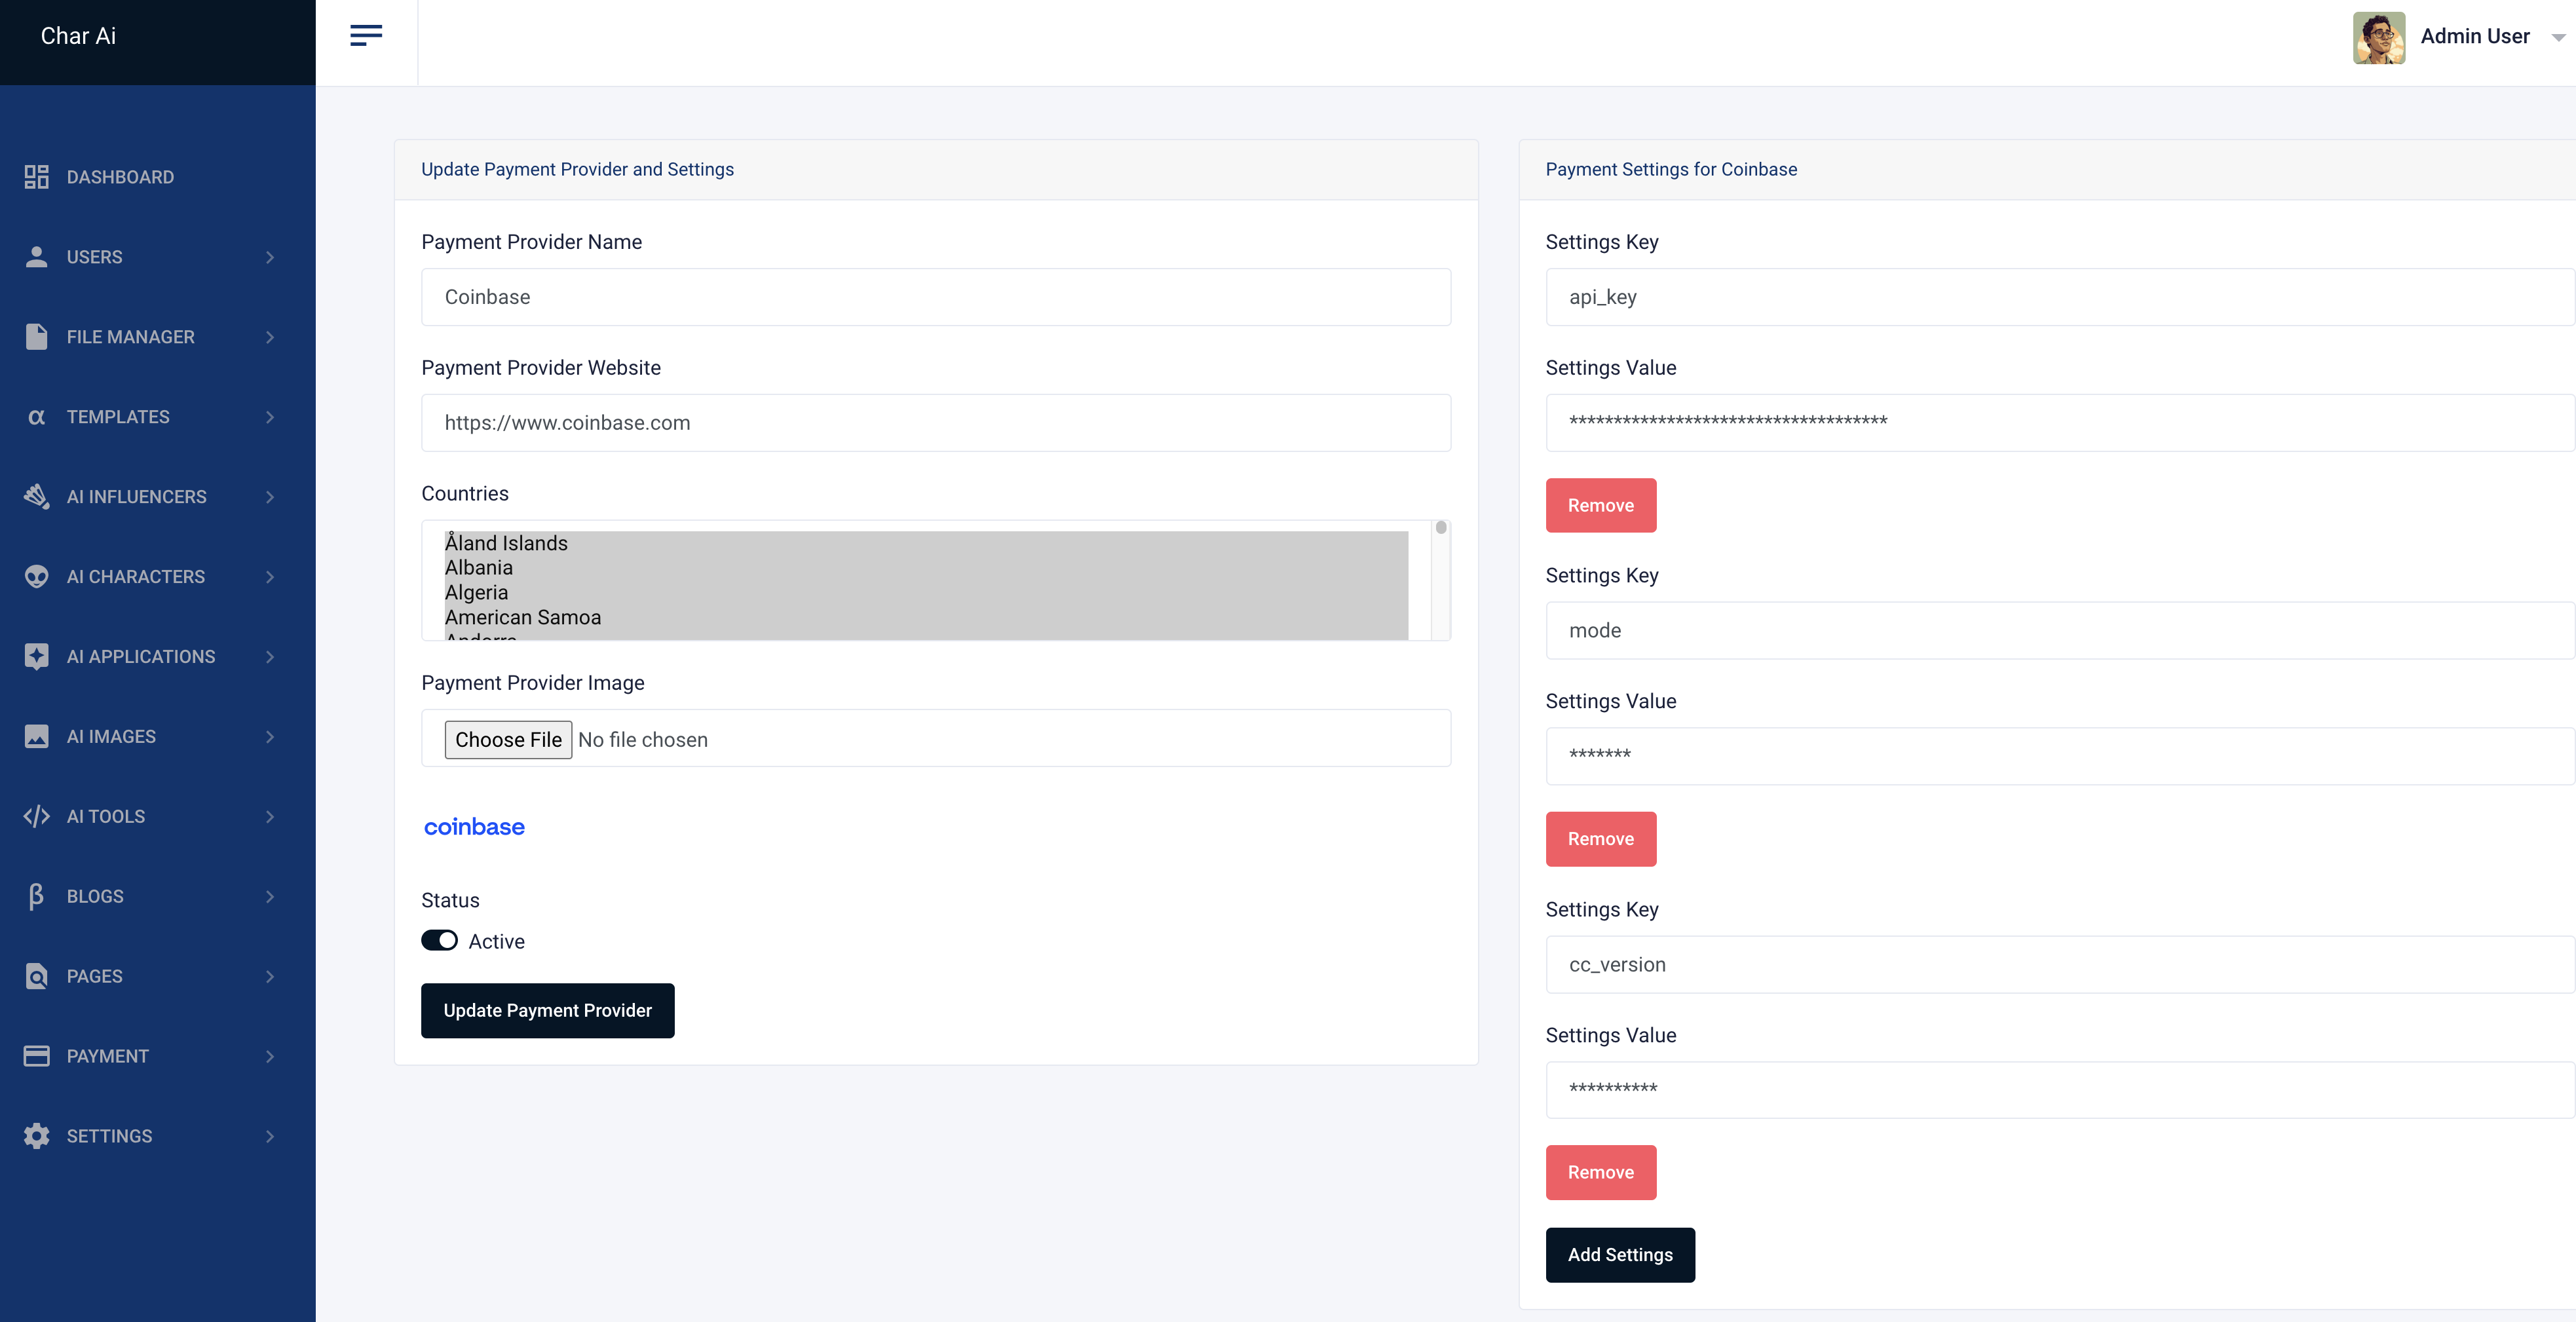
Full detail on how to create an Coinbase integration can be found here.

Crypto.com
Important
Sign Up for Crypto.com: Go to the Crypto.com sign-up page and create a new account. https://merchant.crypto.com/users/sign_up
Log In: Once your account is created, log in to the Crypto.com Dashboard. https://merchant.crypto.com/users/sign_in
Navigate to API Settings:
- In the Crypto.com Dashboard, click on "Settings".
- Go to the "API" tab.
Get API Credentials:
- Click on "Create an API Key" if you haven't already.
- Copy the generated API Key and Secret. Use these keys to integrate Crypto.com Pay with your Laravel application.
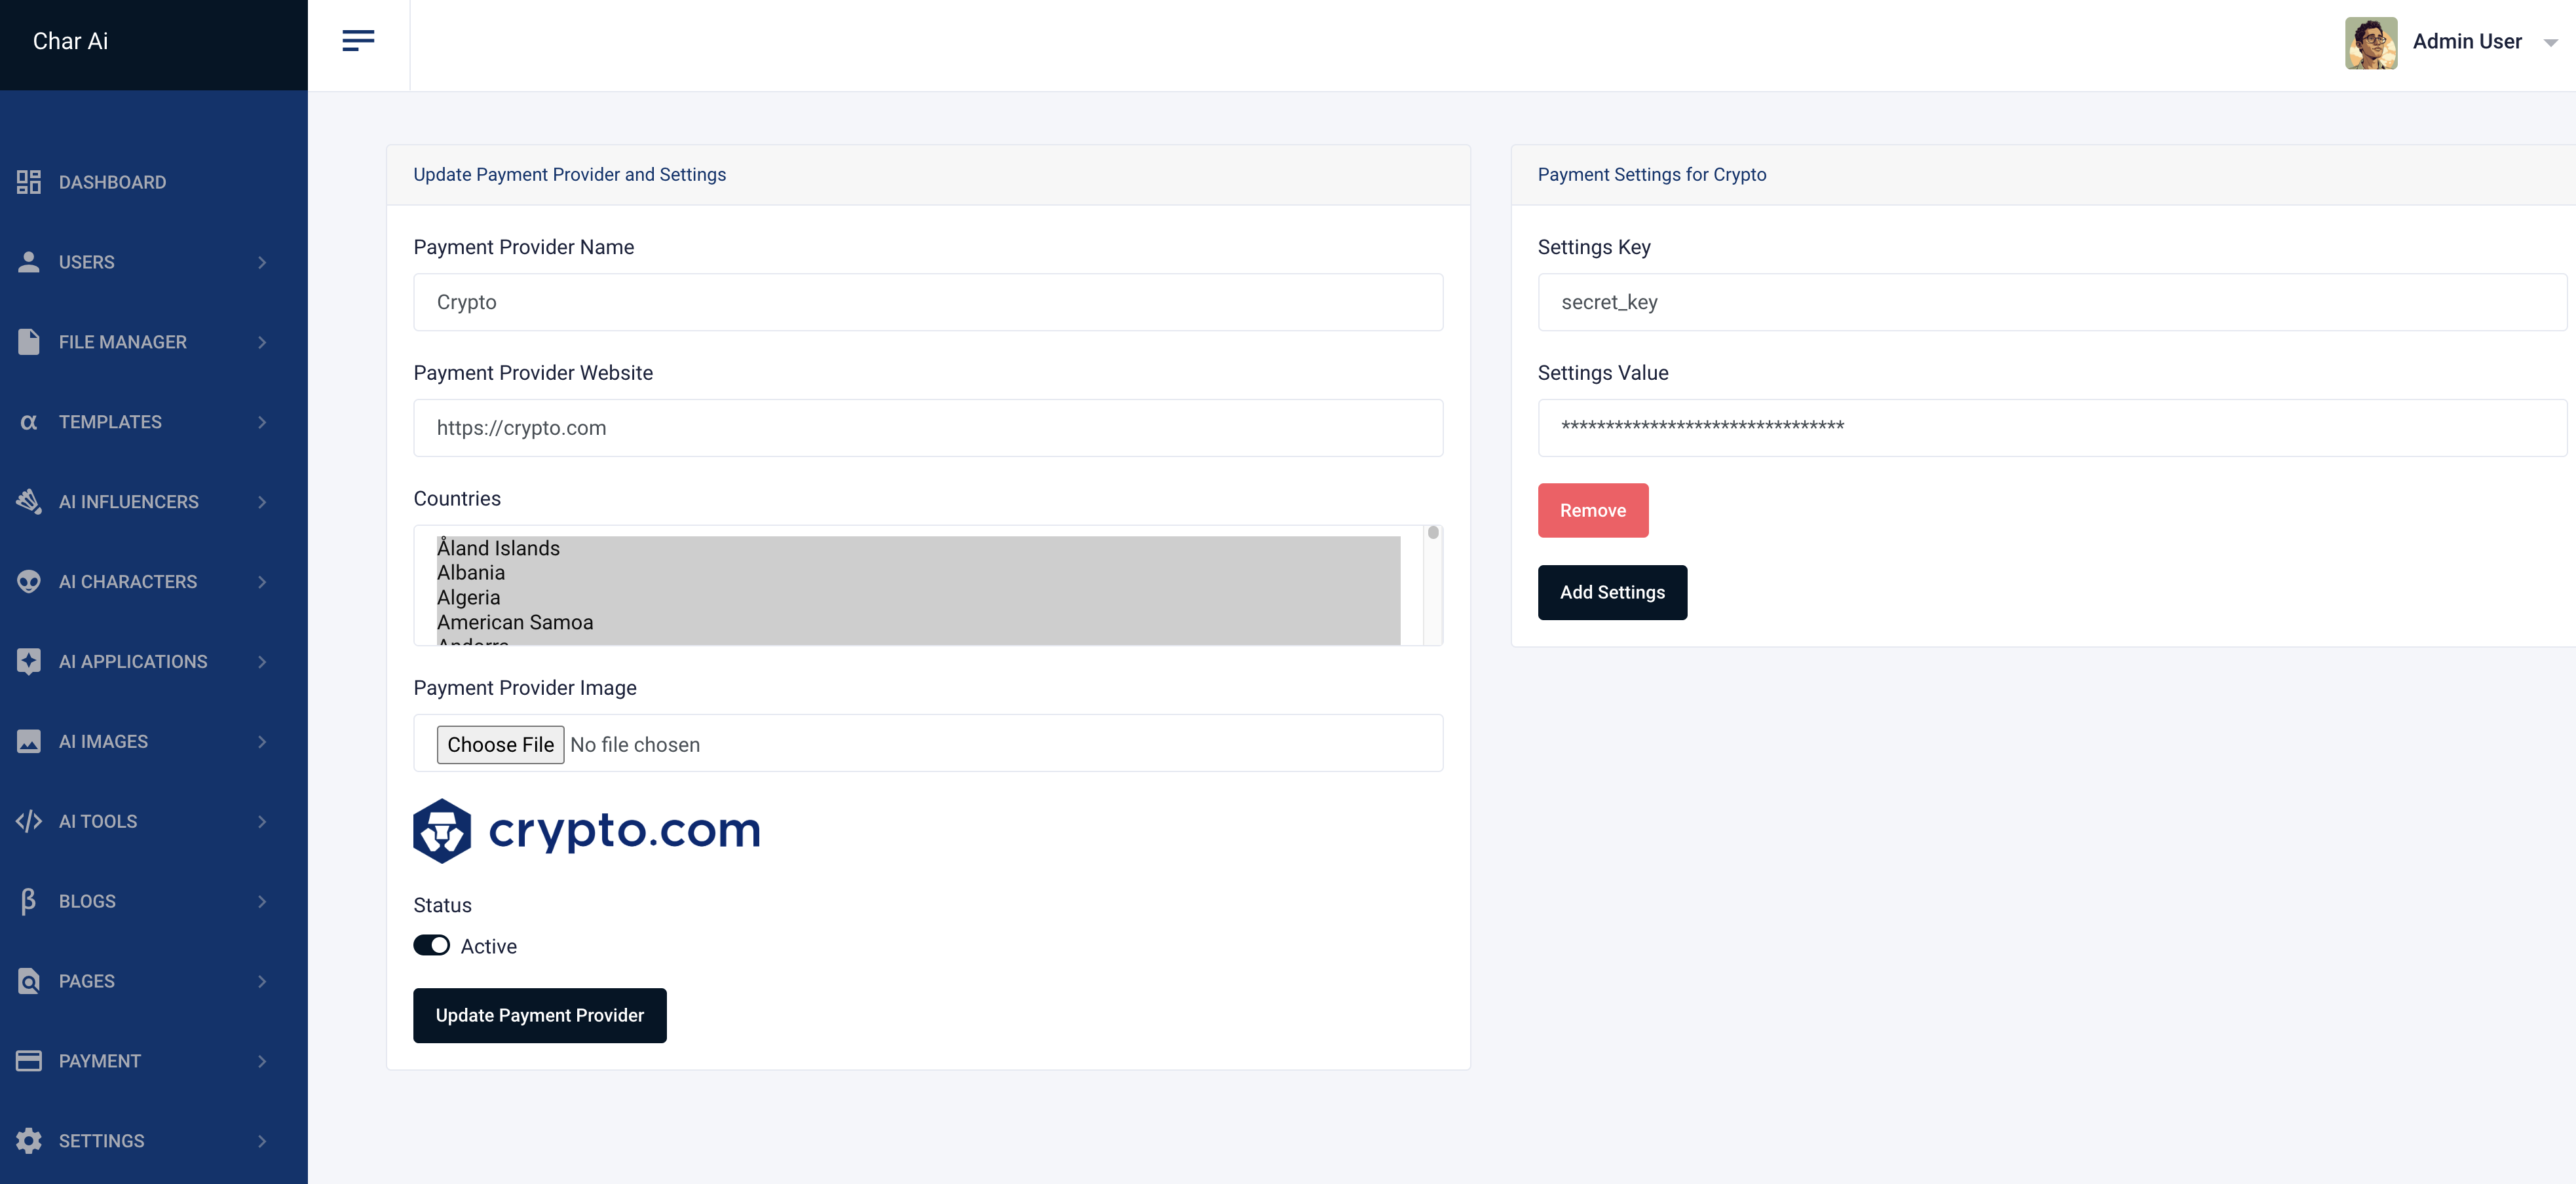
Full detail on how to create an Crypto.com integration can be found here.
Paystack
Important
Sign Up for Paystack: Go to the Paystack sign-up page and create a new account. https://dashboard.paystack.com/#/signup
Log In: Once your account is created, log in to the Paystack Dashboard. https://dashboard.paystack.com/#/login
Navigate to API Settings:
- In the Paystack Dashboard, click on "Settings".
- Go to the "API Keys & Webhooks" tab.
Get API Credentials:
- Copy the "Secret Key" and "Public Key". Use these keys to integrate Paystack with your Laravel application.
- Save these keys in a secure location.
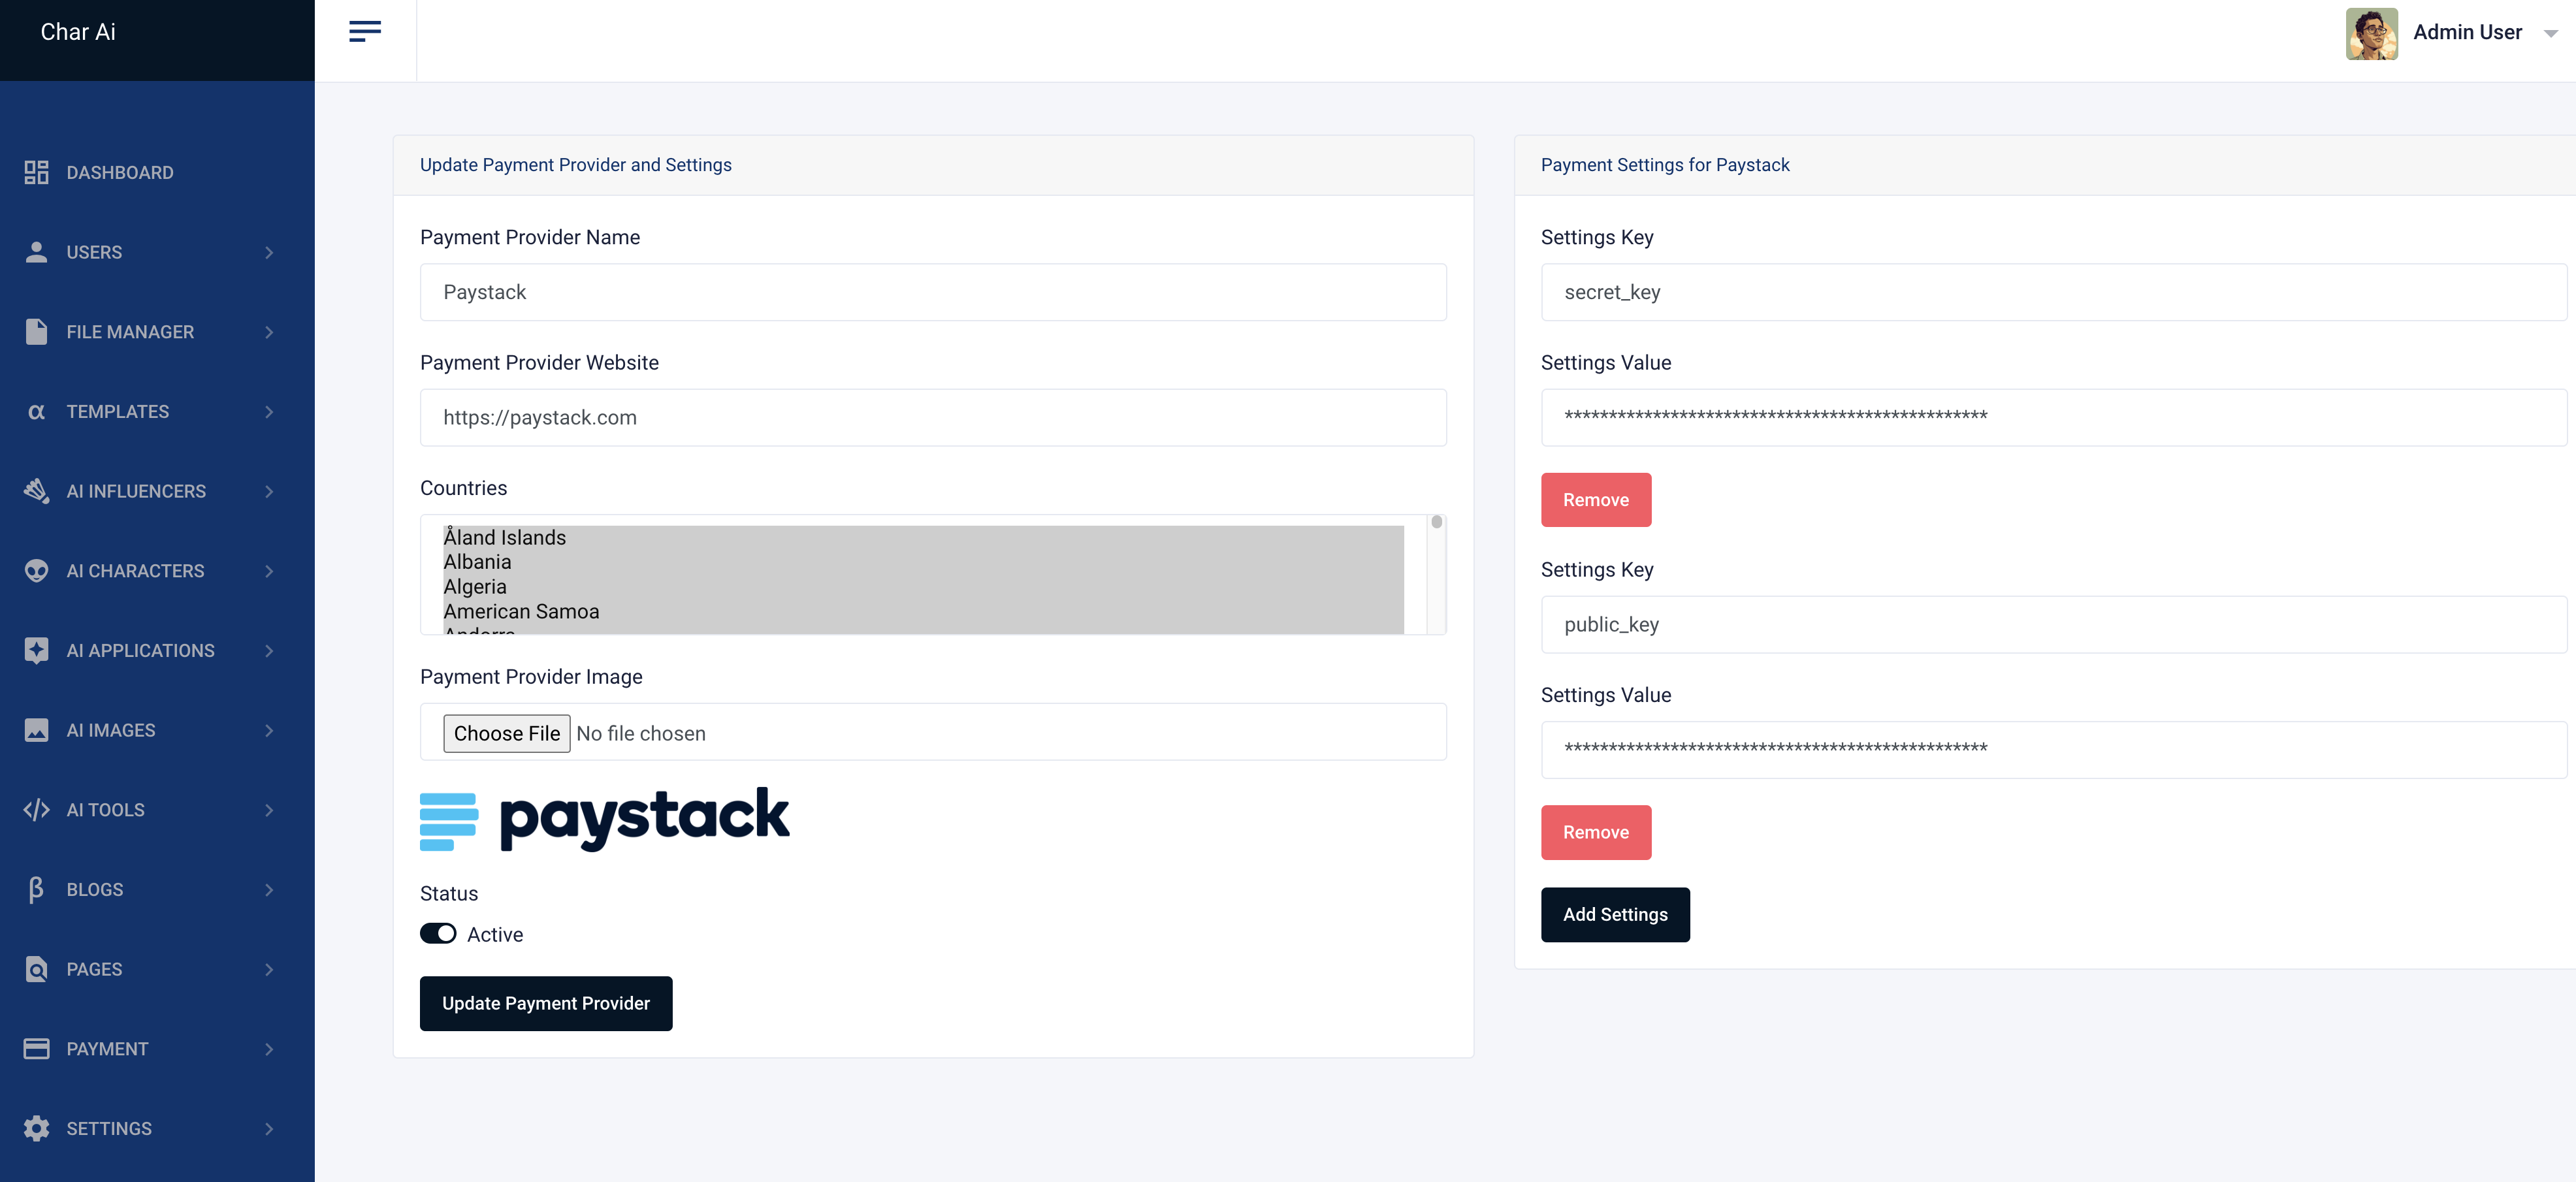
Full detail on how to create an Paystack integration can be found here.

Mollie
Important
Sign Up for Mollie: Go to the Mollie sign-up page and create a new account. https://my.mollie.com/dashboard/signup
Log In: Once your account is created, log in to the Mollie Dashboard. https://my.mollie.com/dashboard/login
Navigate to API Settings:
- In the Mollie Dashboard, click on "Developers" in the left-hand menu.
- Go to the "API keys" tab.
Get API Credentials:
- Copy the "Live API Key" and "Test API Key". Use these keys to integrate Mollie with your Laravel application.
- Save these keys in a secure location.

Full detail on how to create an Mollie integration can be found here.

YooKassa
Important
Sign Up for YooKassa: Go to the YooKassa sign-up page and create a new account. https://yookassa.ru/yooid/signup
Log In: Once your account is created, log in to the YooKassa Dashboard. https://yookassa.ru/yooid/signin/step/login
Navigate to API Settings:
- In the YooKassa Dashboard, go to "Settings" -> "API Keys".
Get API Credentials:
- Copy the "Shop ID" and "Secret Key". Use these keys to integrate YooKassa with your Laravel application.
- Save these keys in a secure location.
Full detail on how to create an YooKassa integration can be found here.

Setup Other Settings
You can manage other settings from the admin panel. You can manage the app's content, google ads, analytics, captcha, smtp, social logins, etc. and other settings.
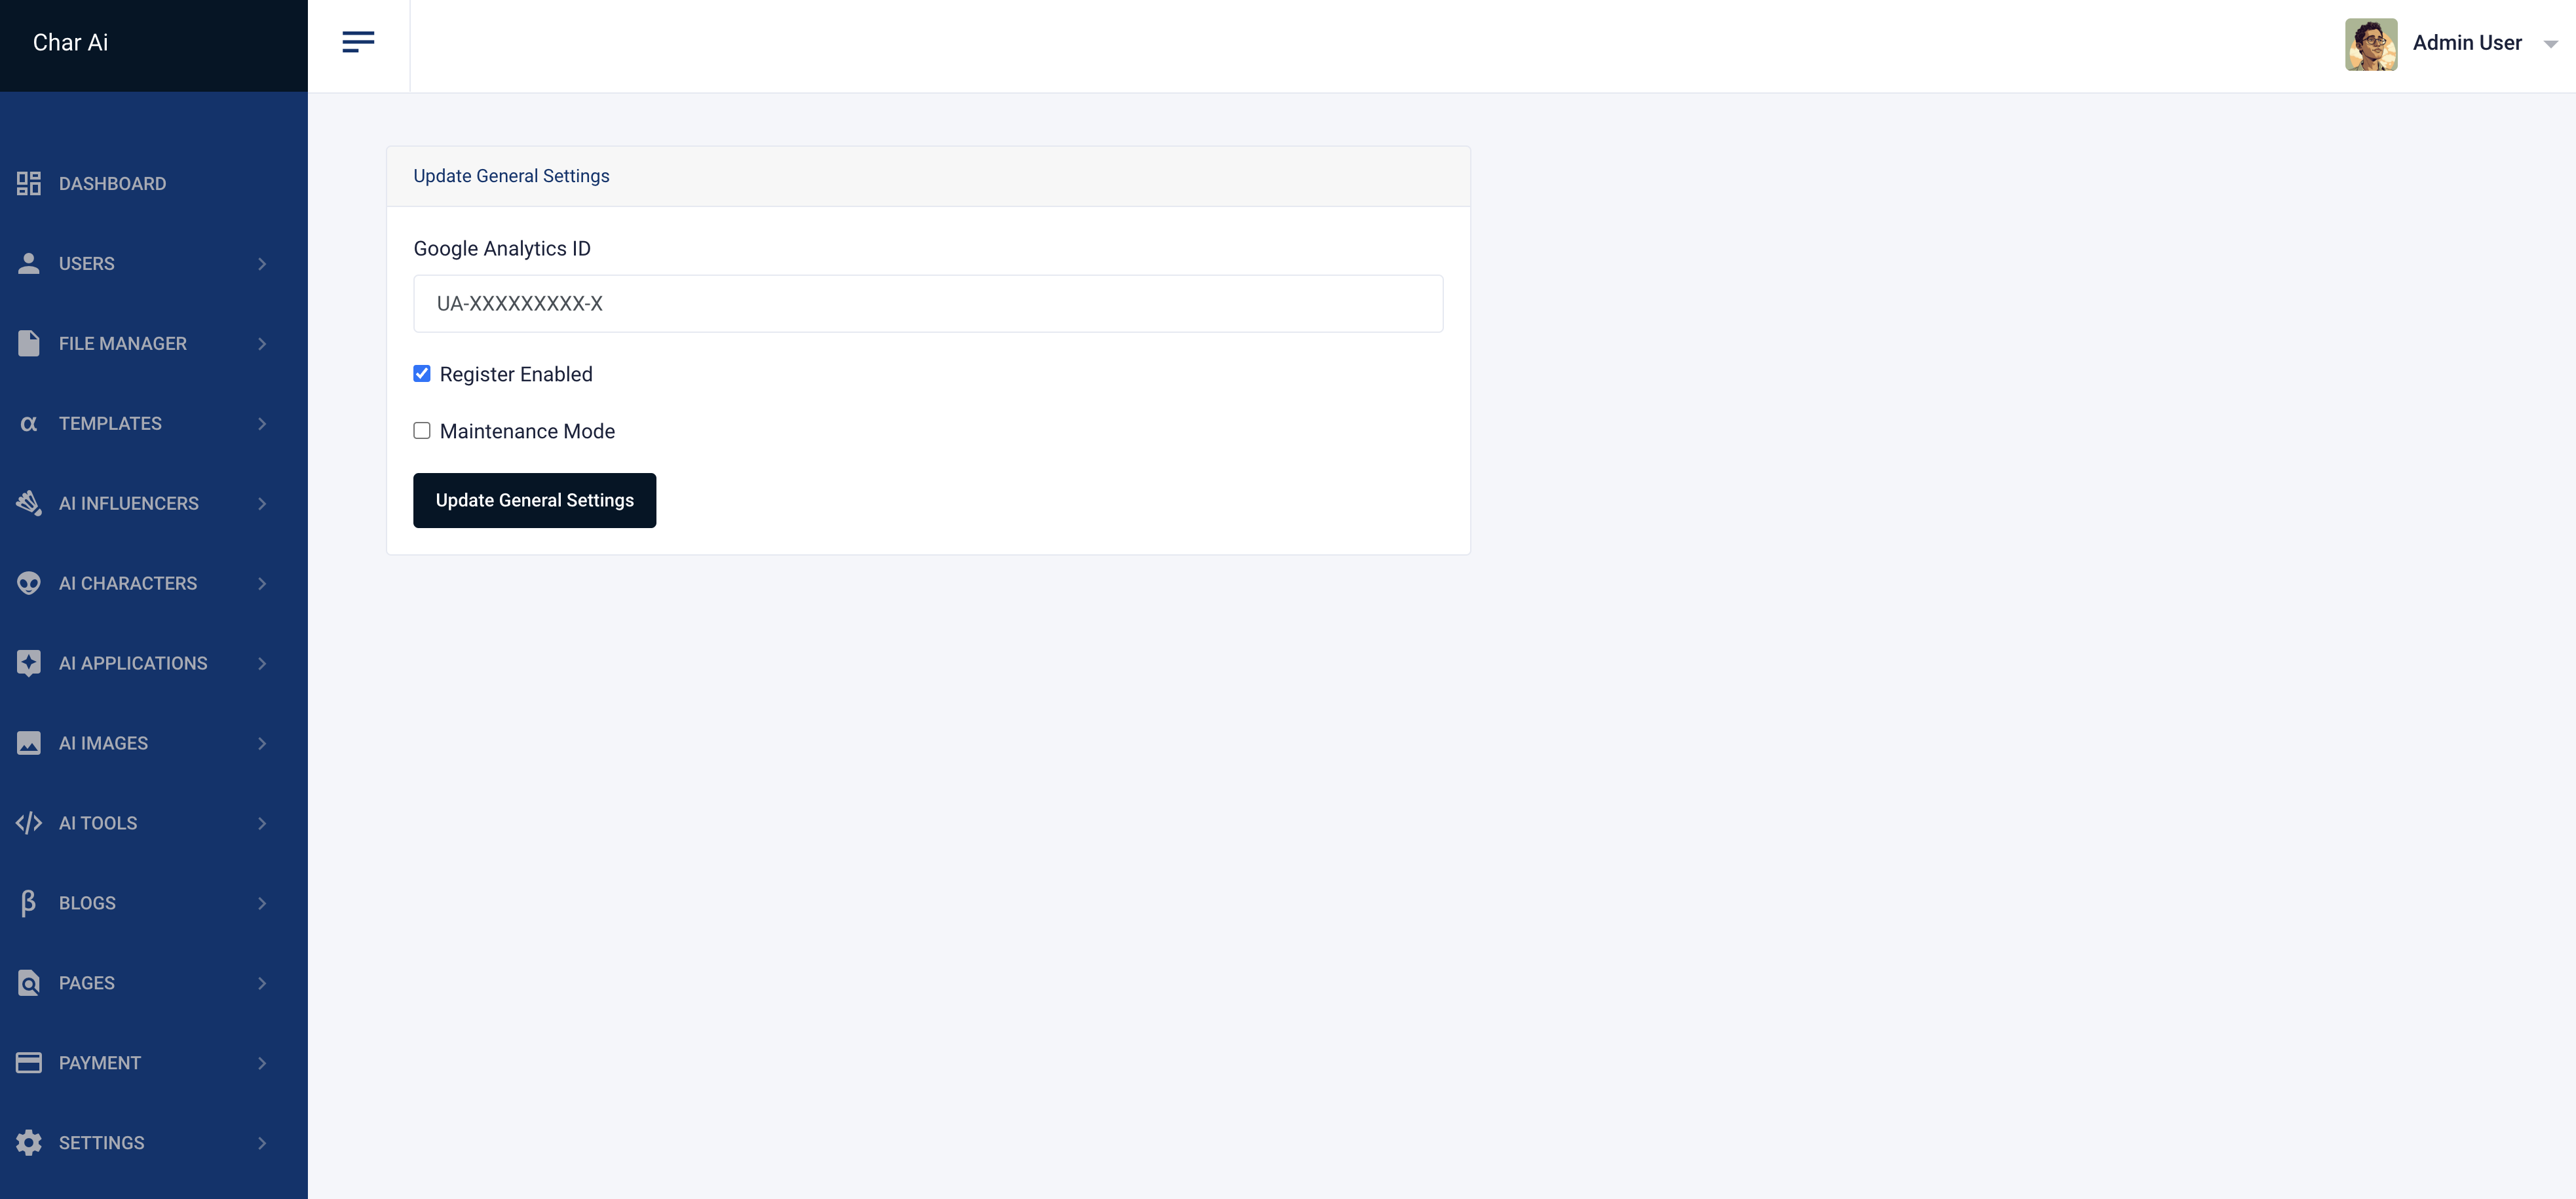
Google Analytics
Important
Sign Up for Google Analytics: Go to Google Analytics and sign up for a new account if you don’t already have one. https://analytics.google.com
Set Up a Property:
- Click on the "Admin" gear icon at the bottom left of the Google Analytics dashboard.
- Under the "Account" column, select an account or create a new one.
- Under the "Property" column, click on "Create Property".
- Fill in the required details such as property name, reporting time zone, and currency.
- Click "Next" and follow the prompts to complete the setup.
Get the Tracking ID:
- After setting up the property, you will be given a "Tracking ID" (format: G-XXXXXXXXX-X).
- Copy the tracking ID as you will need it to set up Google Analytics in your Laravel application.
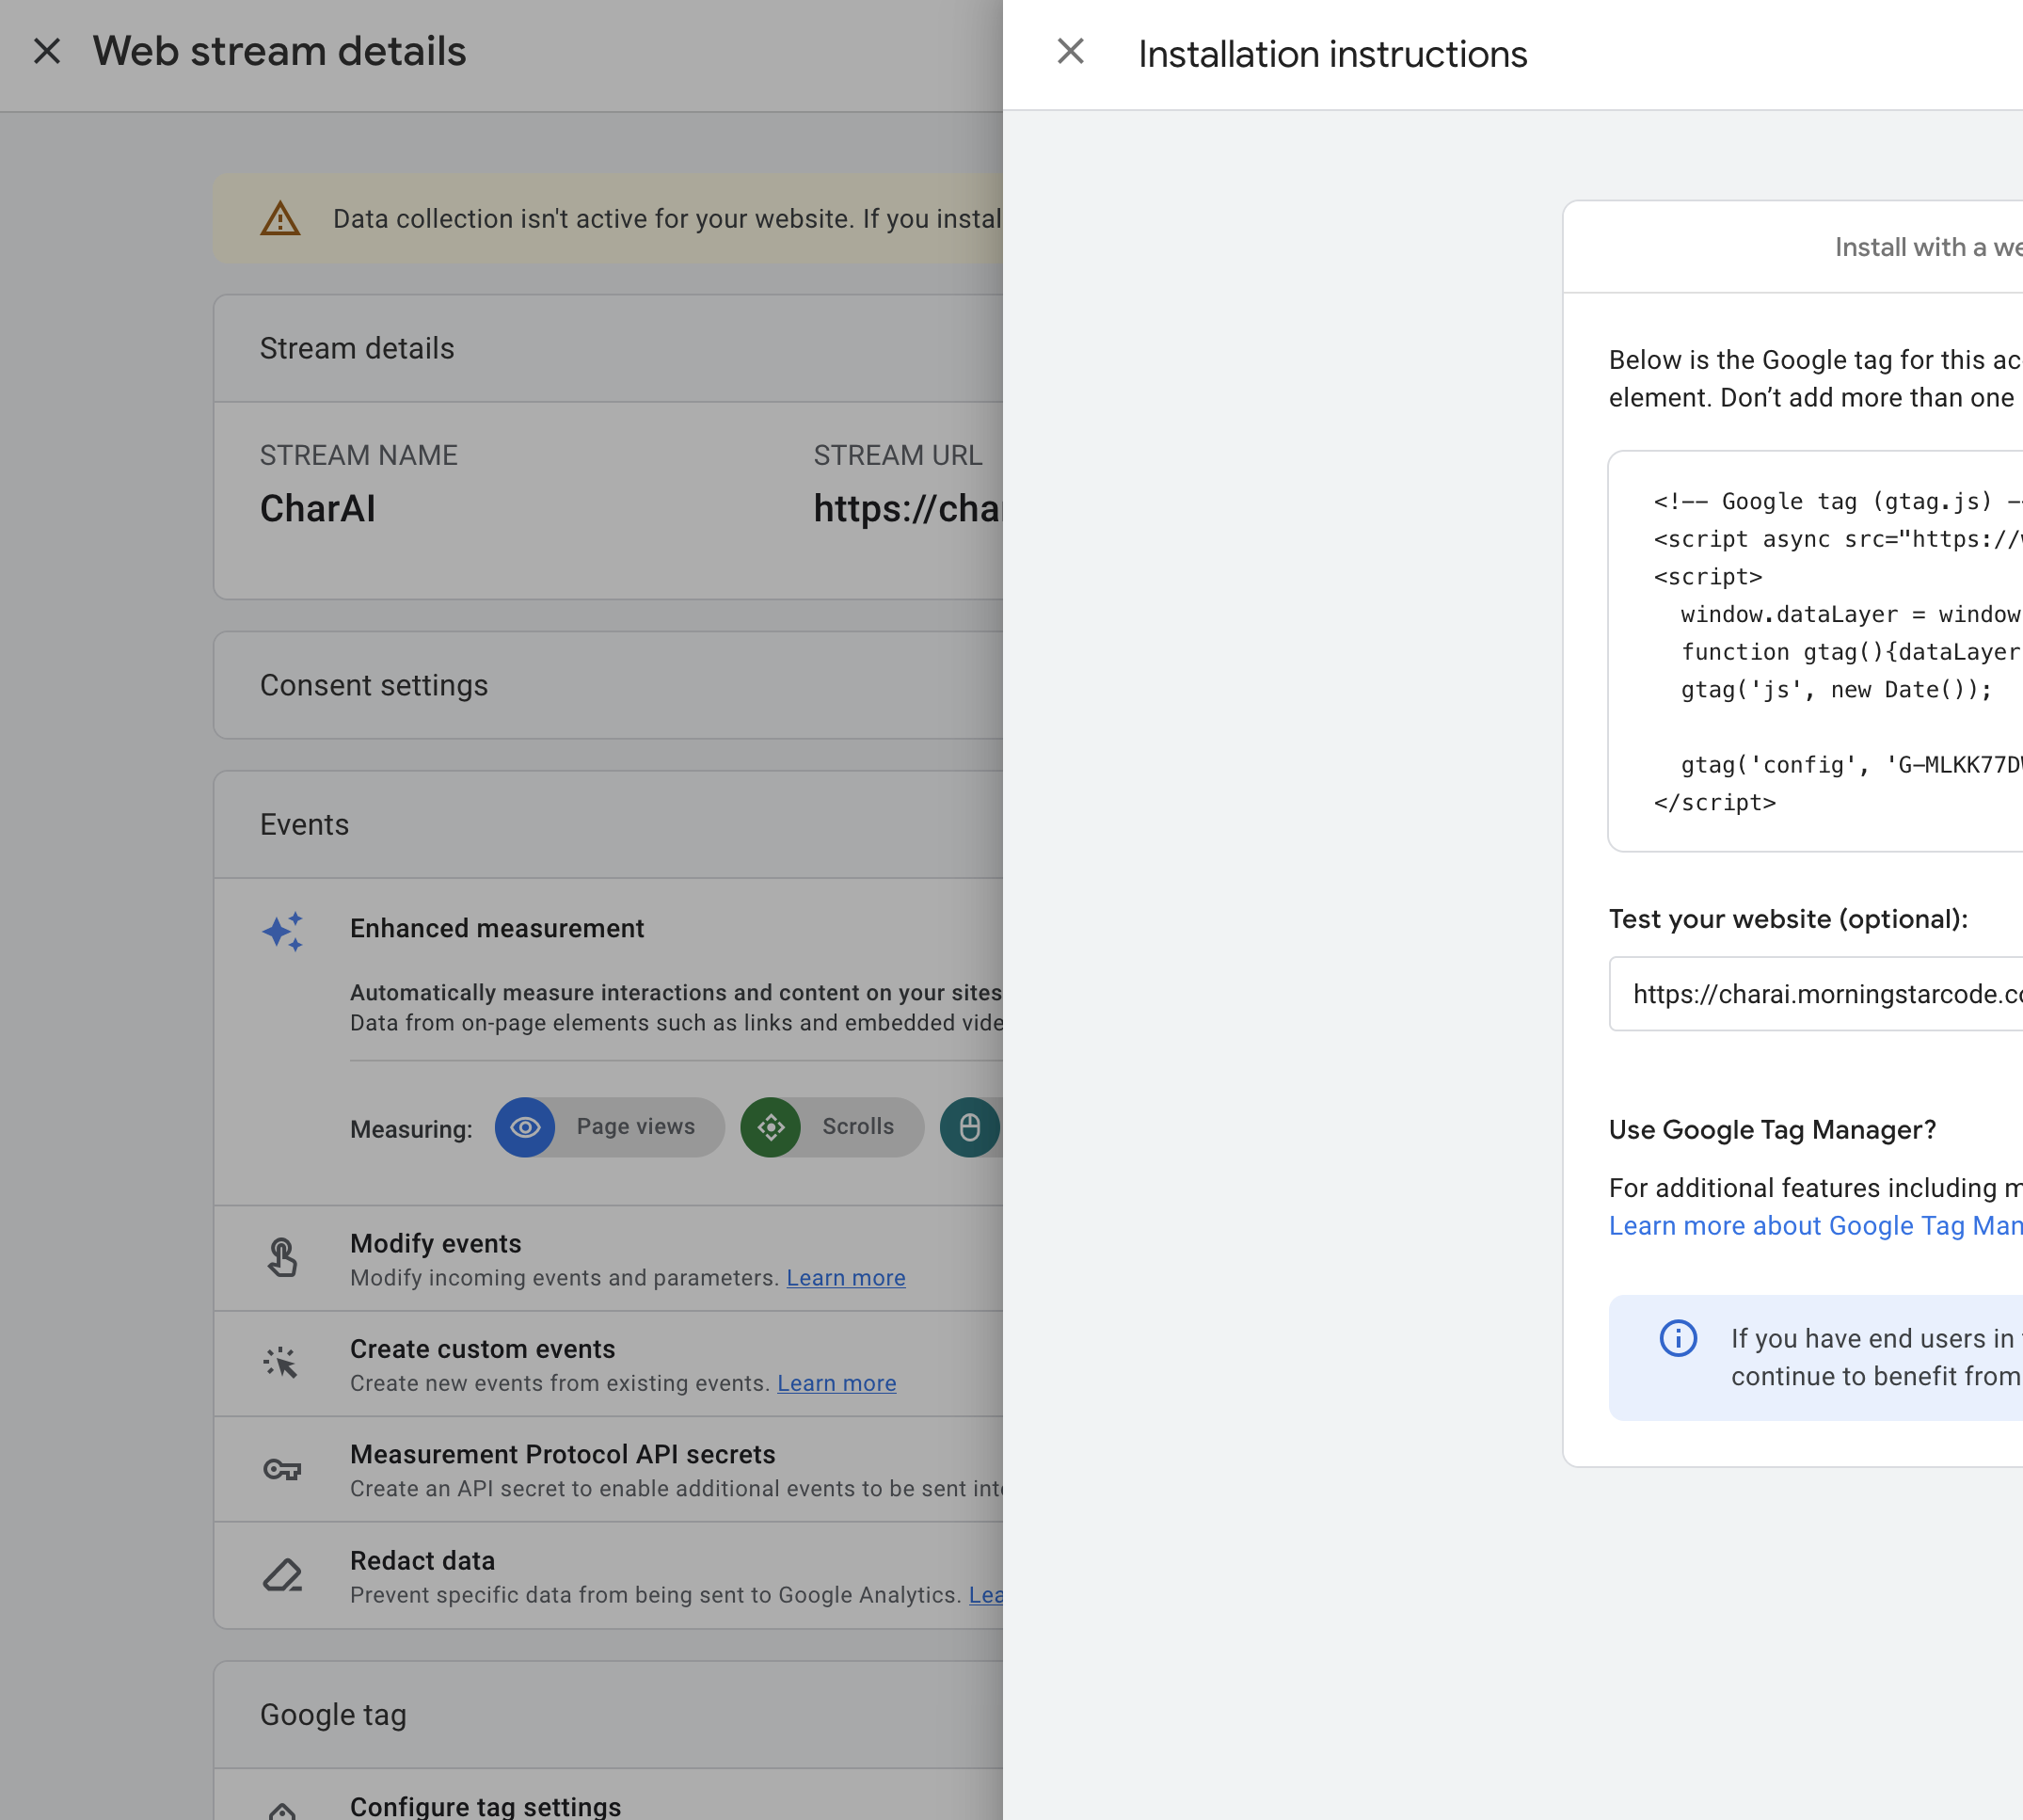
Full detail on how to create an Google Analytics integration can be found here.
Google Captcha / CloudFlare Turnstile
Important
Go to Google reCAPTCHA: Visit the Google reCAPTCHA site. https://www.google.com/recaptcha/admin/create
Register a New Site:
- Label: Enter a label for your site.
- reCAPTCHA type: Choose "reCAPTCHA v2" and select "I'm not a robot" Checkbox.
- Domains: Enter your domain name (e.g., example.com).
- Accept the reCAPTCHA Terms of Service.
- Click "Submit".
Get the Site Key and Secret Key:
- After registering your site, you will receive a Site Key and a Secret Key.
- Save these keys in a secure location.

Full detail on how to create an Google Captcha integration can be found here.
Important
Sign Up for Cloudflare: Go to Cloudflare and sign up for a new account if you don’t already have one. https://www.cloudflare.com/products/turnstile
Log In: After creating your account, log in to the Cloudflare Dashboard. https://dash.cloudflare.com/login
Go to the Turnstile Page:
- In the Cloudflare dashboard, navigate to the "Turnstile" section.
- Click on "Add Site" to register your site with Turnstile.
Register Your Site:
- Enter a "Site Name".
- Enter the "Domains" where you will be using Turnstile.
- You can configure additional settings like widget customization if needed.
- Click "Save".
Get the Site Key and Secret Key:
- After registering your site, you will receive a "Site Key" and a "Secret Key".
- Save these keys as you will need them for the Laravel integration.
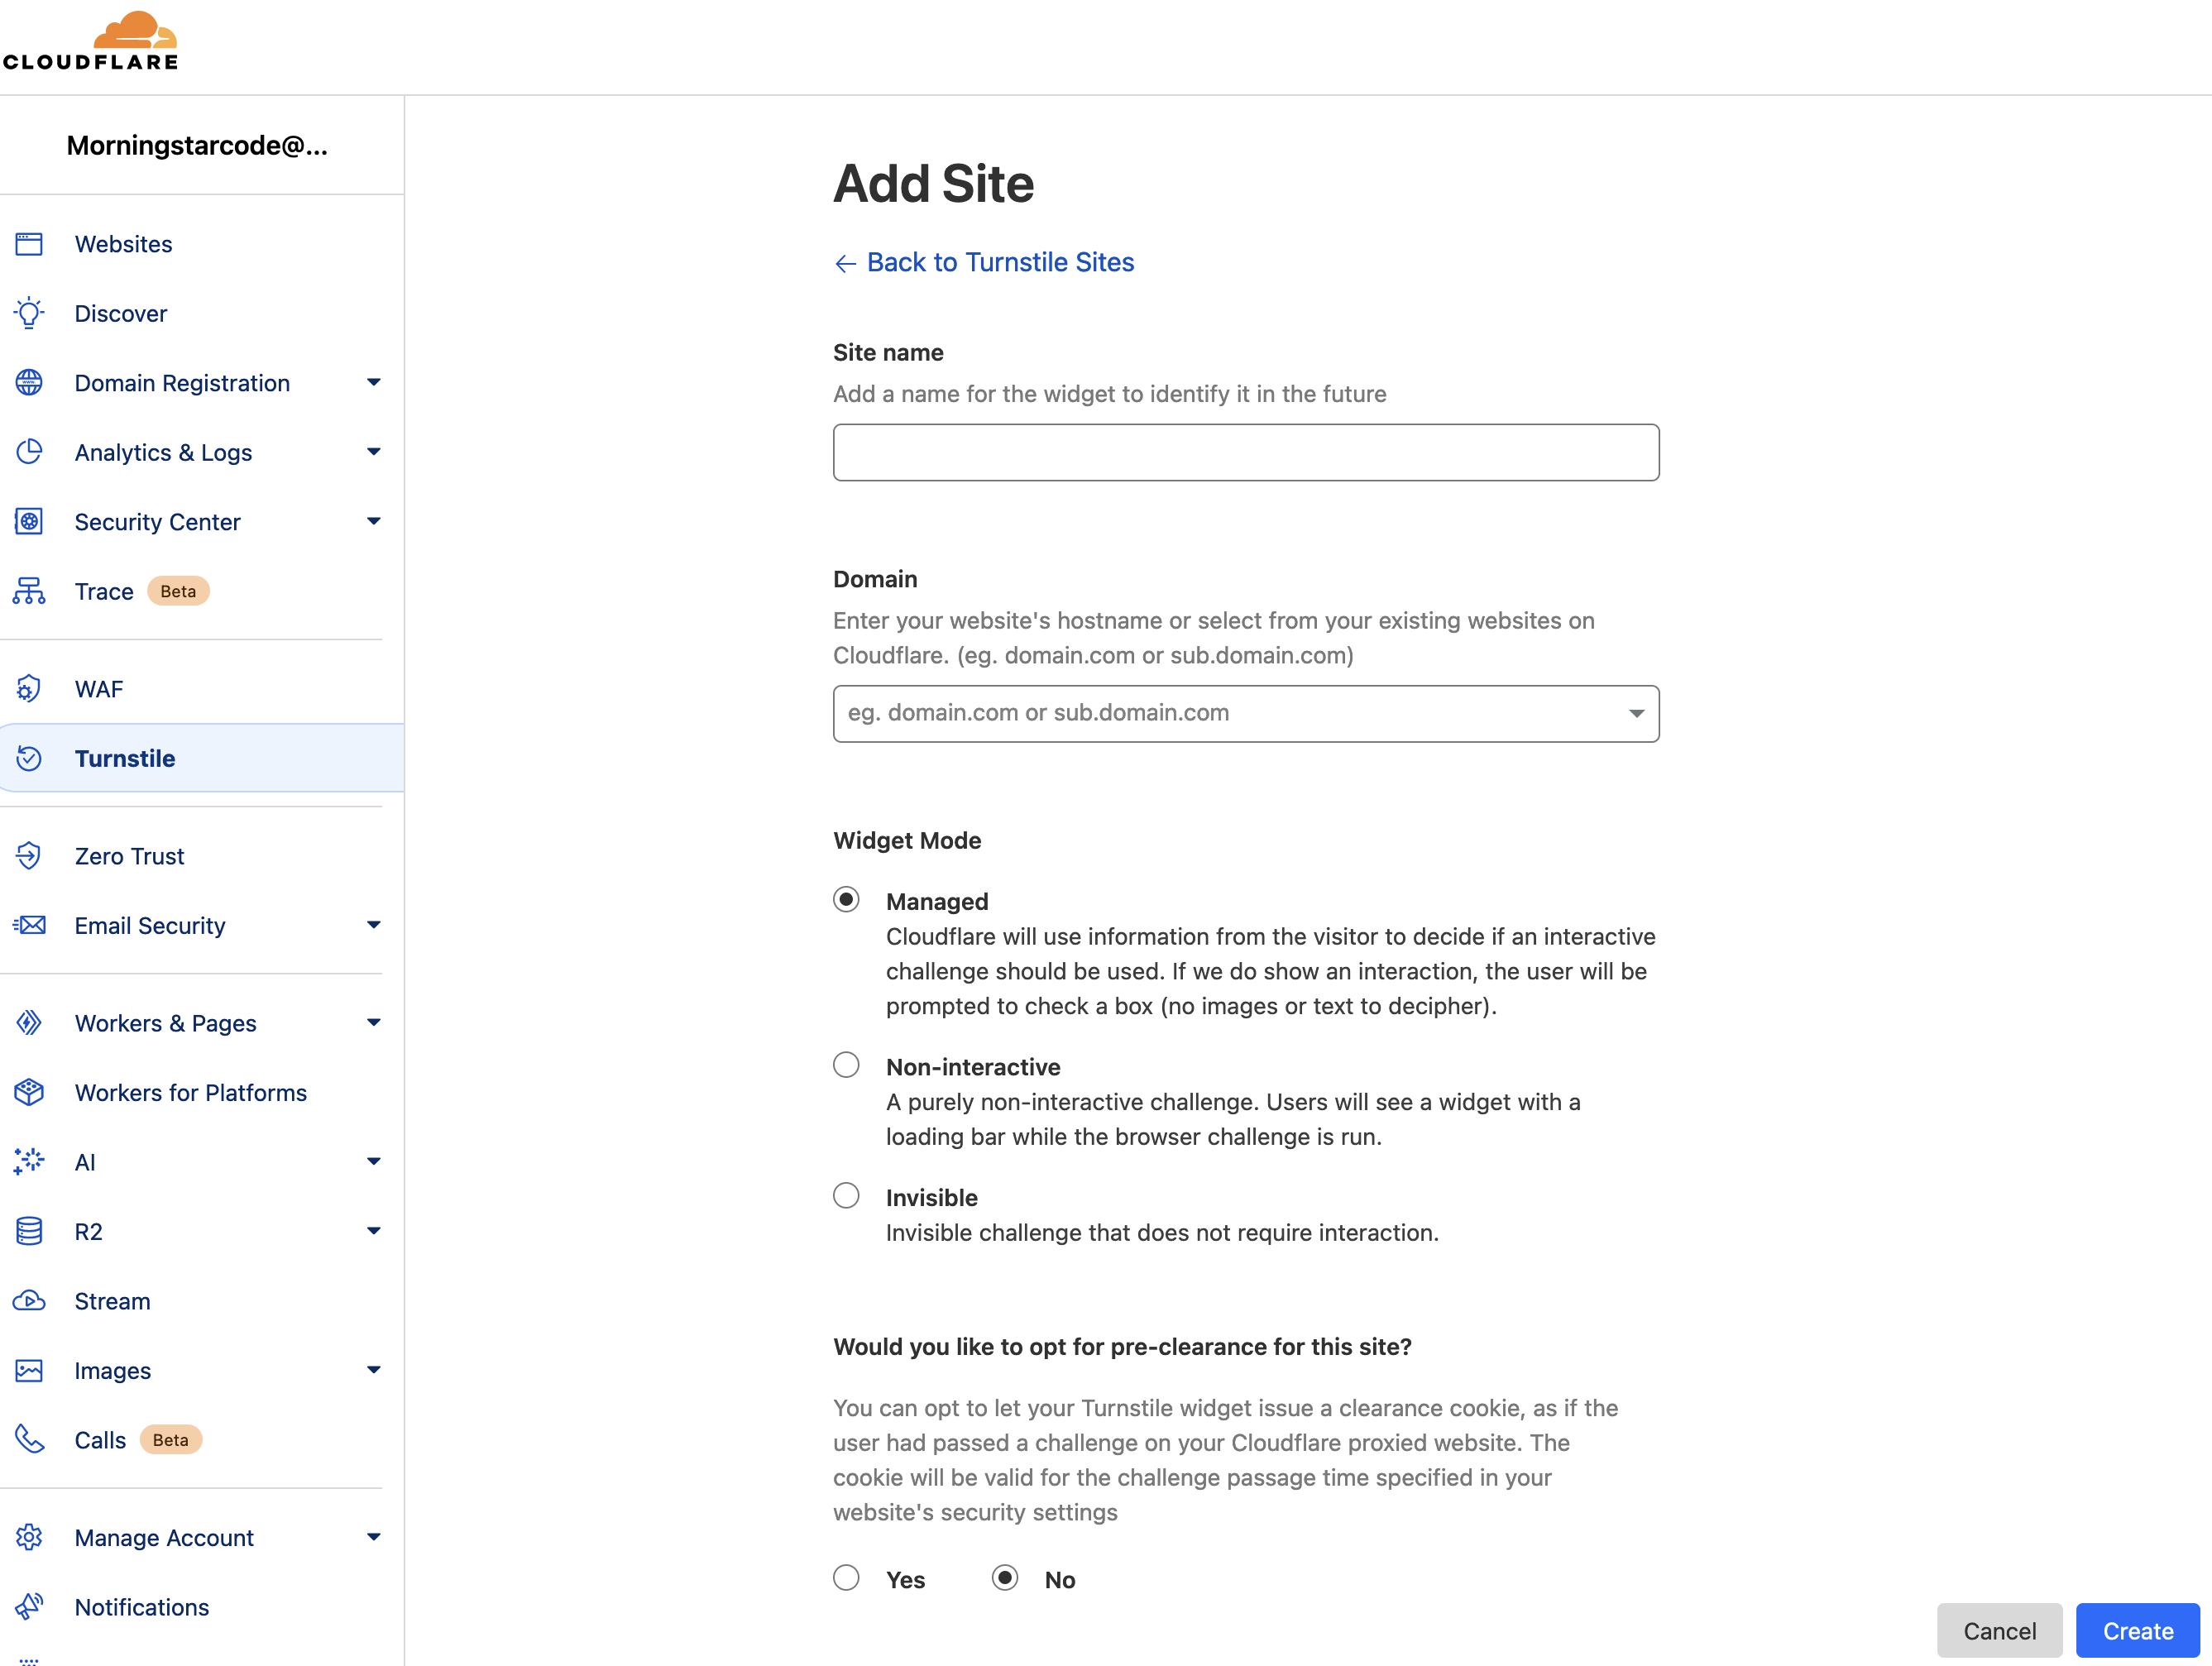
Full detail on how to create an CloudFlare Captcha integration can be found here.

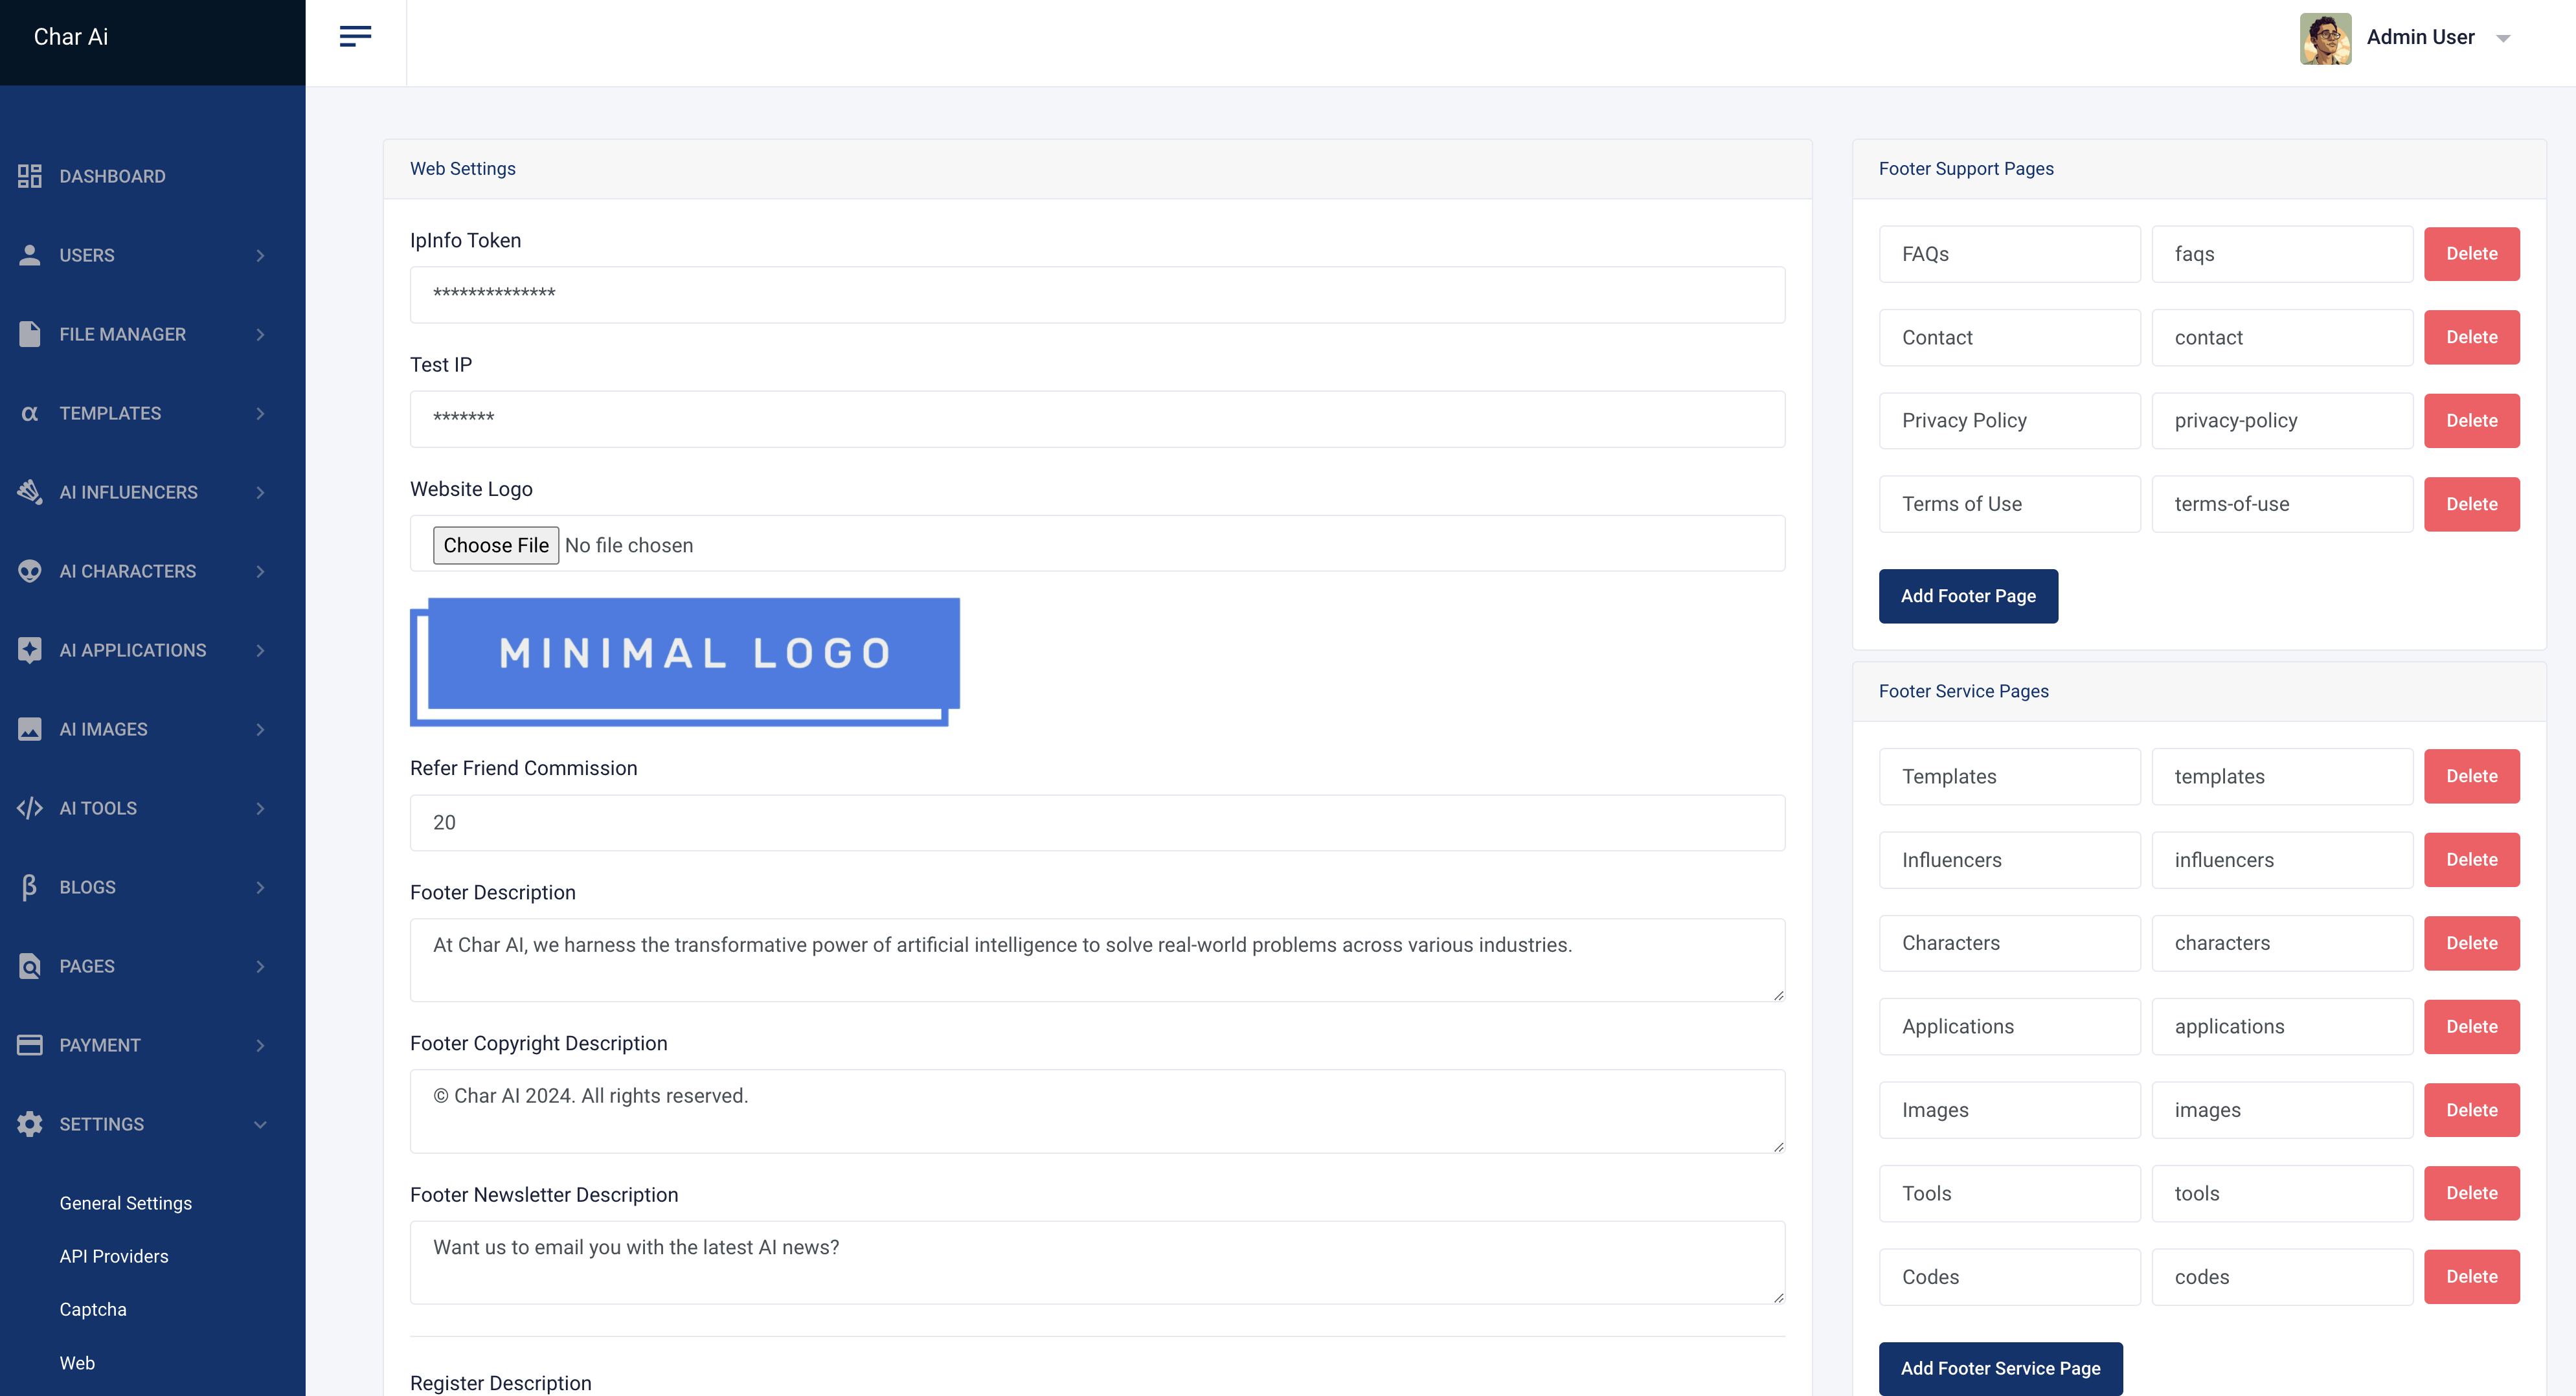
Web Settings
Important
You can manage the app's content and settings from the admin panel. You can add or remove pages, manage the app's content, and settings.
- Website logo.
- Some descriptions like footer, newsletter, eetc..
- Footer Service Pages
- Footer Social Links
- Footer Support Pages
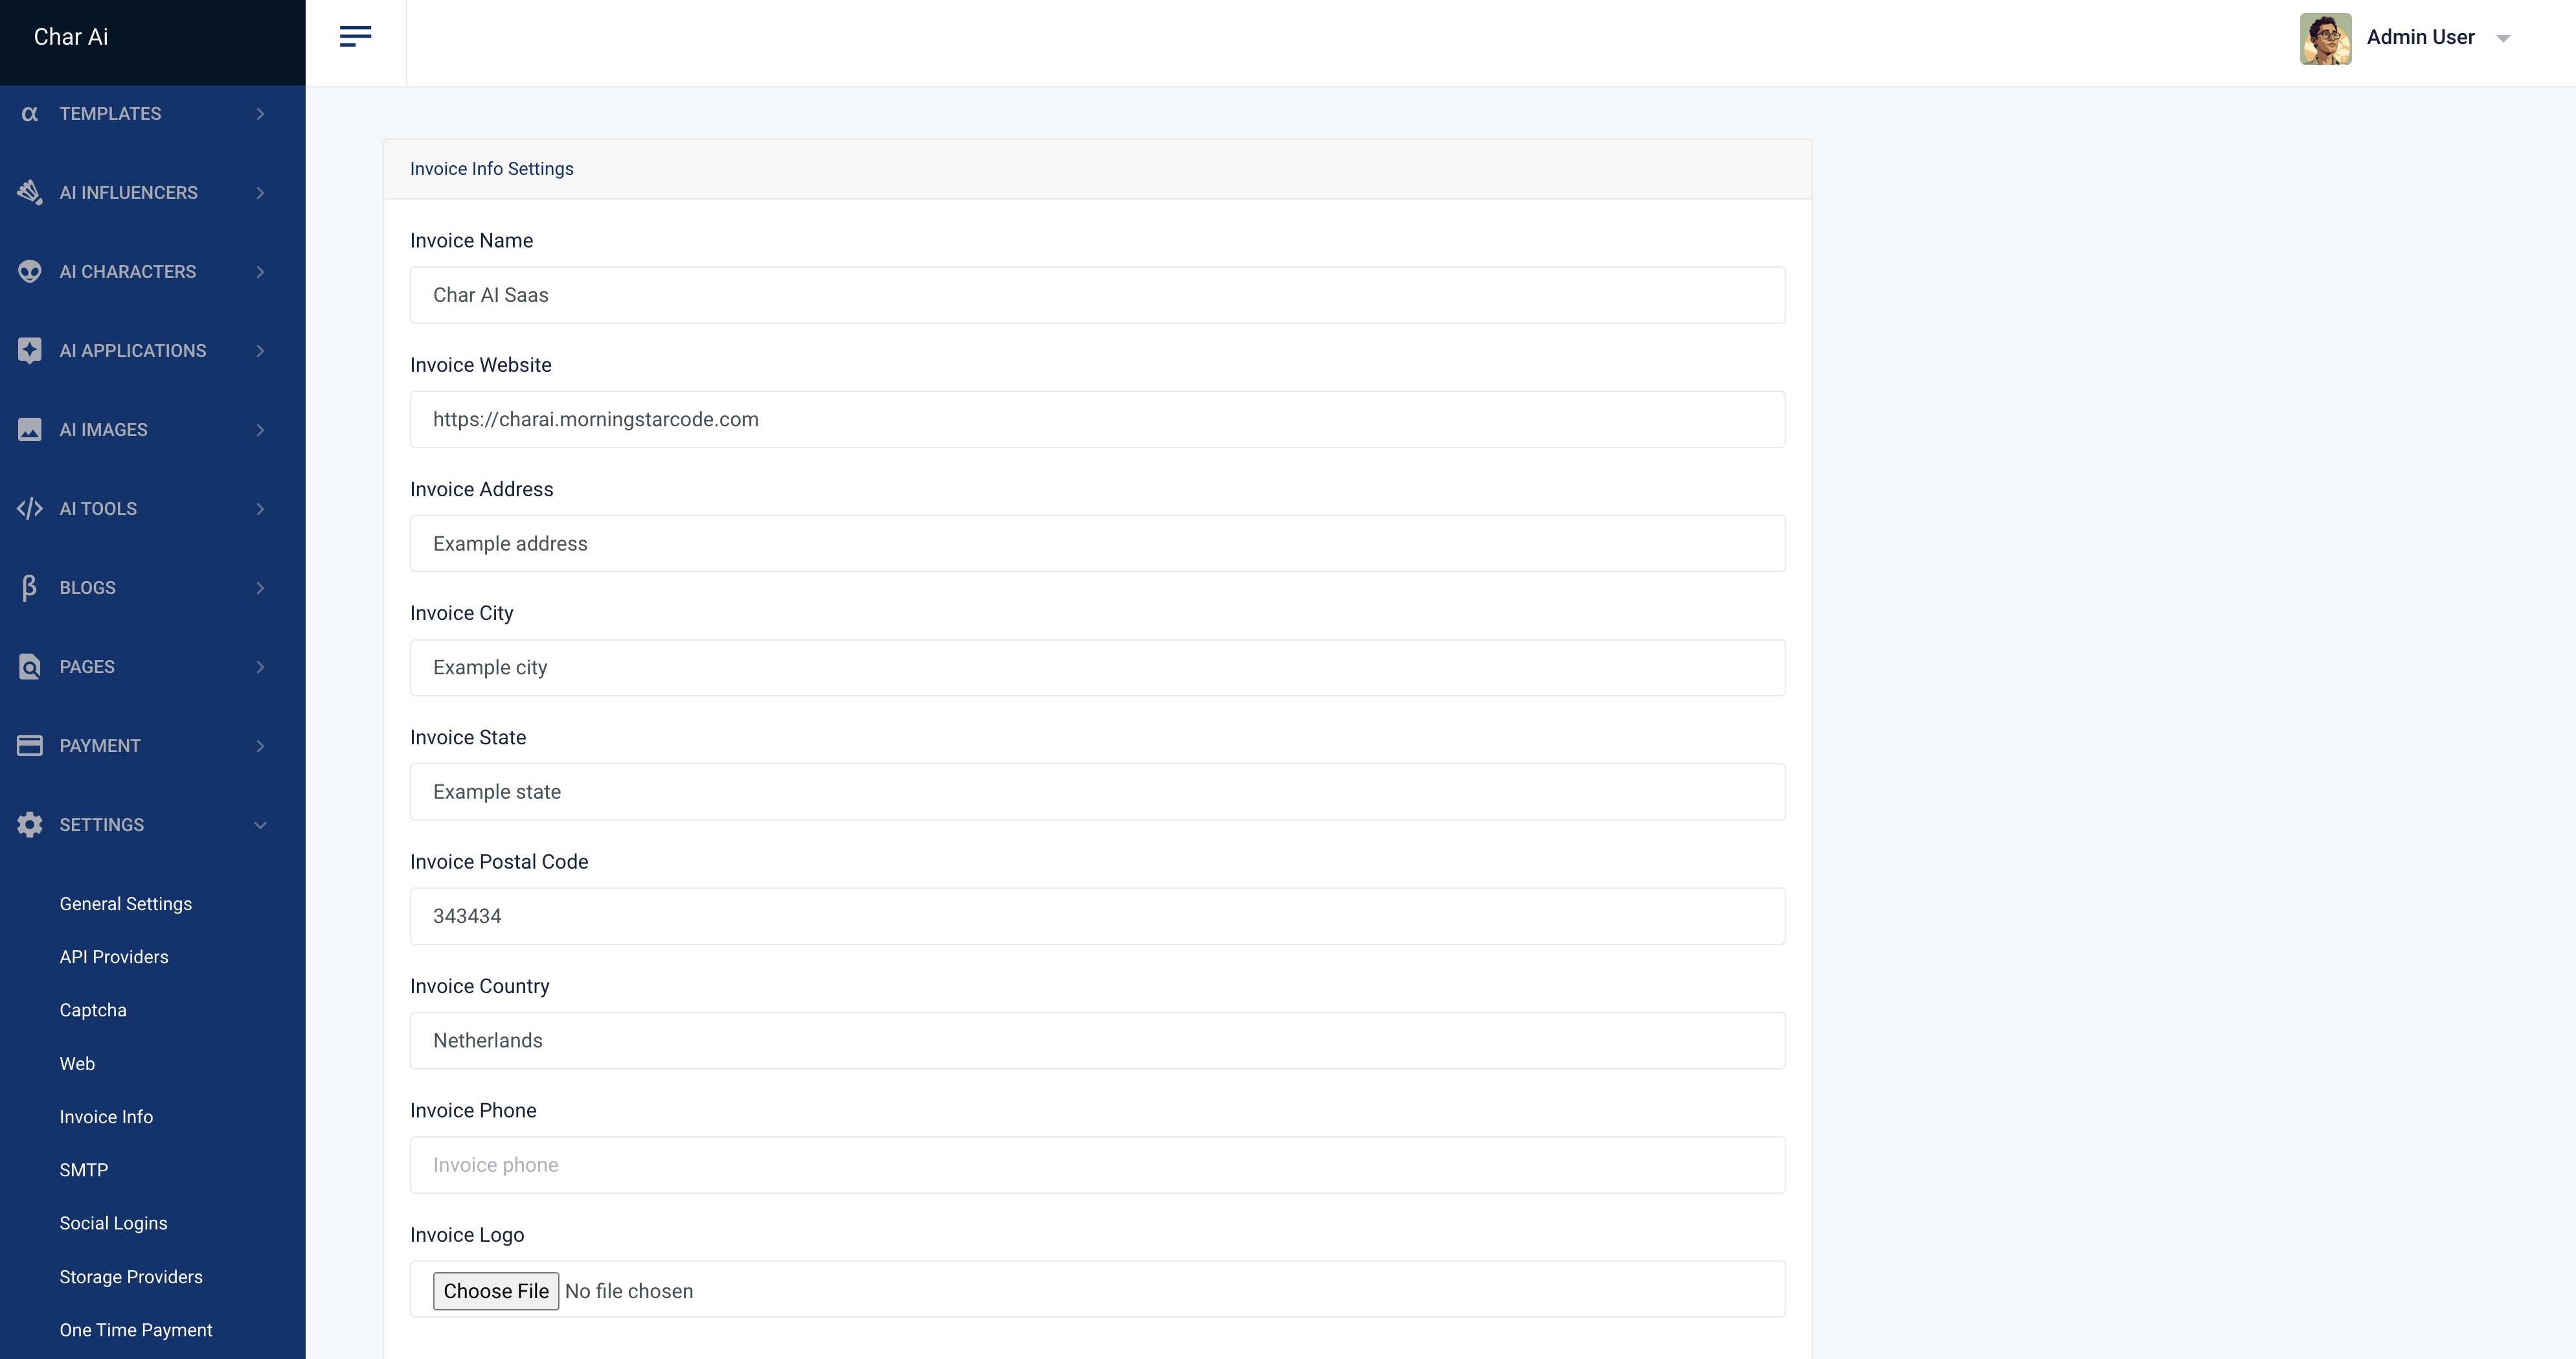
Invoice Info Settings
Important
You can update invoice information from the admin panel. You can add or remove invoice information.
- Invoice name.
- Invoice address.
- Invoice phone.
- Invoice email.
- Invoice website.
- Invoice city.
- Invoice country.
- Invoice logo.
SMTP Settings
Important
You can update SMTP settings from the admin panel. You can add or remove smtp settings.
- Mailer
- Host
- Port
- Username
- Password
- From Address

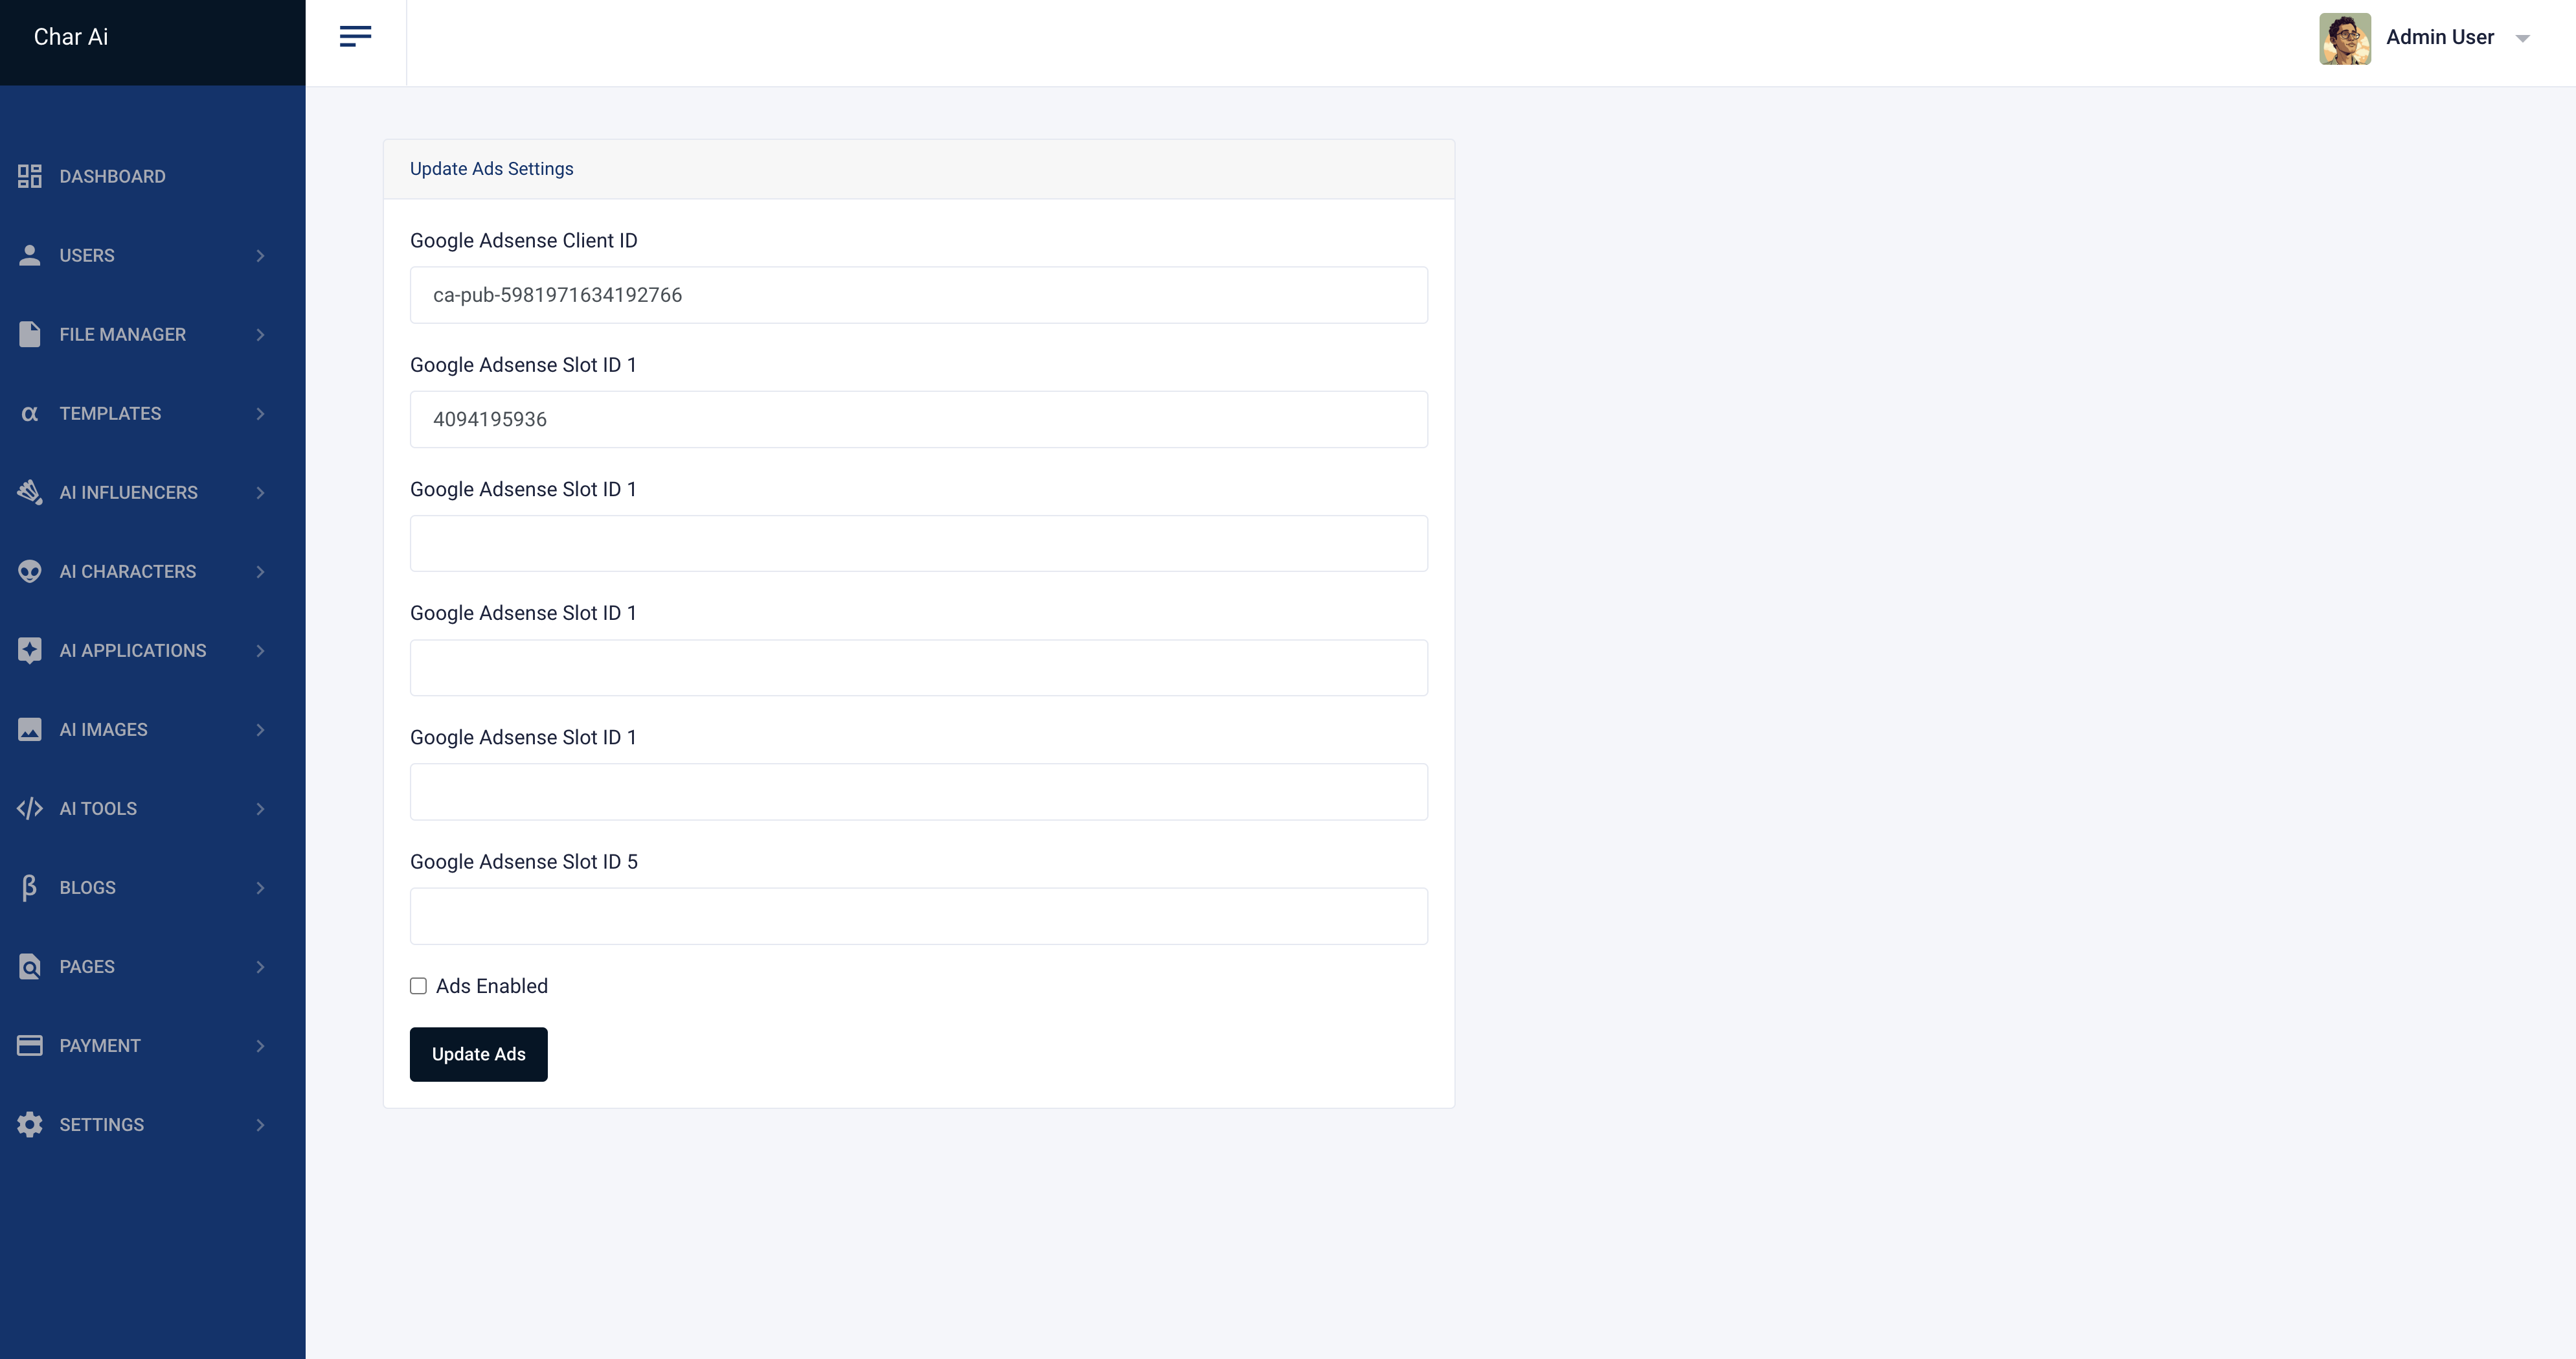
Google Adsense Settings
Important
Visit the Google AdSense Sign-Up Page. https://www.google.com/adsense
Enter Your Website URL:
- Provide the URL of the website where you want to display ads. Make sure that your website complies with Google’s AdSense policies.
- If you don't have a website yet, you can choose "I don't have a site yet" and set it up later.
Enter Your Email Preferences:
- Choose whether you want to receive customized help and performance suggestions.
- Click "Save and Continue".
Enter Your Payment Information:
- Fill in your payment details, including the country and time zone.
- Review and accept the AdSense terms and conditions.
Submit Your Application:
- After submitting your application, Google will review your site. This process can take a few days to a couple of weeks.
Access the AdSense Dashboard
- After your account is approved, sign in to your AdSense account.
Create Ad Units:
- In the left sidebar, click on "Ads".
- Select "By ad unit" and click on "Display ads", "In-feed ads", or "In-article ads" depending on where you want the ads to appear.
Copy the Ad Code:
- AdSense will generate a piece of HTML code.
- Copy this code, as you will need to insert it into your website.
Full detail on how to create an Google Adsense integration can be found here.
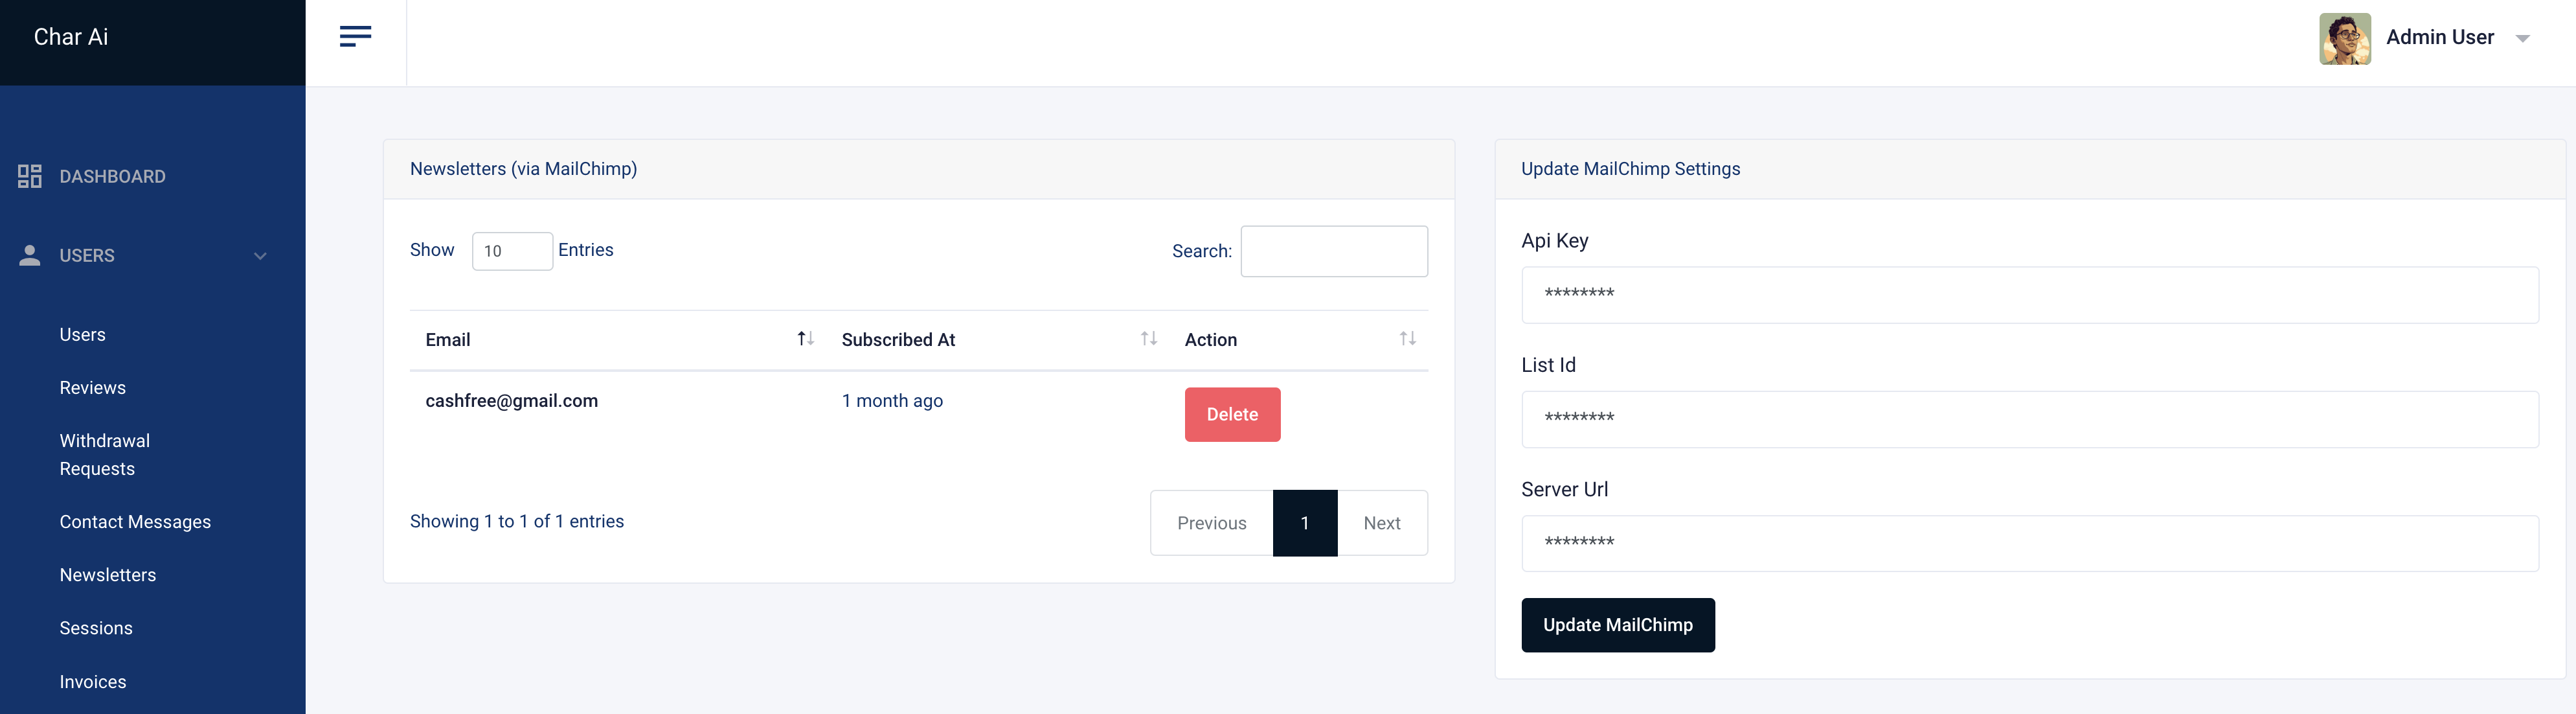
MailChimp
Important
Go to the Mailchimp website.
Click on "Sign Up Free" and create an account by following the on-screen instructions.
https://login.mailchimp.come
After creating your account, you will be prompted to set up your profile, including your
company details, address, and other relevant information.
Create an Audience:
- Once your account is set up, navigate to the "Audience" section in the Mailchimp dashboard.
- Click on "Create Audience" and follow the prompts to set up your audience (mailing list). This is where your subscribers will be added.
Configure Audience Settings:
- Set the audience name, default email address, and other settings.
- Save your audience.
Access API Keys:
- In the Mailchimp dashboard, click on your profile name in the bottom left corner.
- Go to "Account" -> "Extras" -> "API keys".
Create an API Key:
- Click on "Create A Key" to generate a new API key.
- Copy the API key as you will need it to connect your Laravel application with Mailchimp.

Full detail on how to create an MailChimp integration can be found here.
Admin Features
You can manage folders, files, templates, AI models, users, subscriptions, characters, applications, tools, subscription packages, images, blogs, pages, payment settings, and other settings from the admin panel.

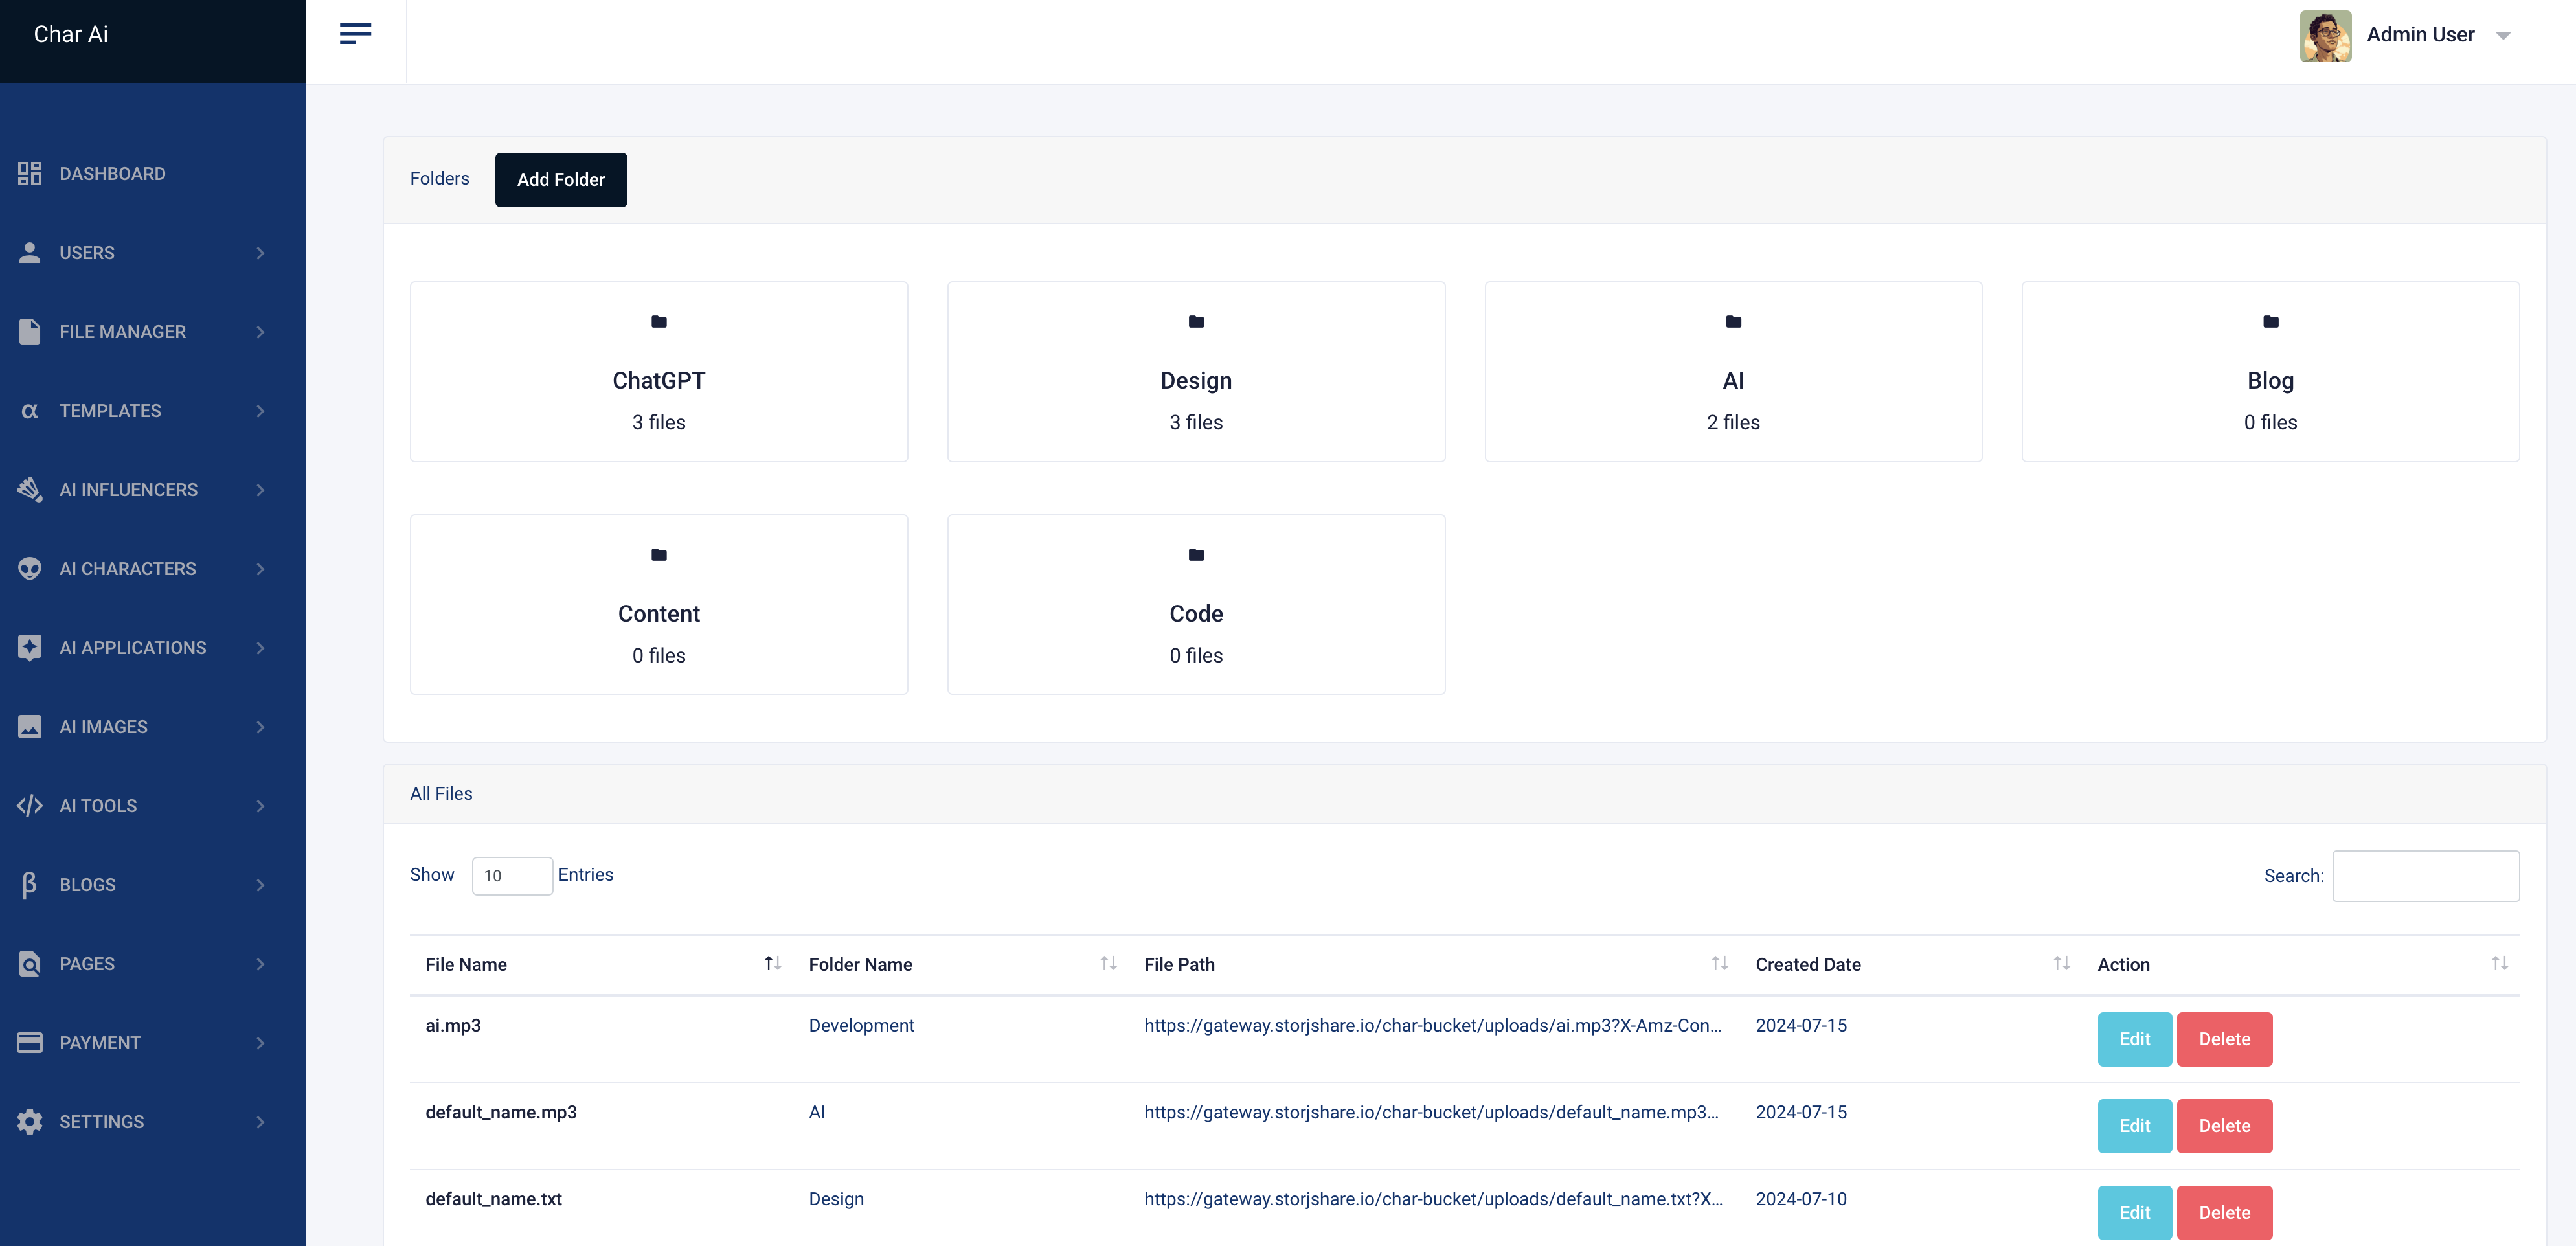
File Manager
Manage folders and files from the admin panel. You can edit, create, delete folders and files. You can save template or tool prompt results to files and folders.
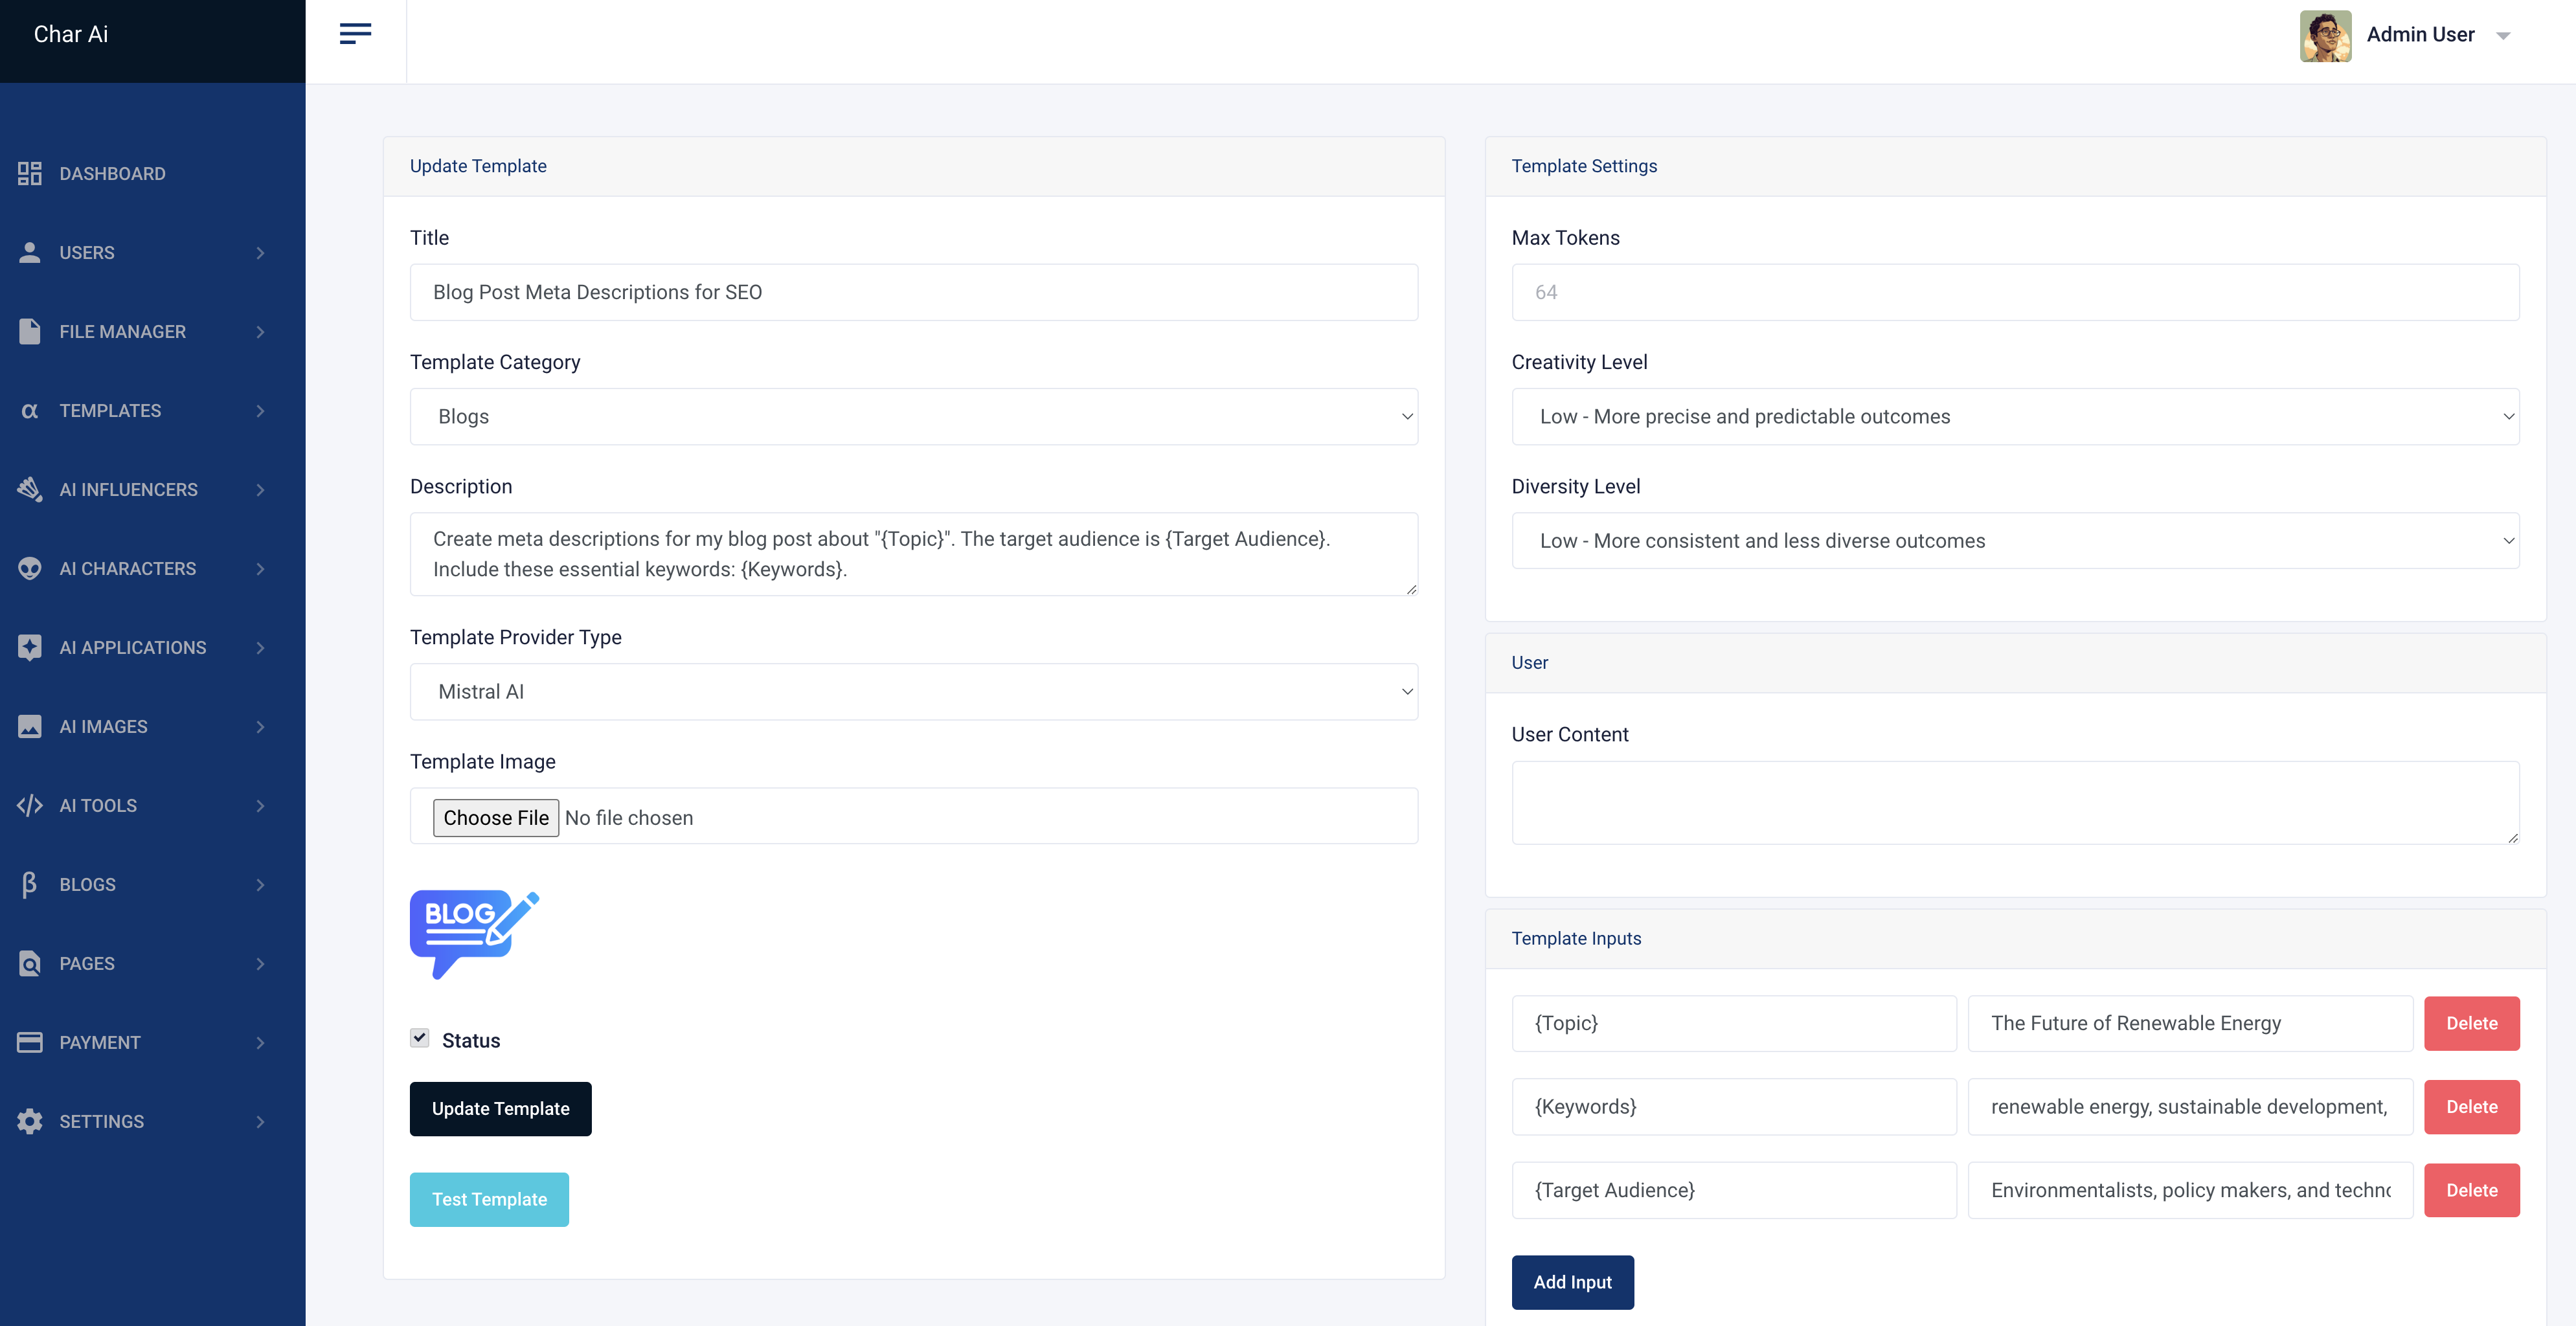
Templates
You can manage prompt templates easily and dynamically from the admin panel. You can create, edit, delete, and manage templates. You can test templates with AI models.

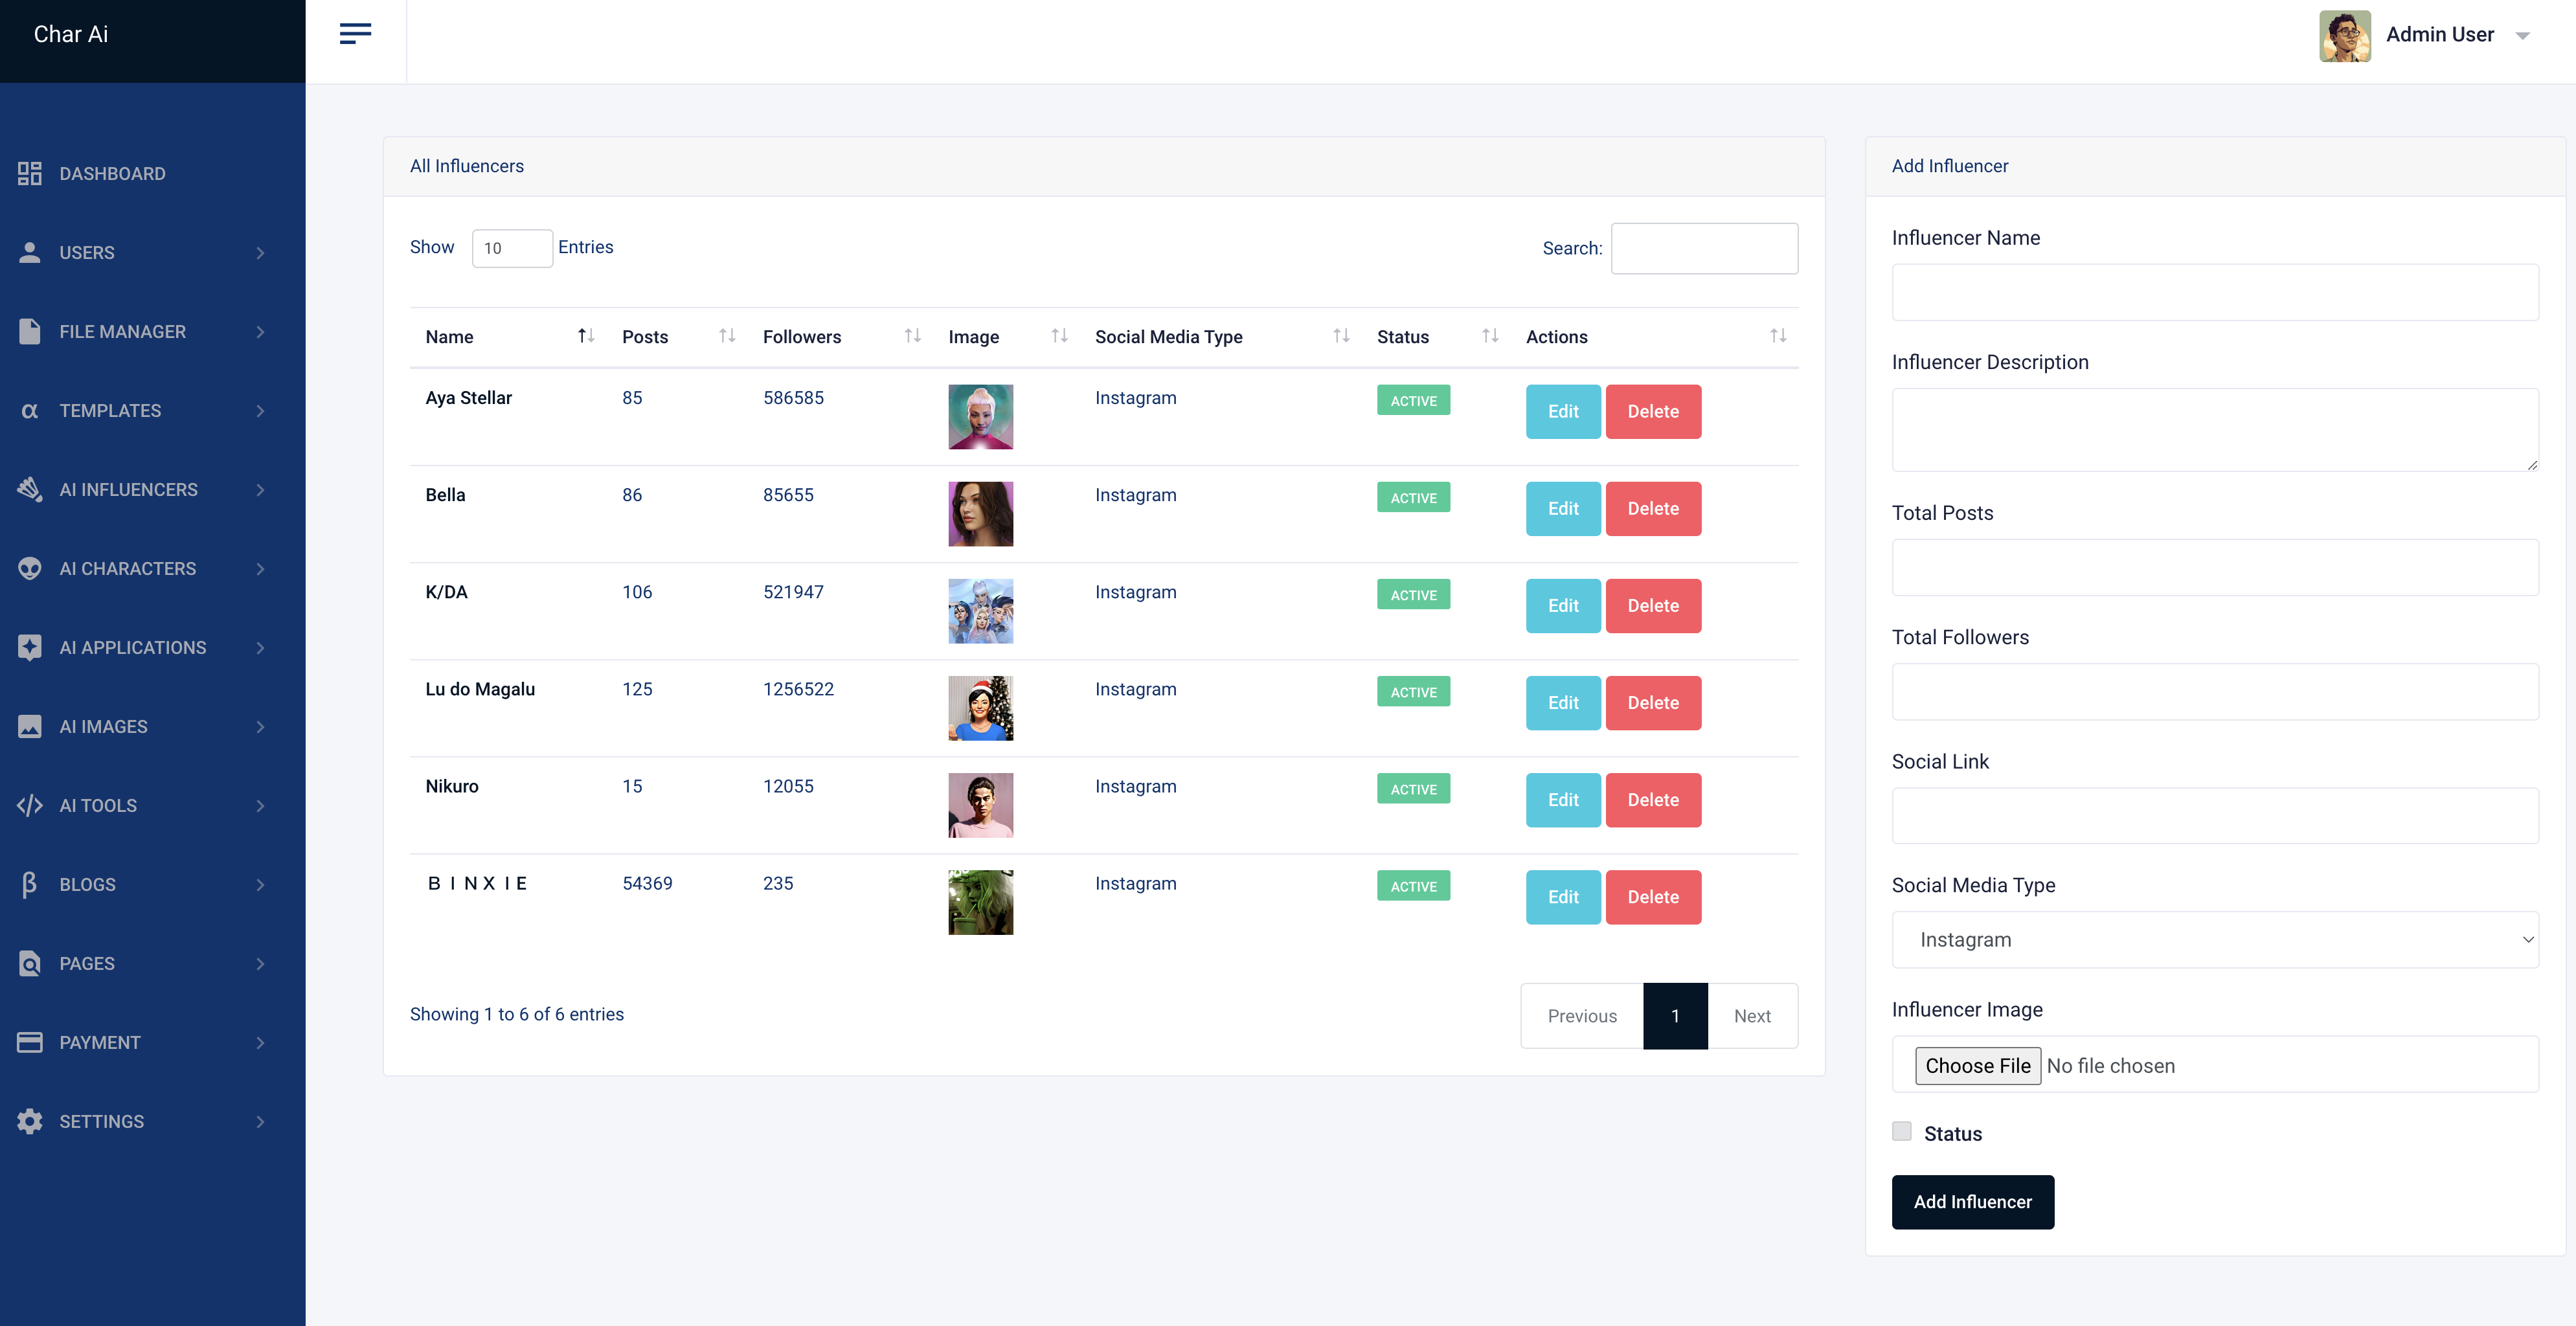
AI Influencers
You can manage AI influencers easily and dynamically from the admin panel. You can create, edit, delete, and manage influencers.
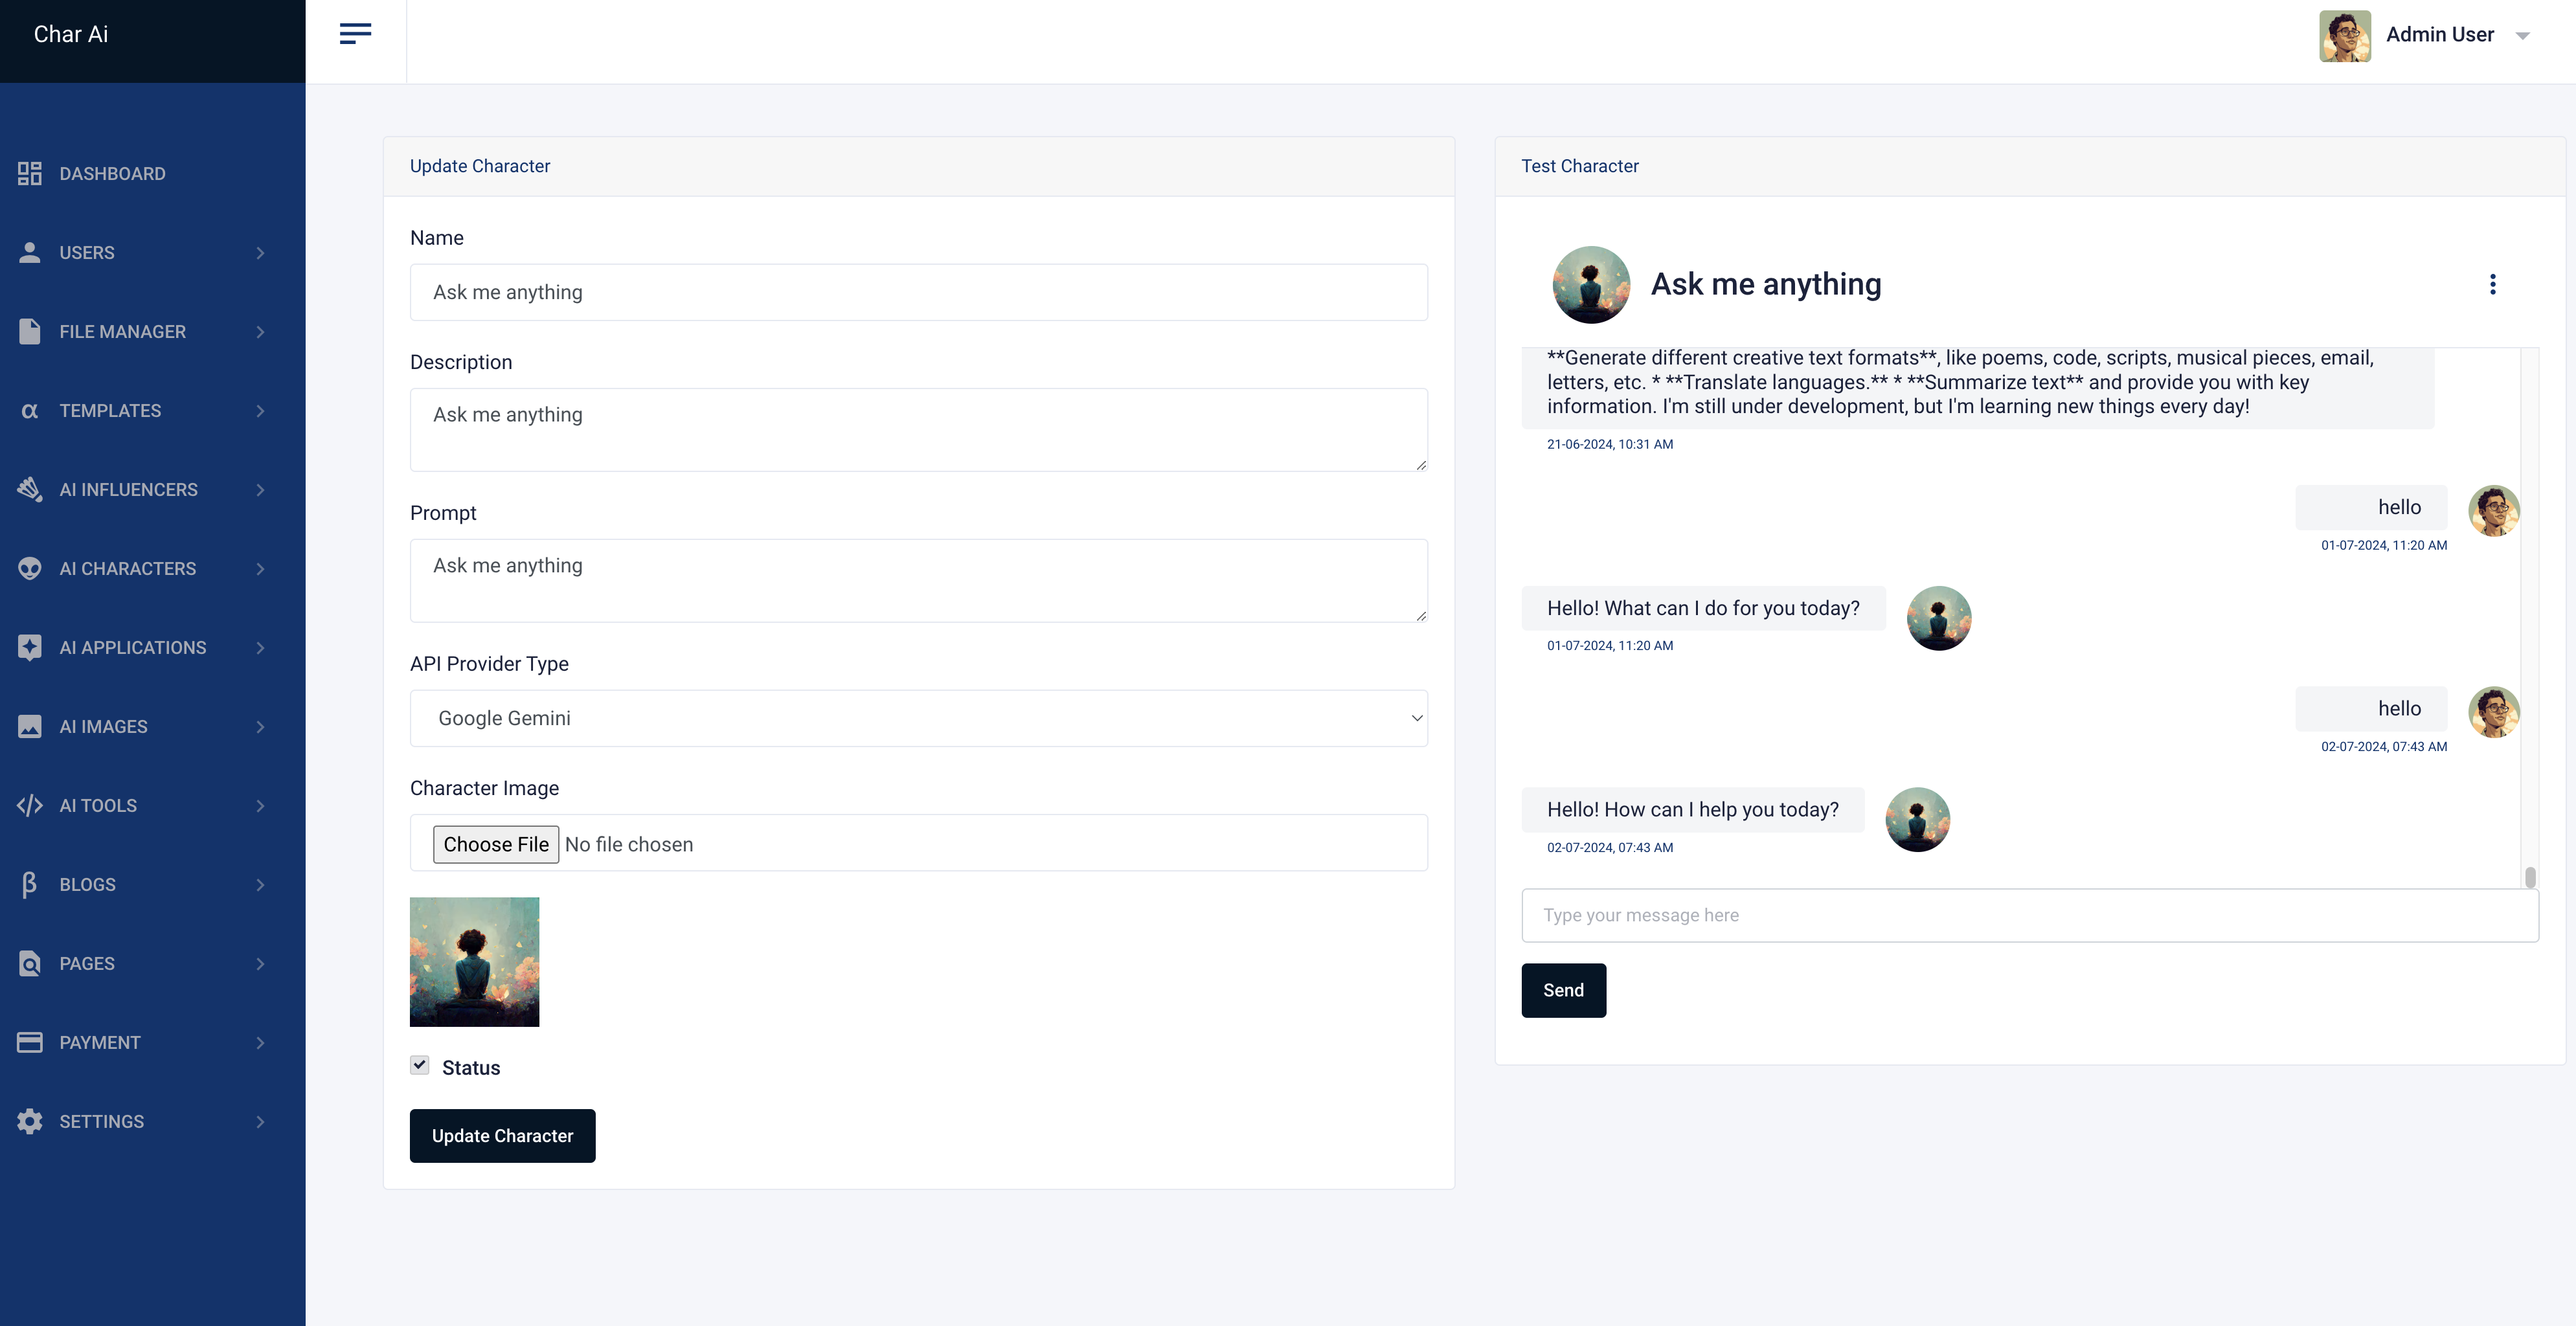
AI Characters
You can manage AI characters easily and dynamically from the admin panel. You can create, edit, delete, and manage characters. You can test characters with AI models by chatting with them.

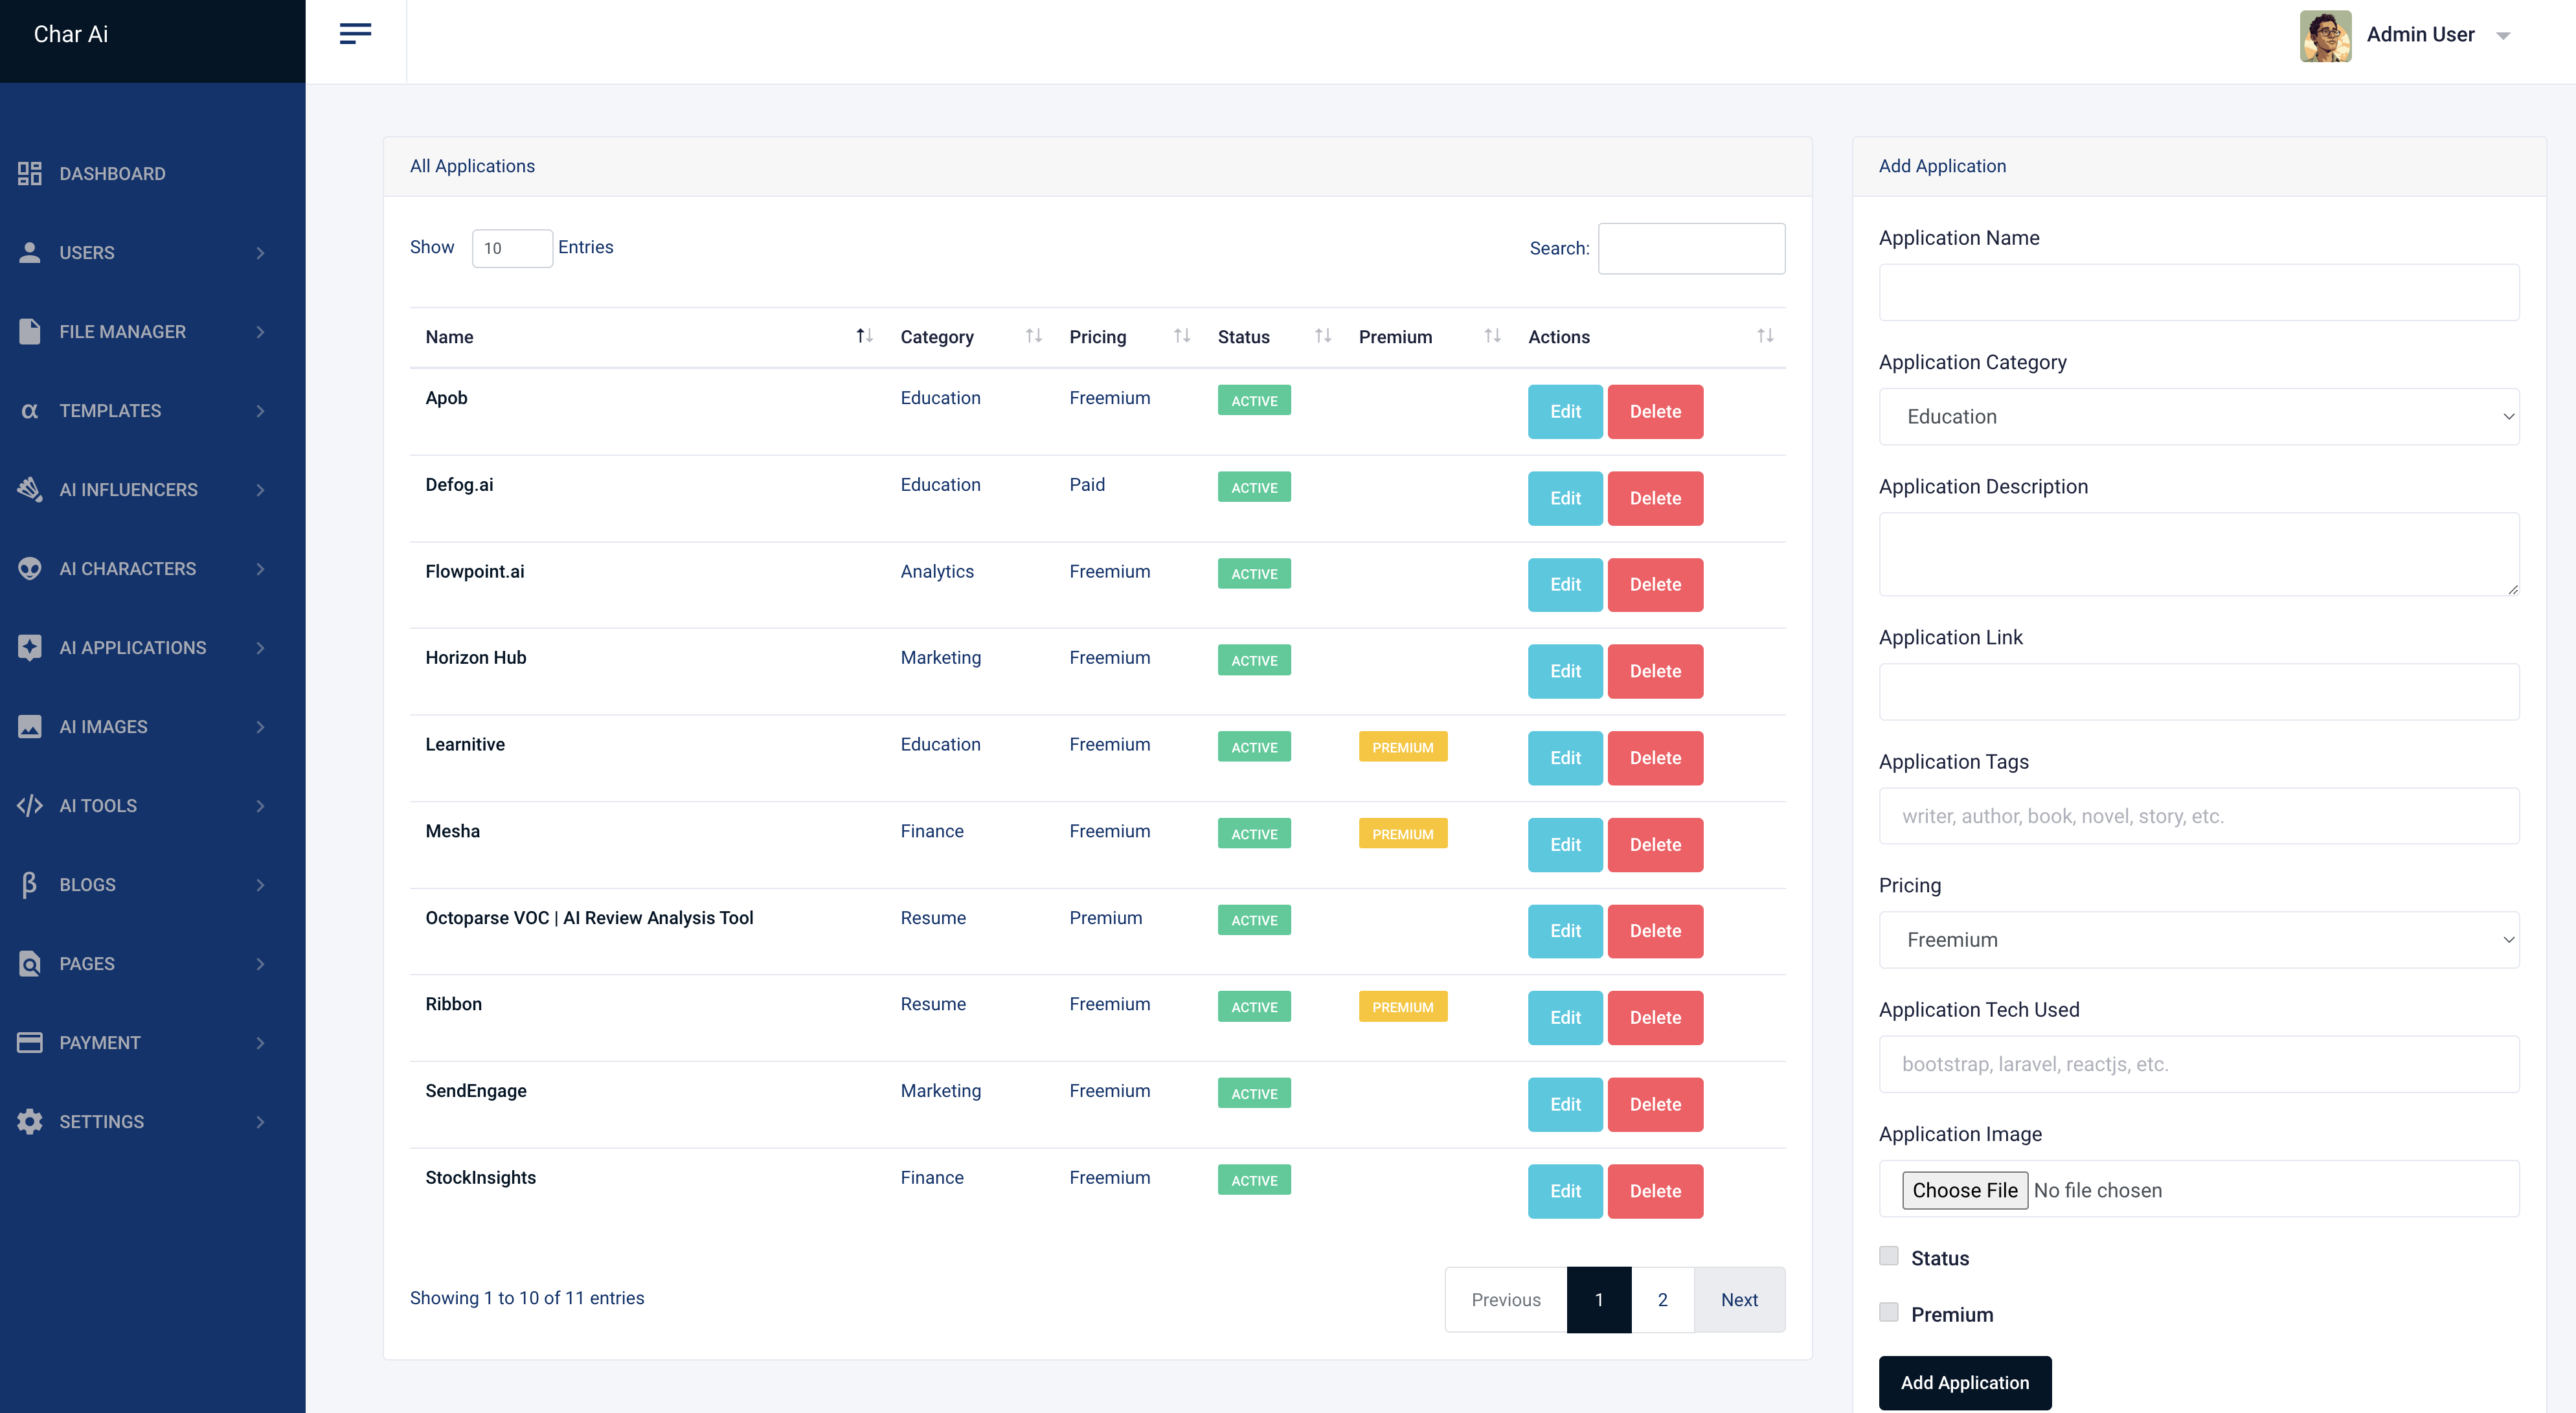
AI Applications
You can manage AI ecosystem applications easily and dynamically from the admin panel. You can create, edit, delete, and manage applications. You can promote applications to users.
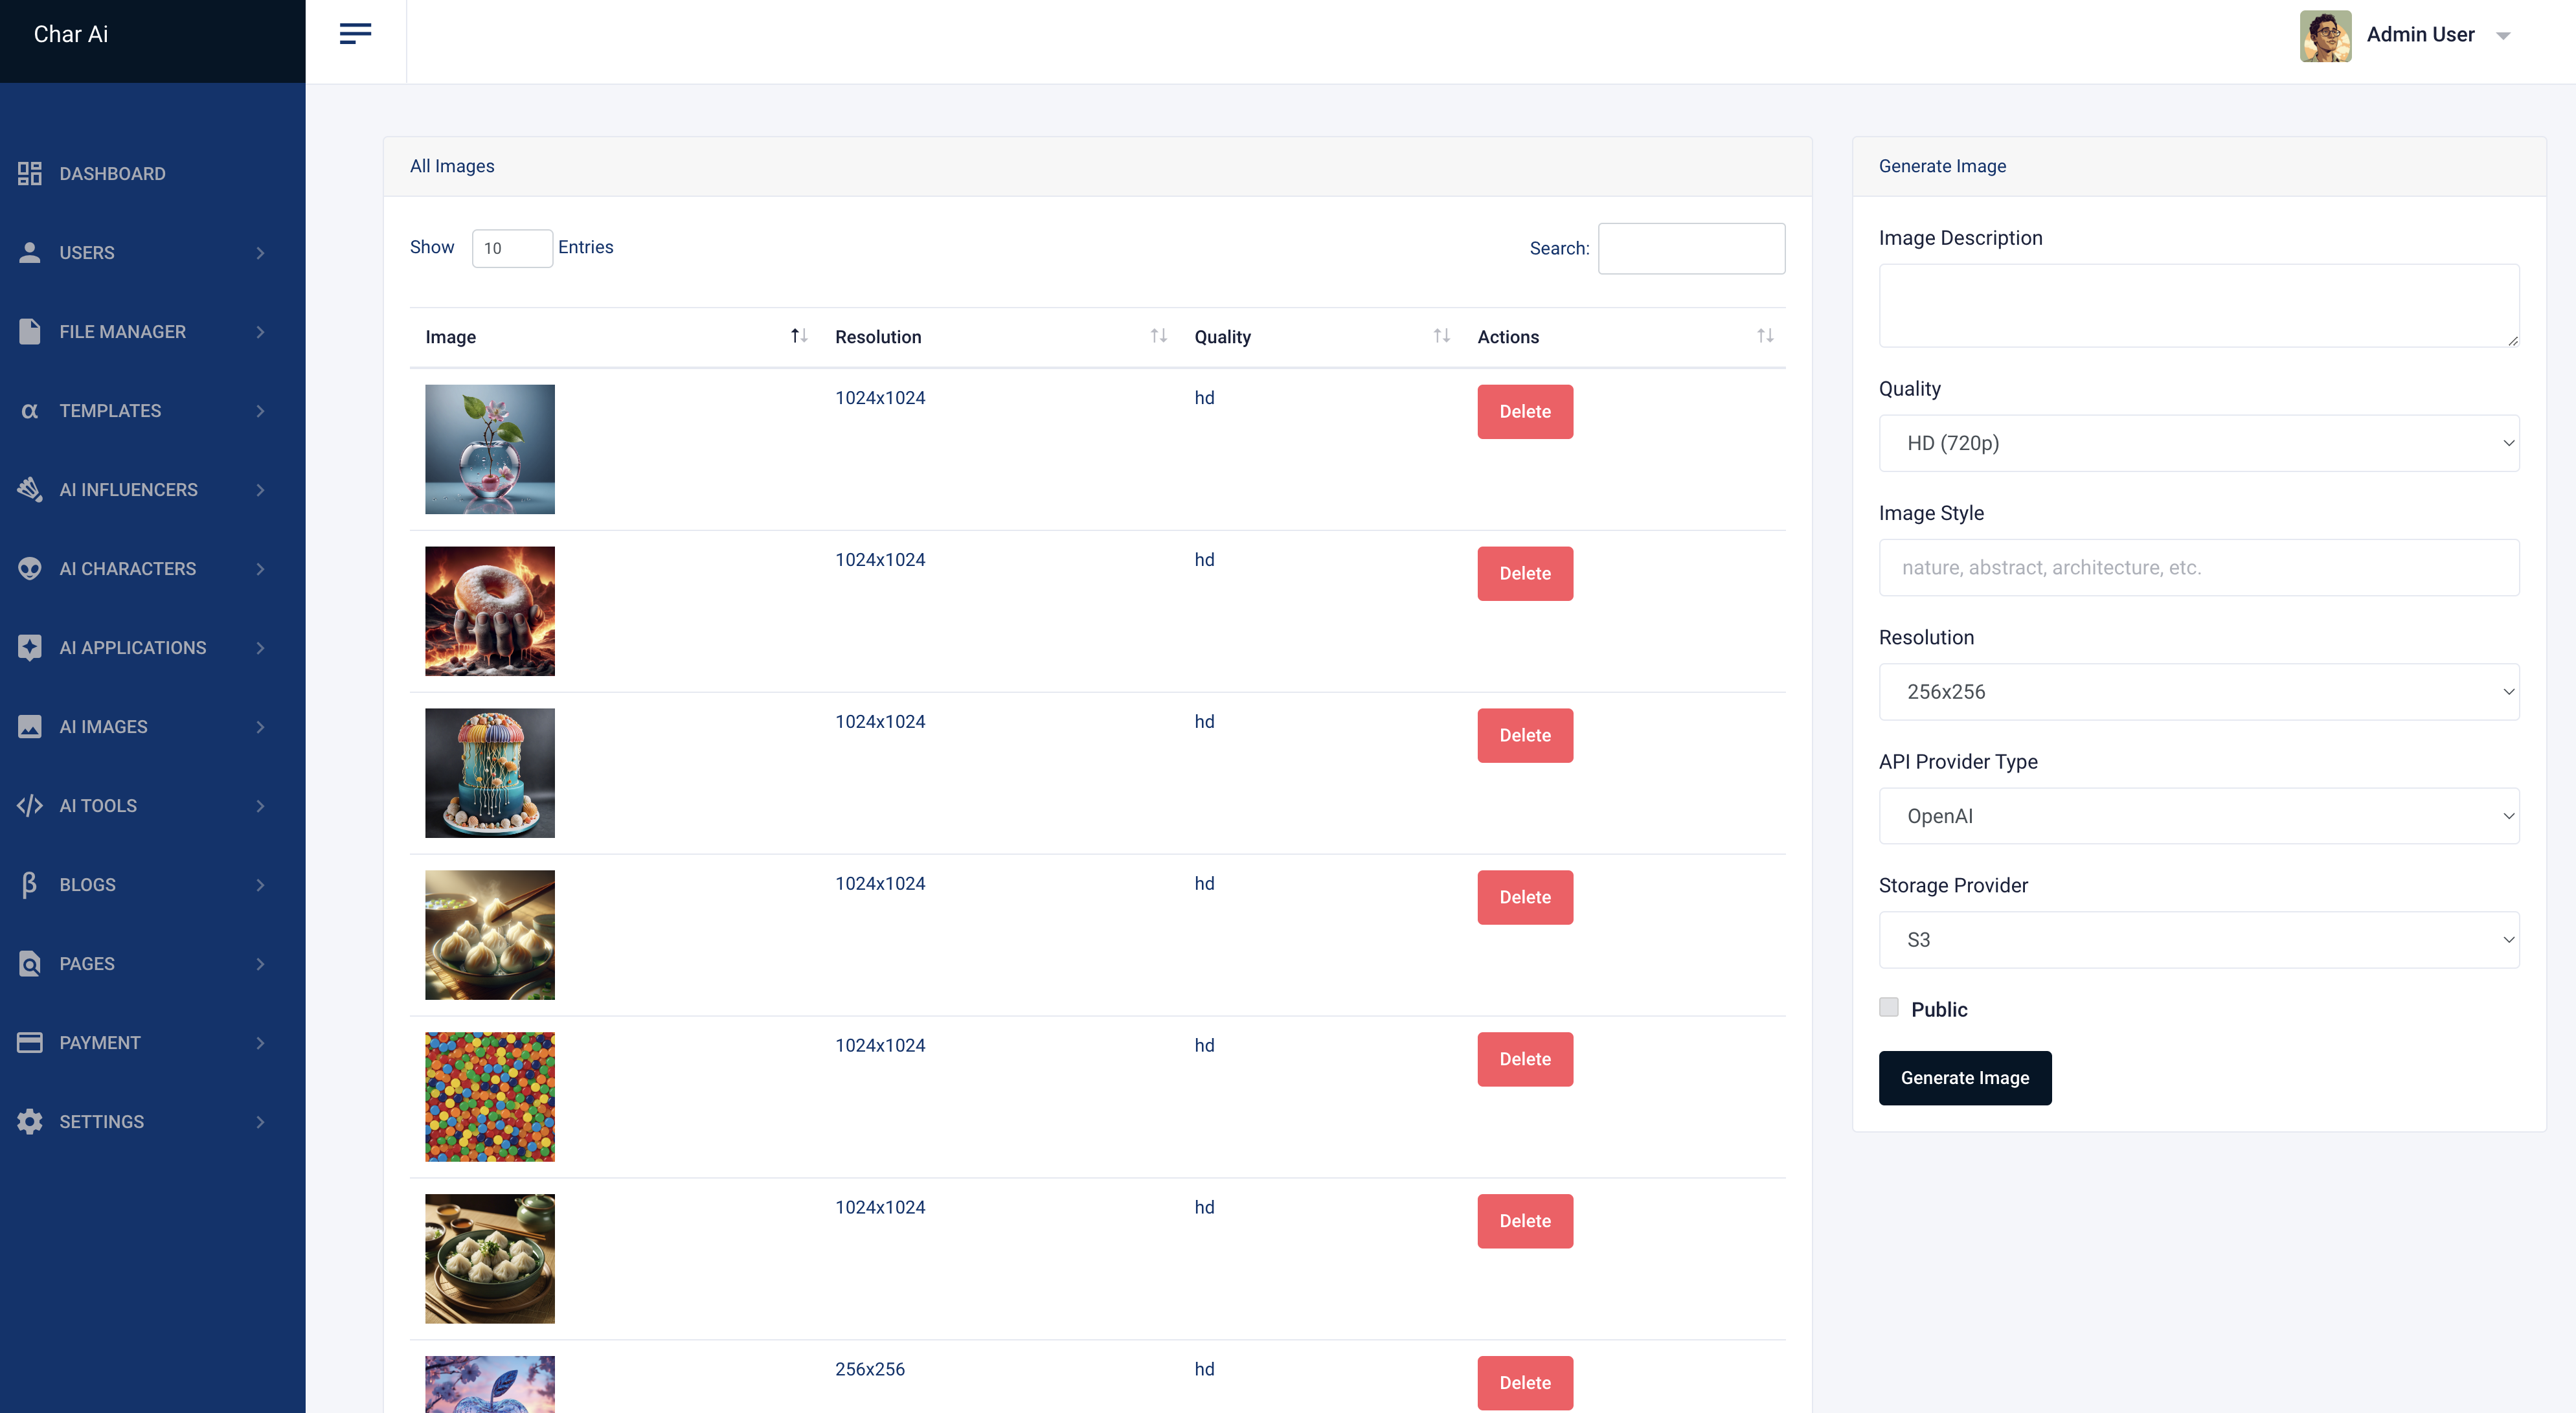
AI Generated Images
You can manage AI generated images easily and dynamically from the admin panel. You can generate, view, delete, and manage images.
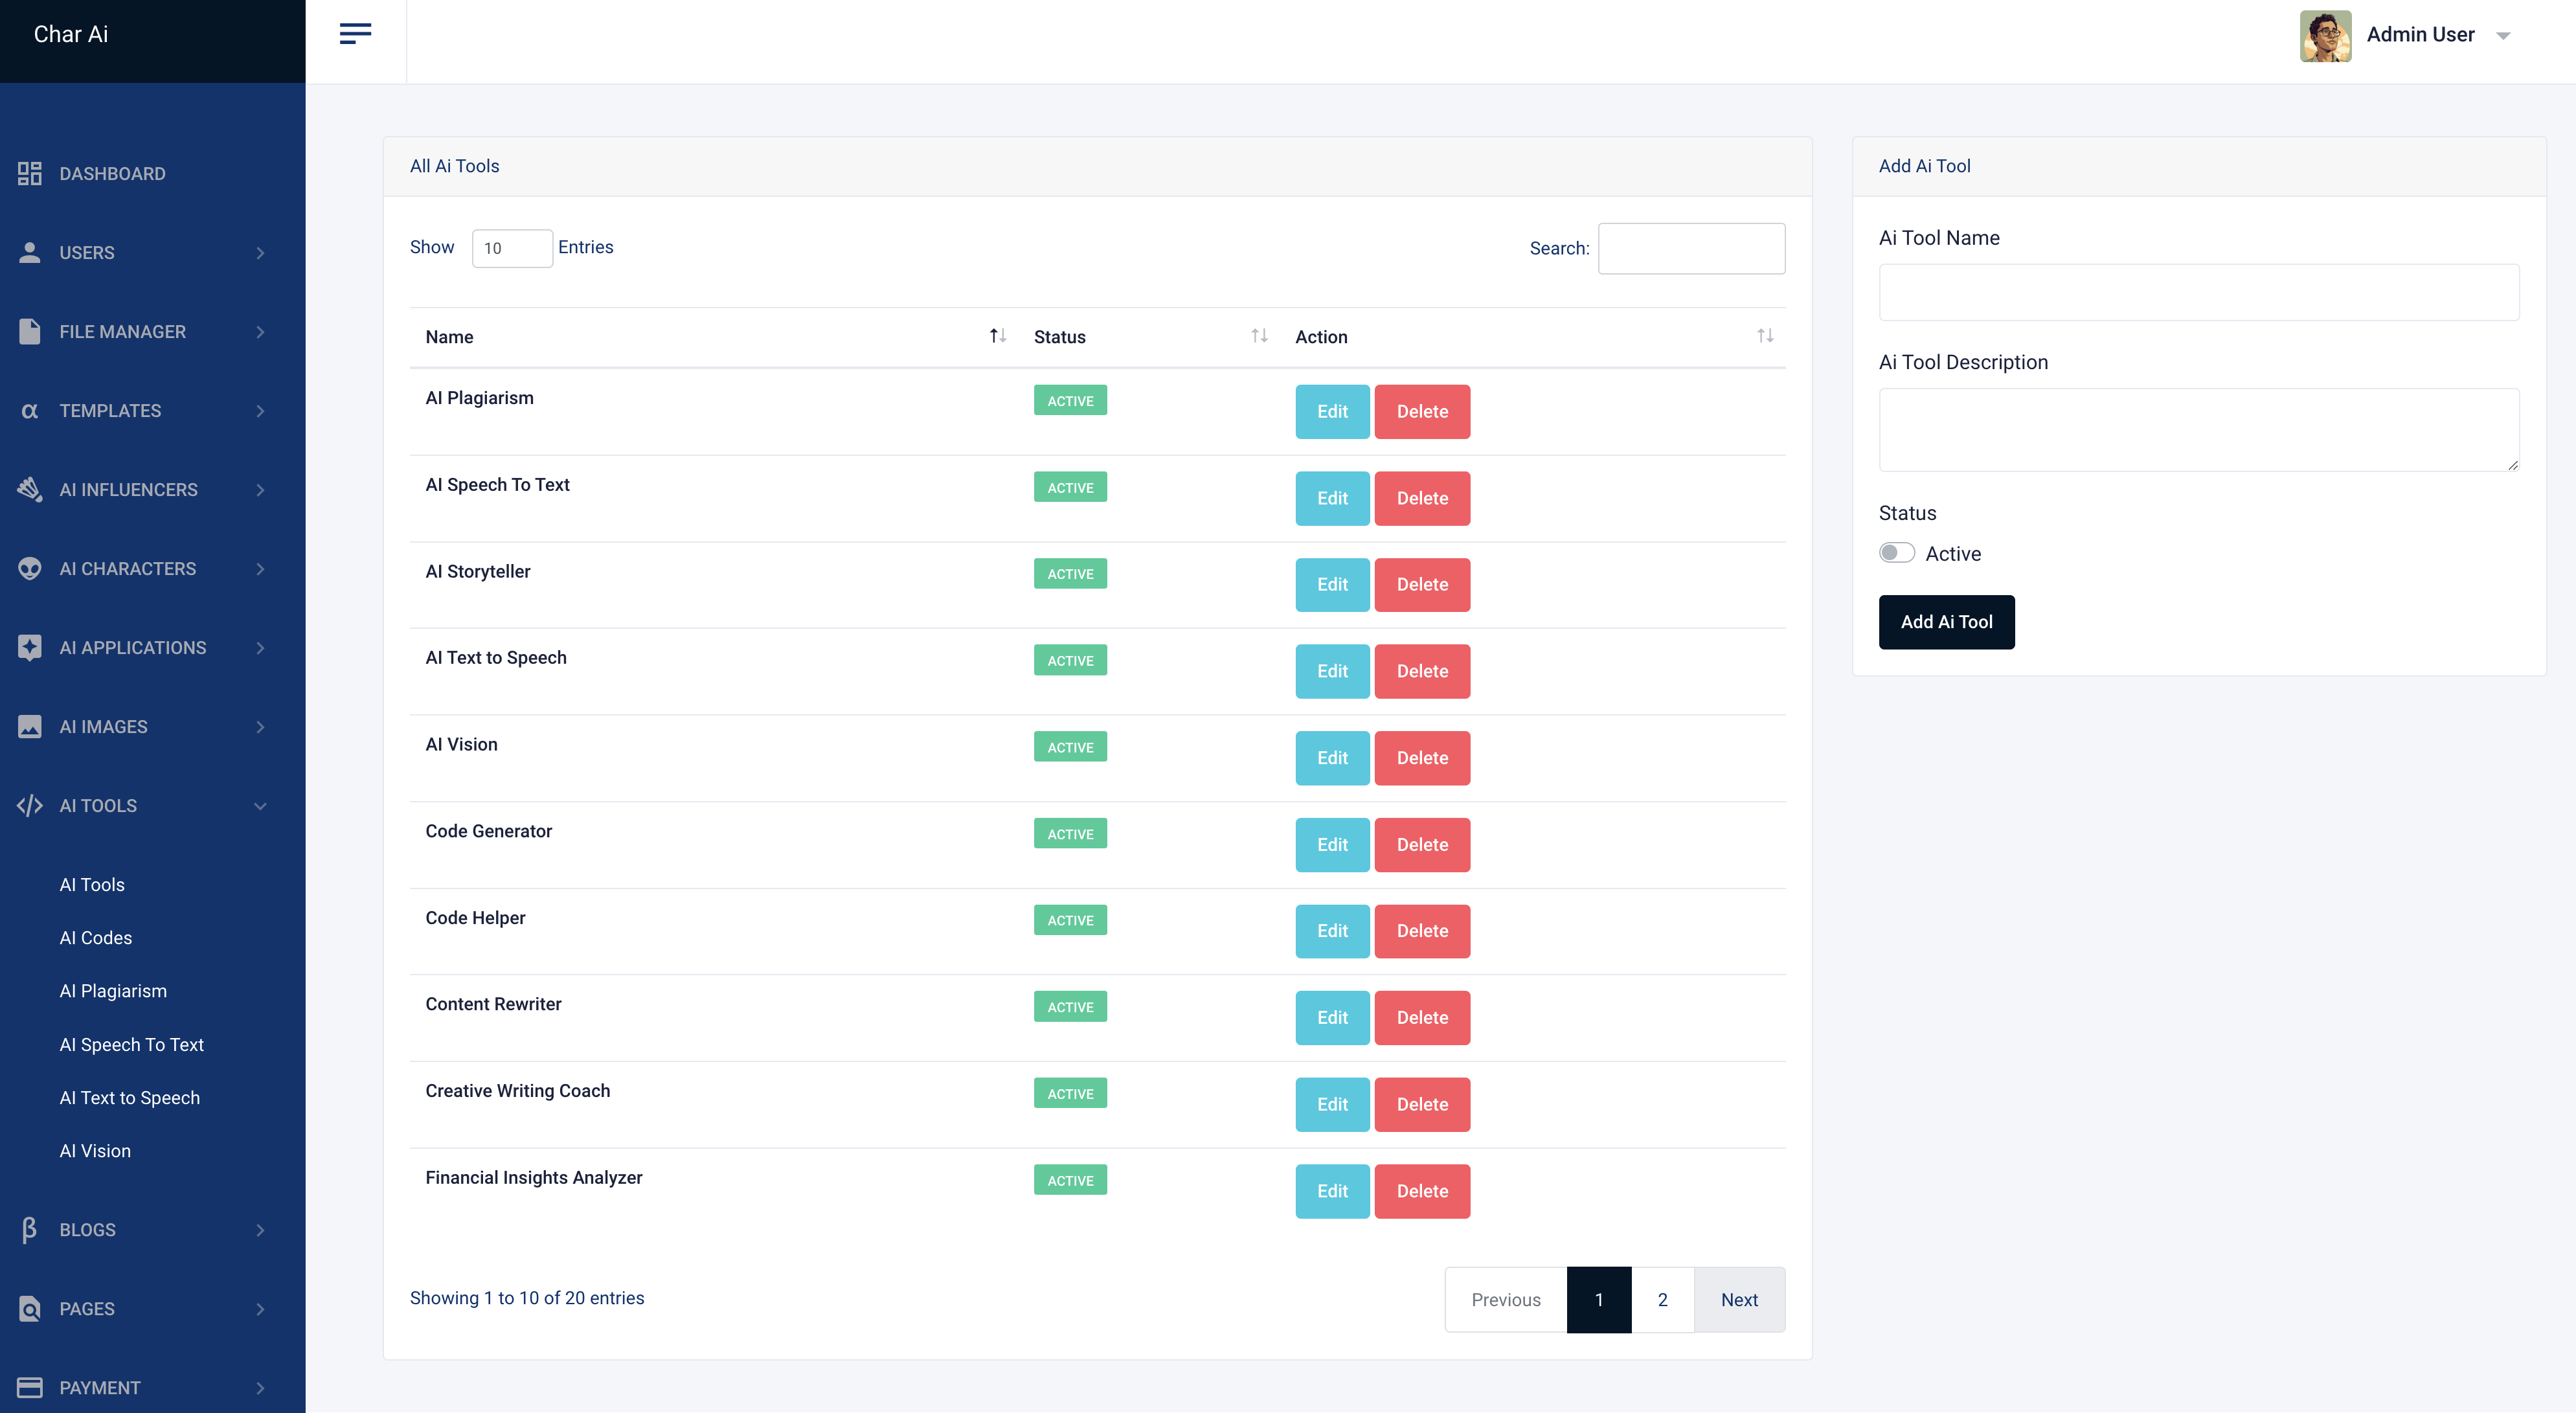
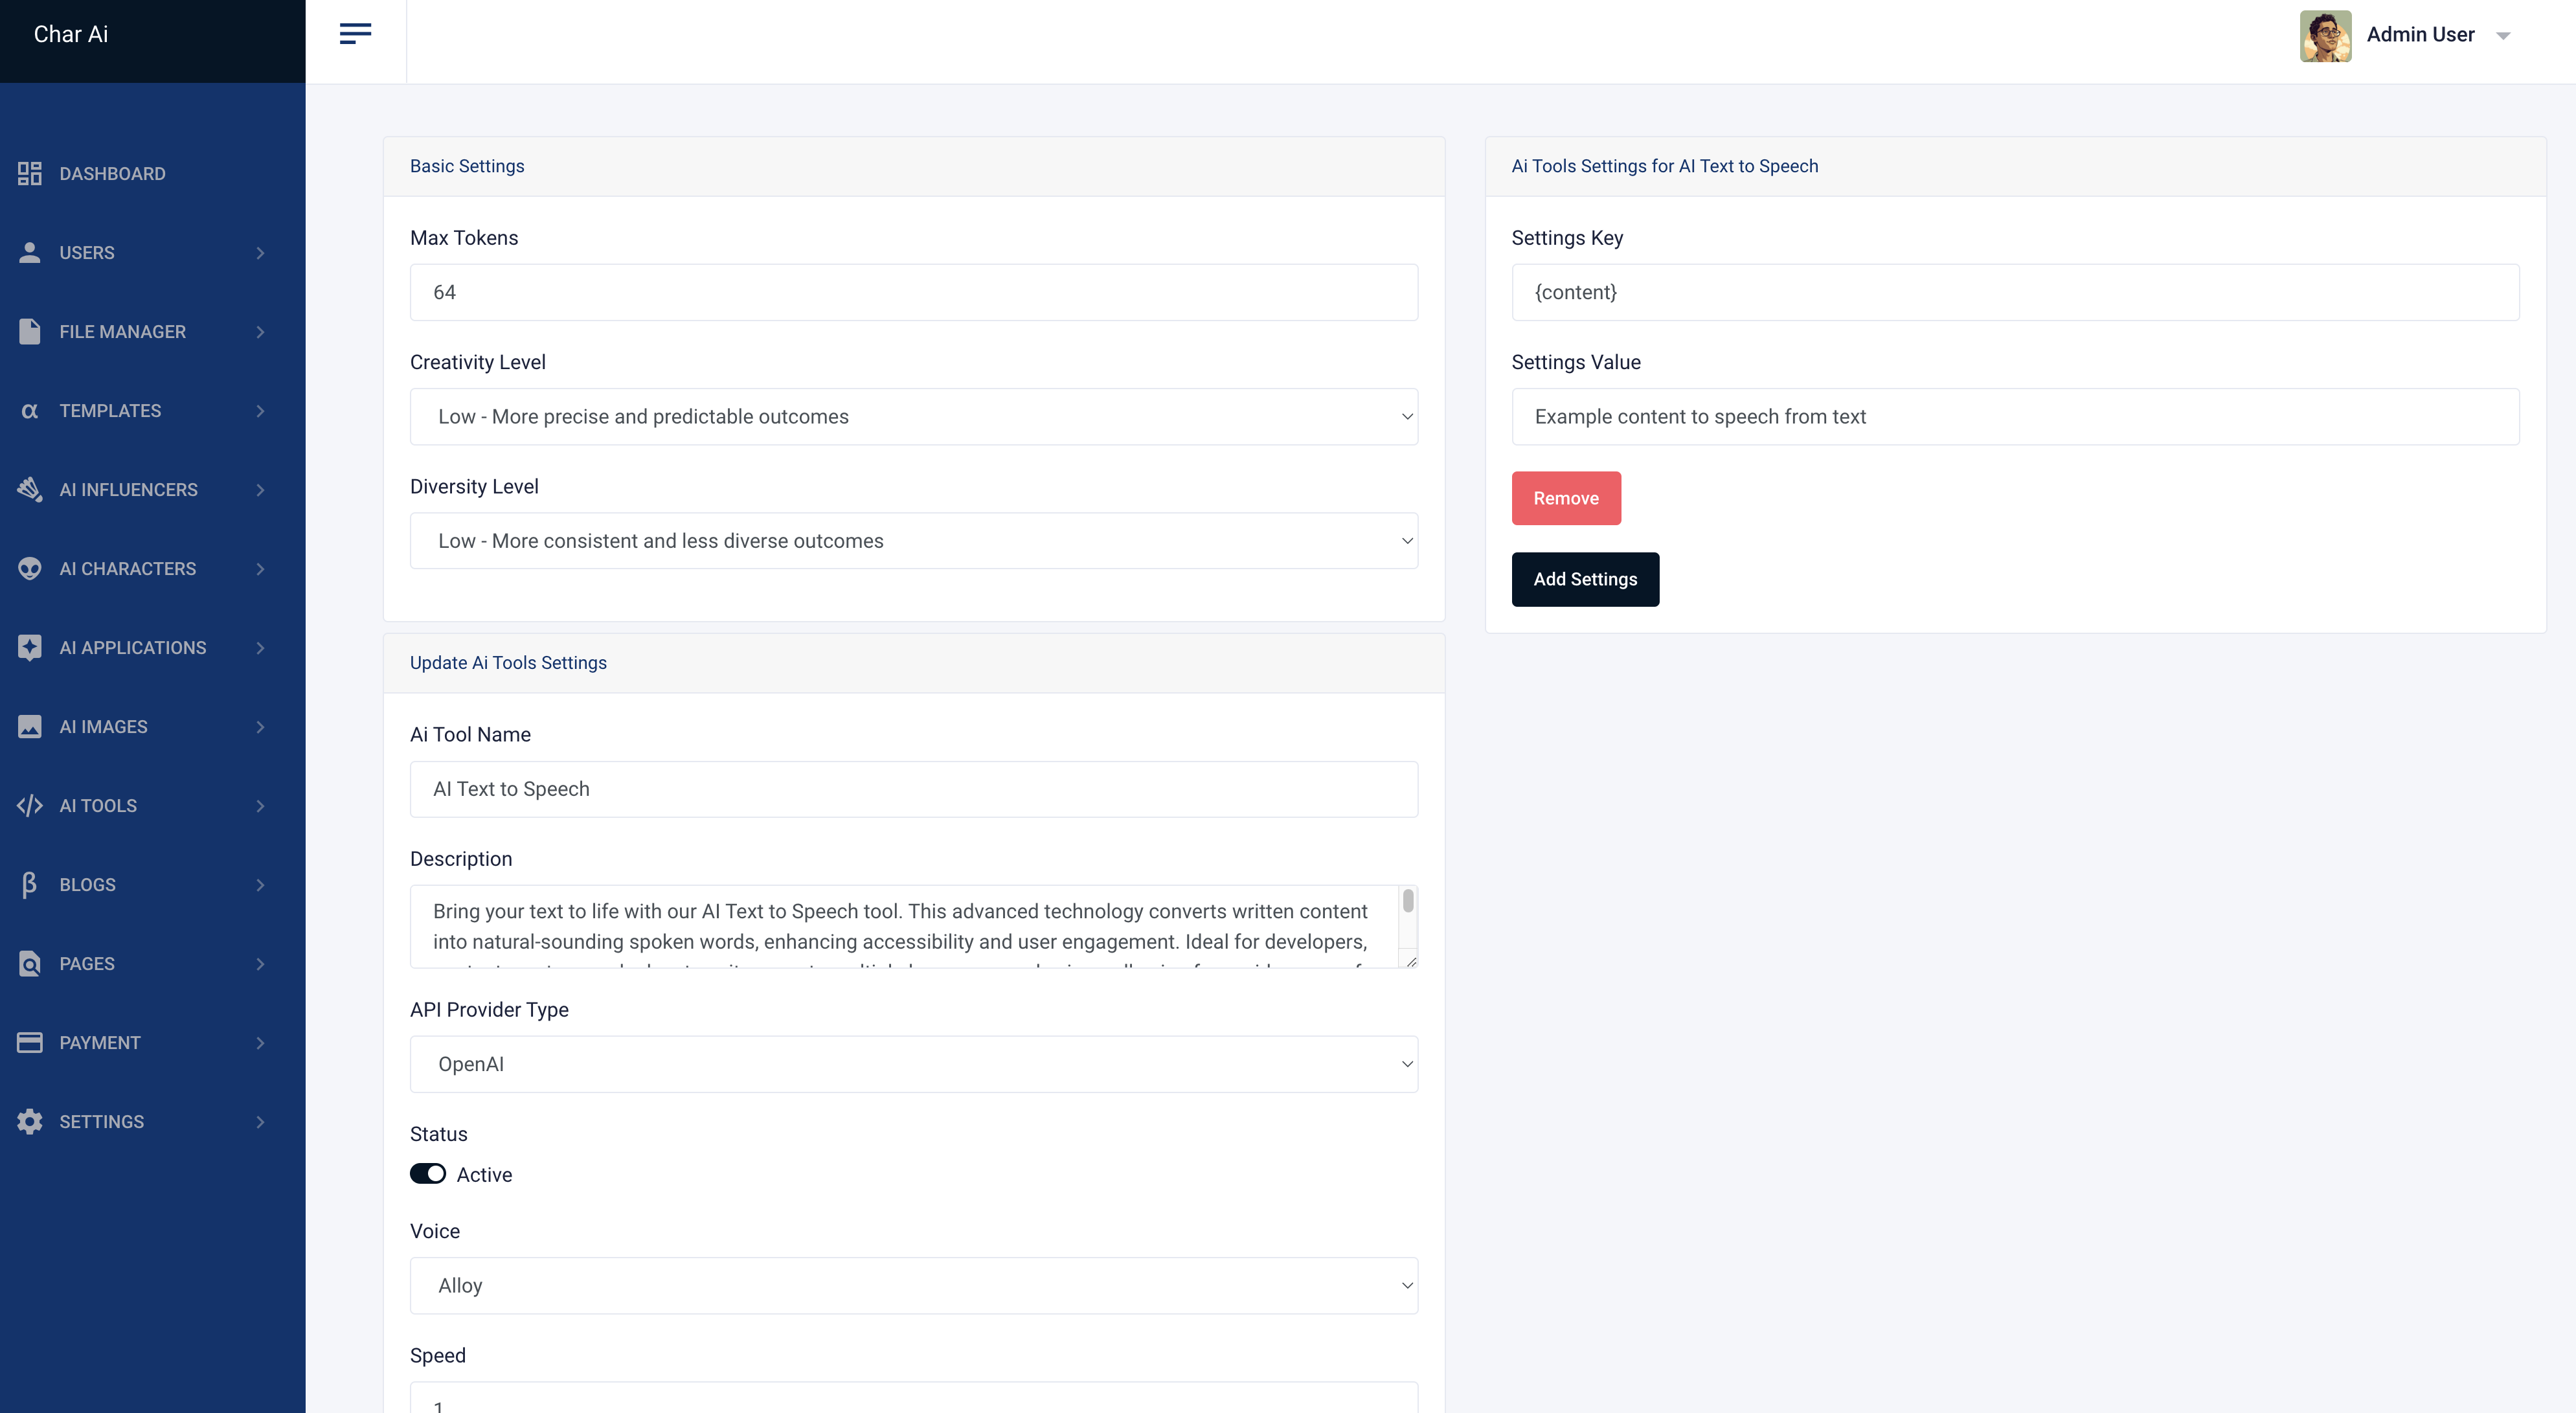
AI Tools
You can manage AI tools easily and dynamically from the admin panel. You can add, delete, edit, test, and manage tools. You can test tools with AI models.
Some pre-built tools are available in the system.
- AI Codes
- AI Plagiarism
- AI Speech To Text
- AI Vision
- AI Storyteller
- Content Rewriter
- Financial Insights Analyzer
- etc.
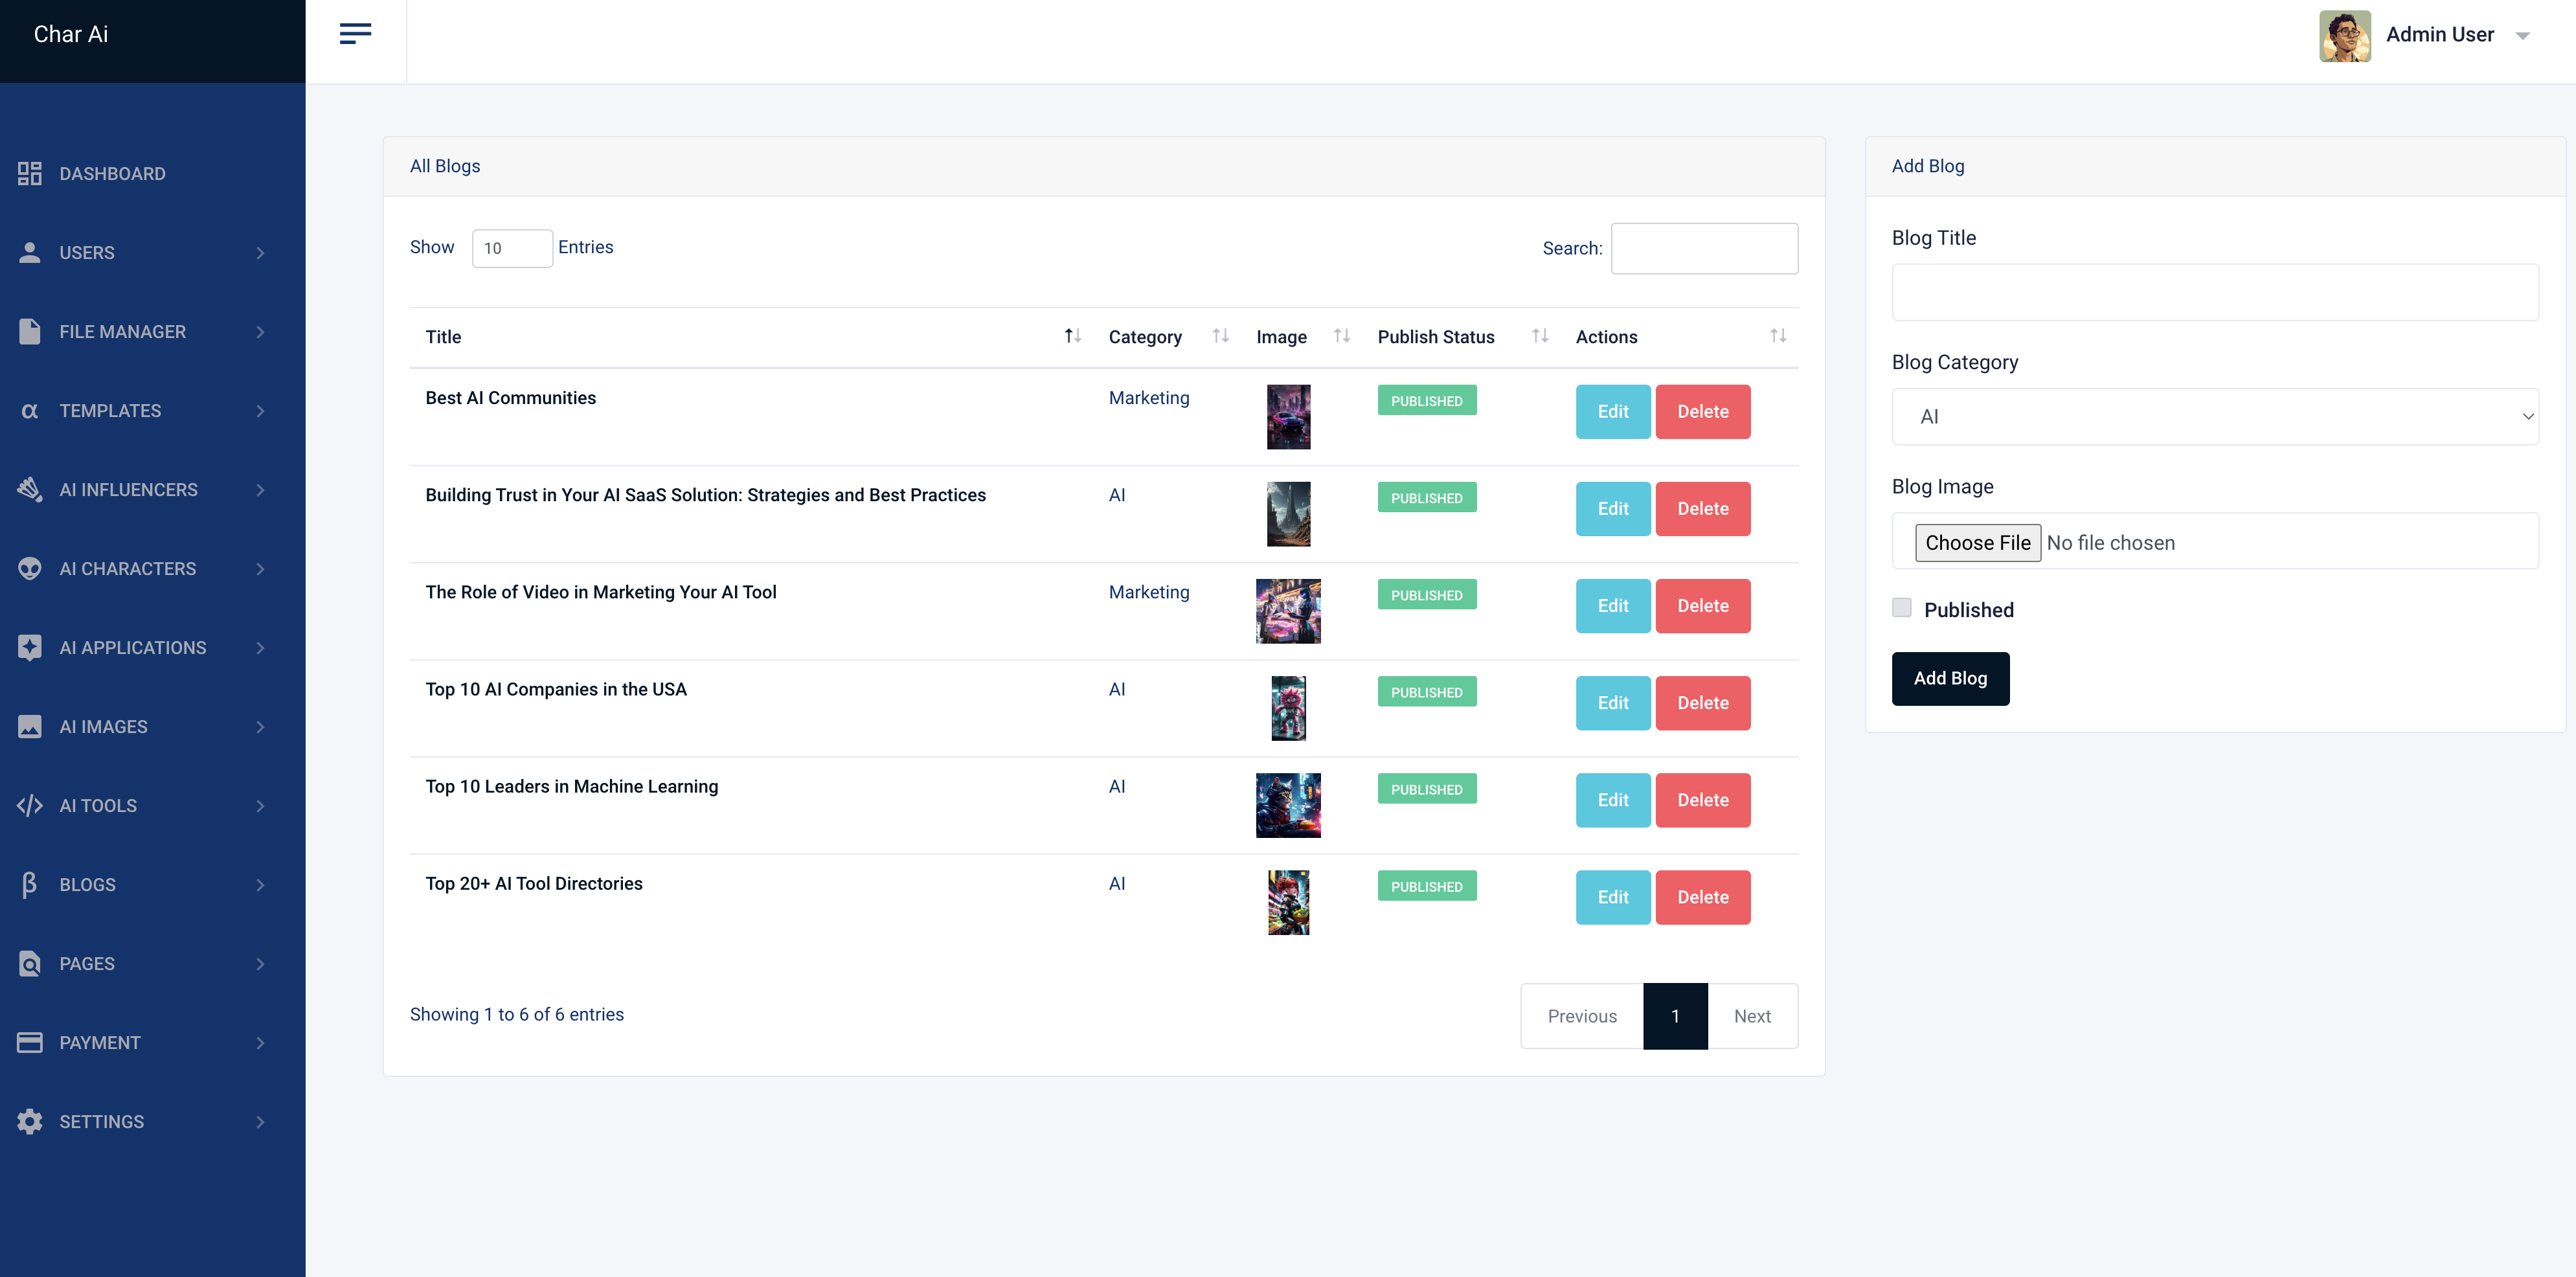
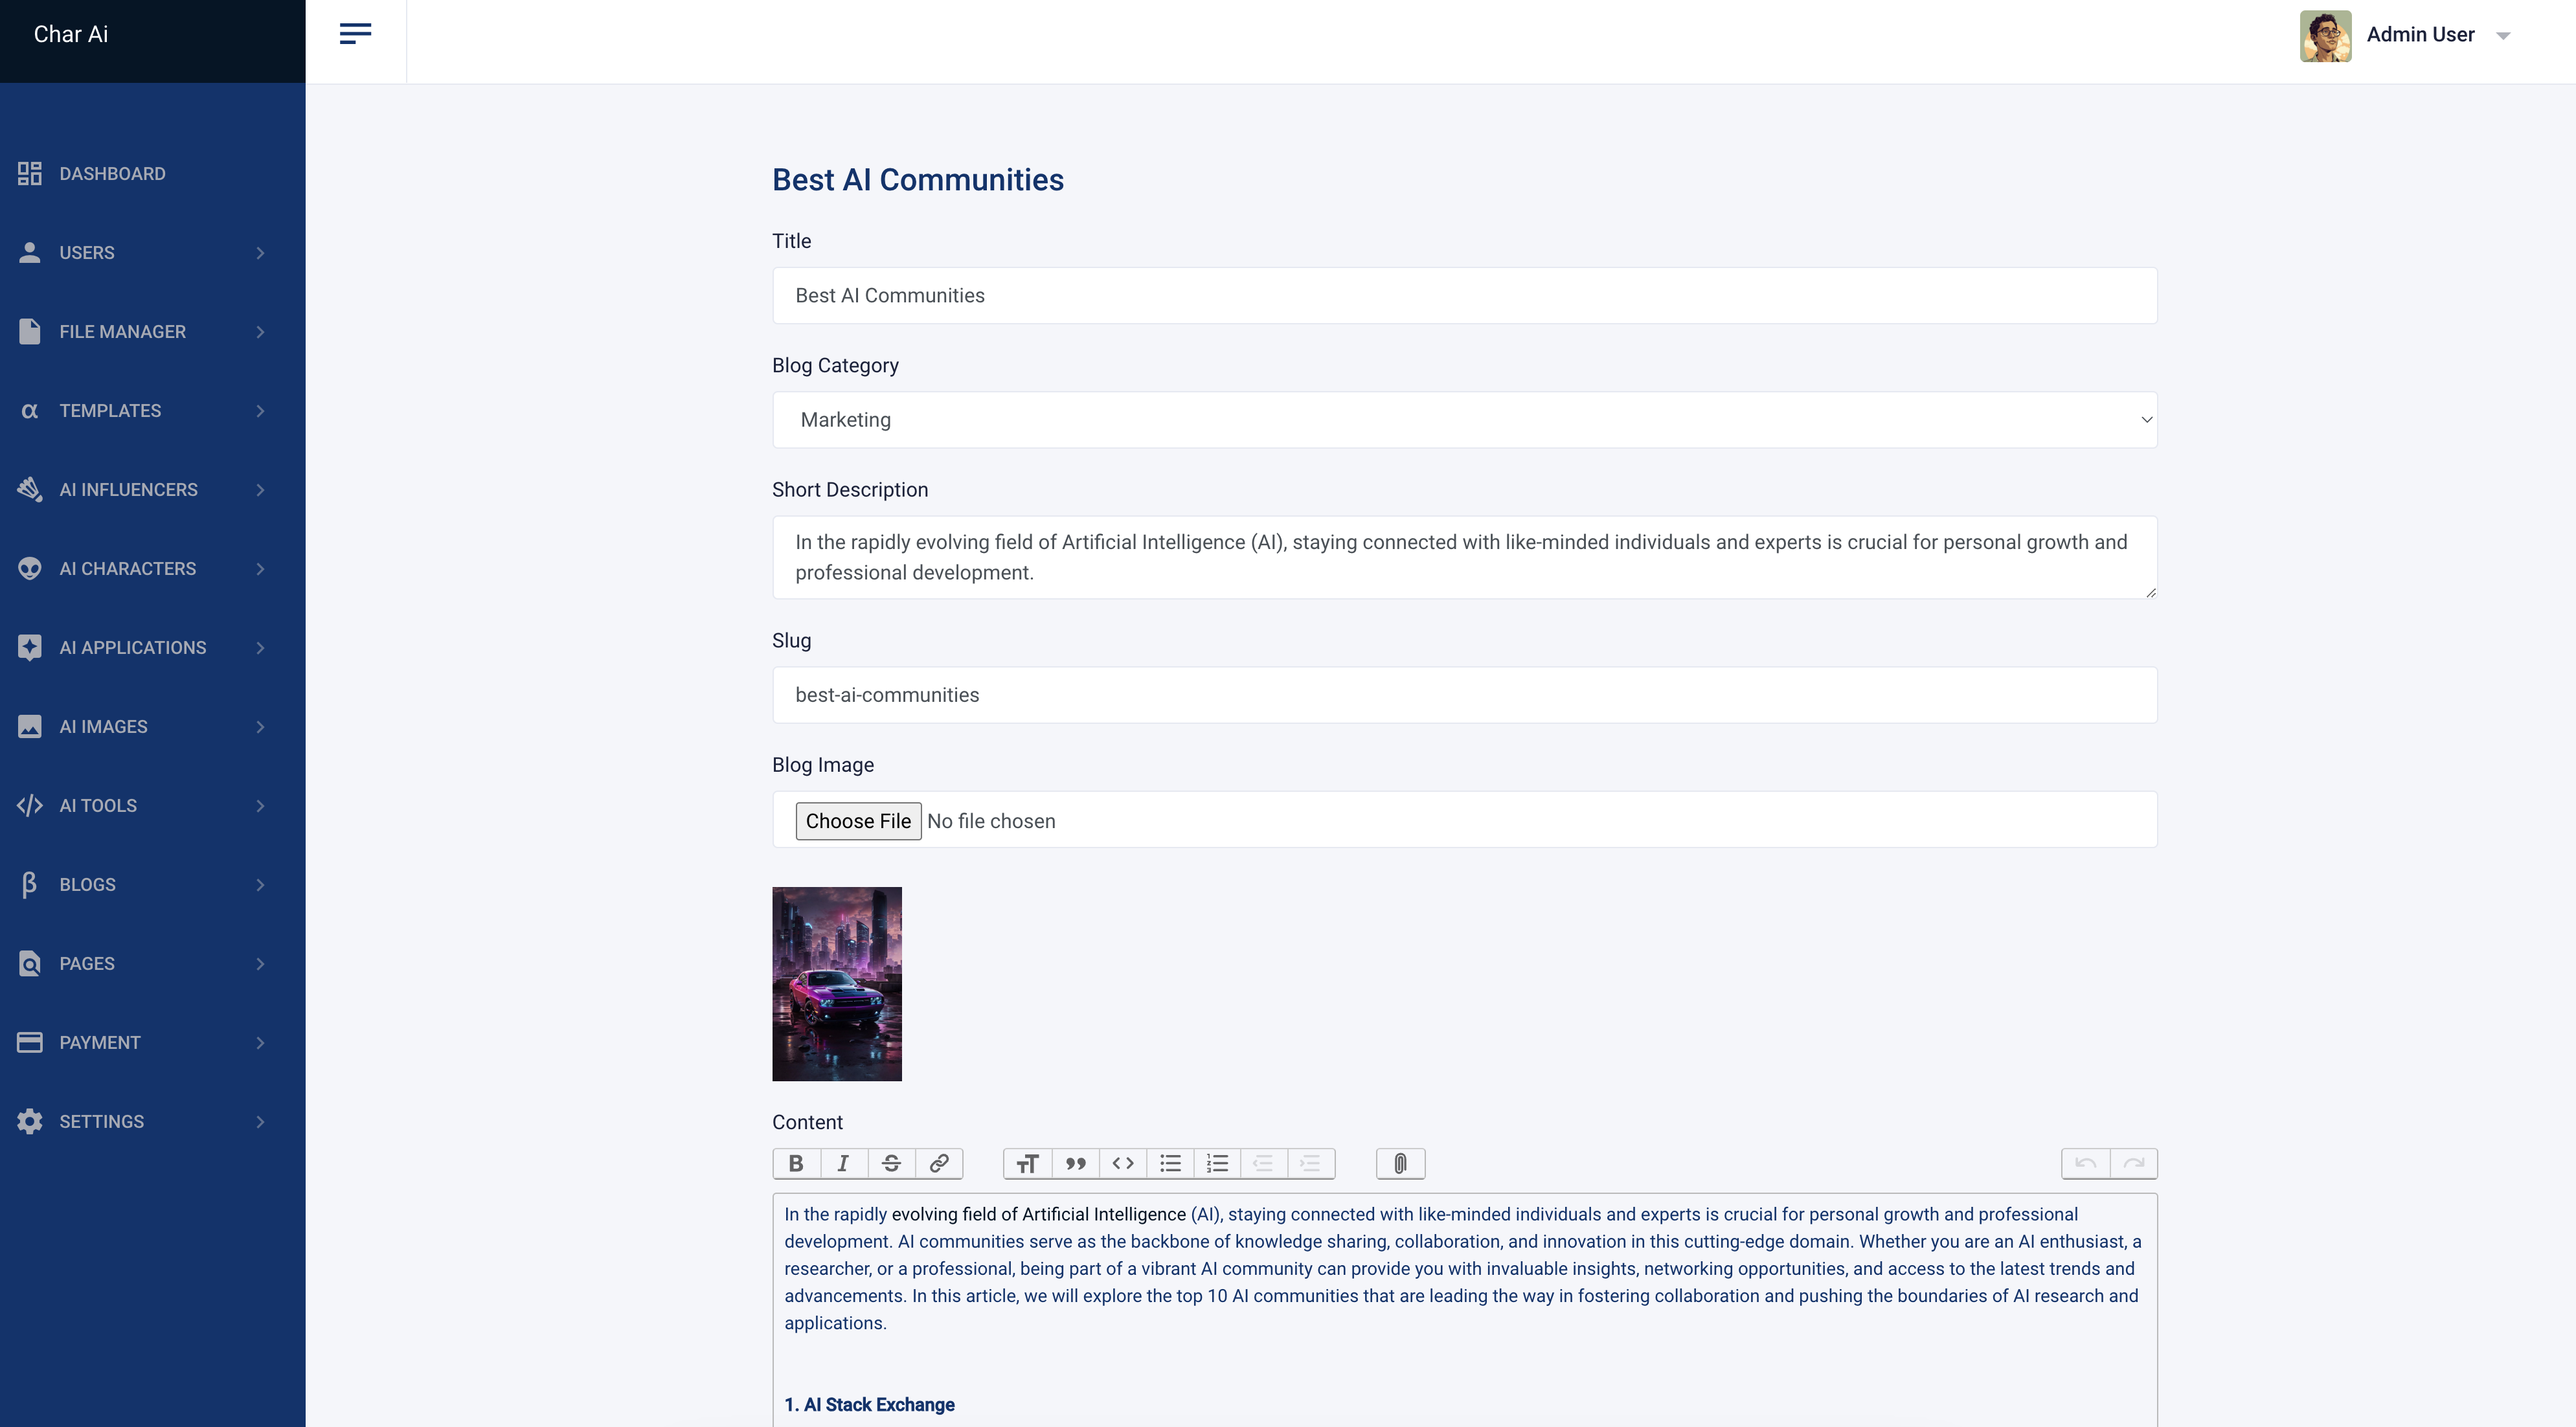
Blogs
You can manage blogs easily and dynamically from the admin panel. You can add, delete, edit, and manage blogs.
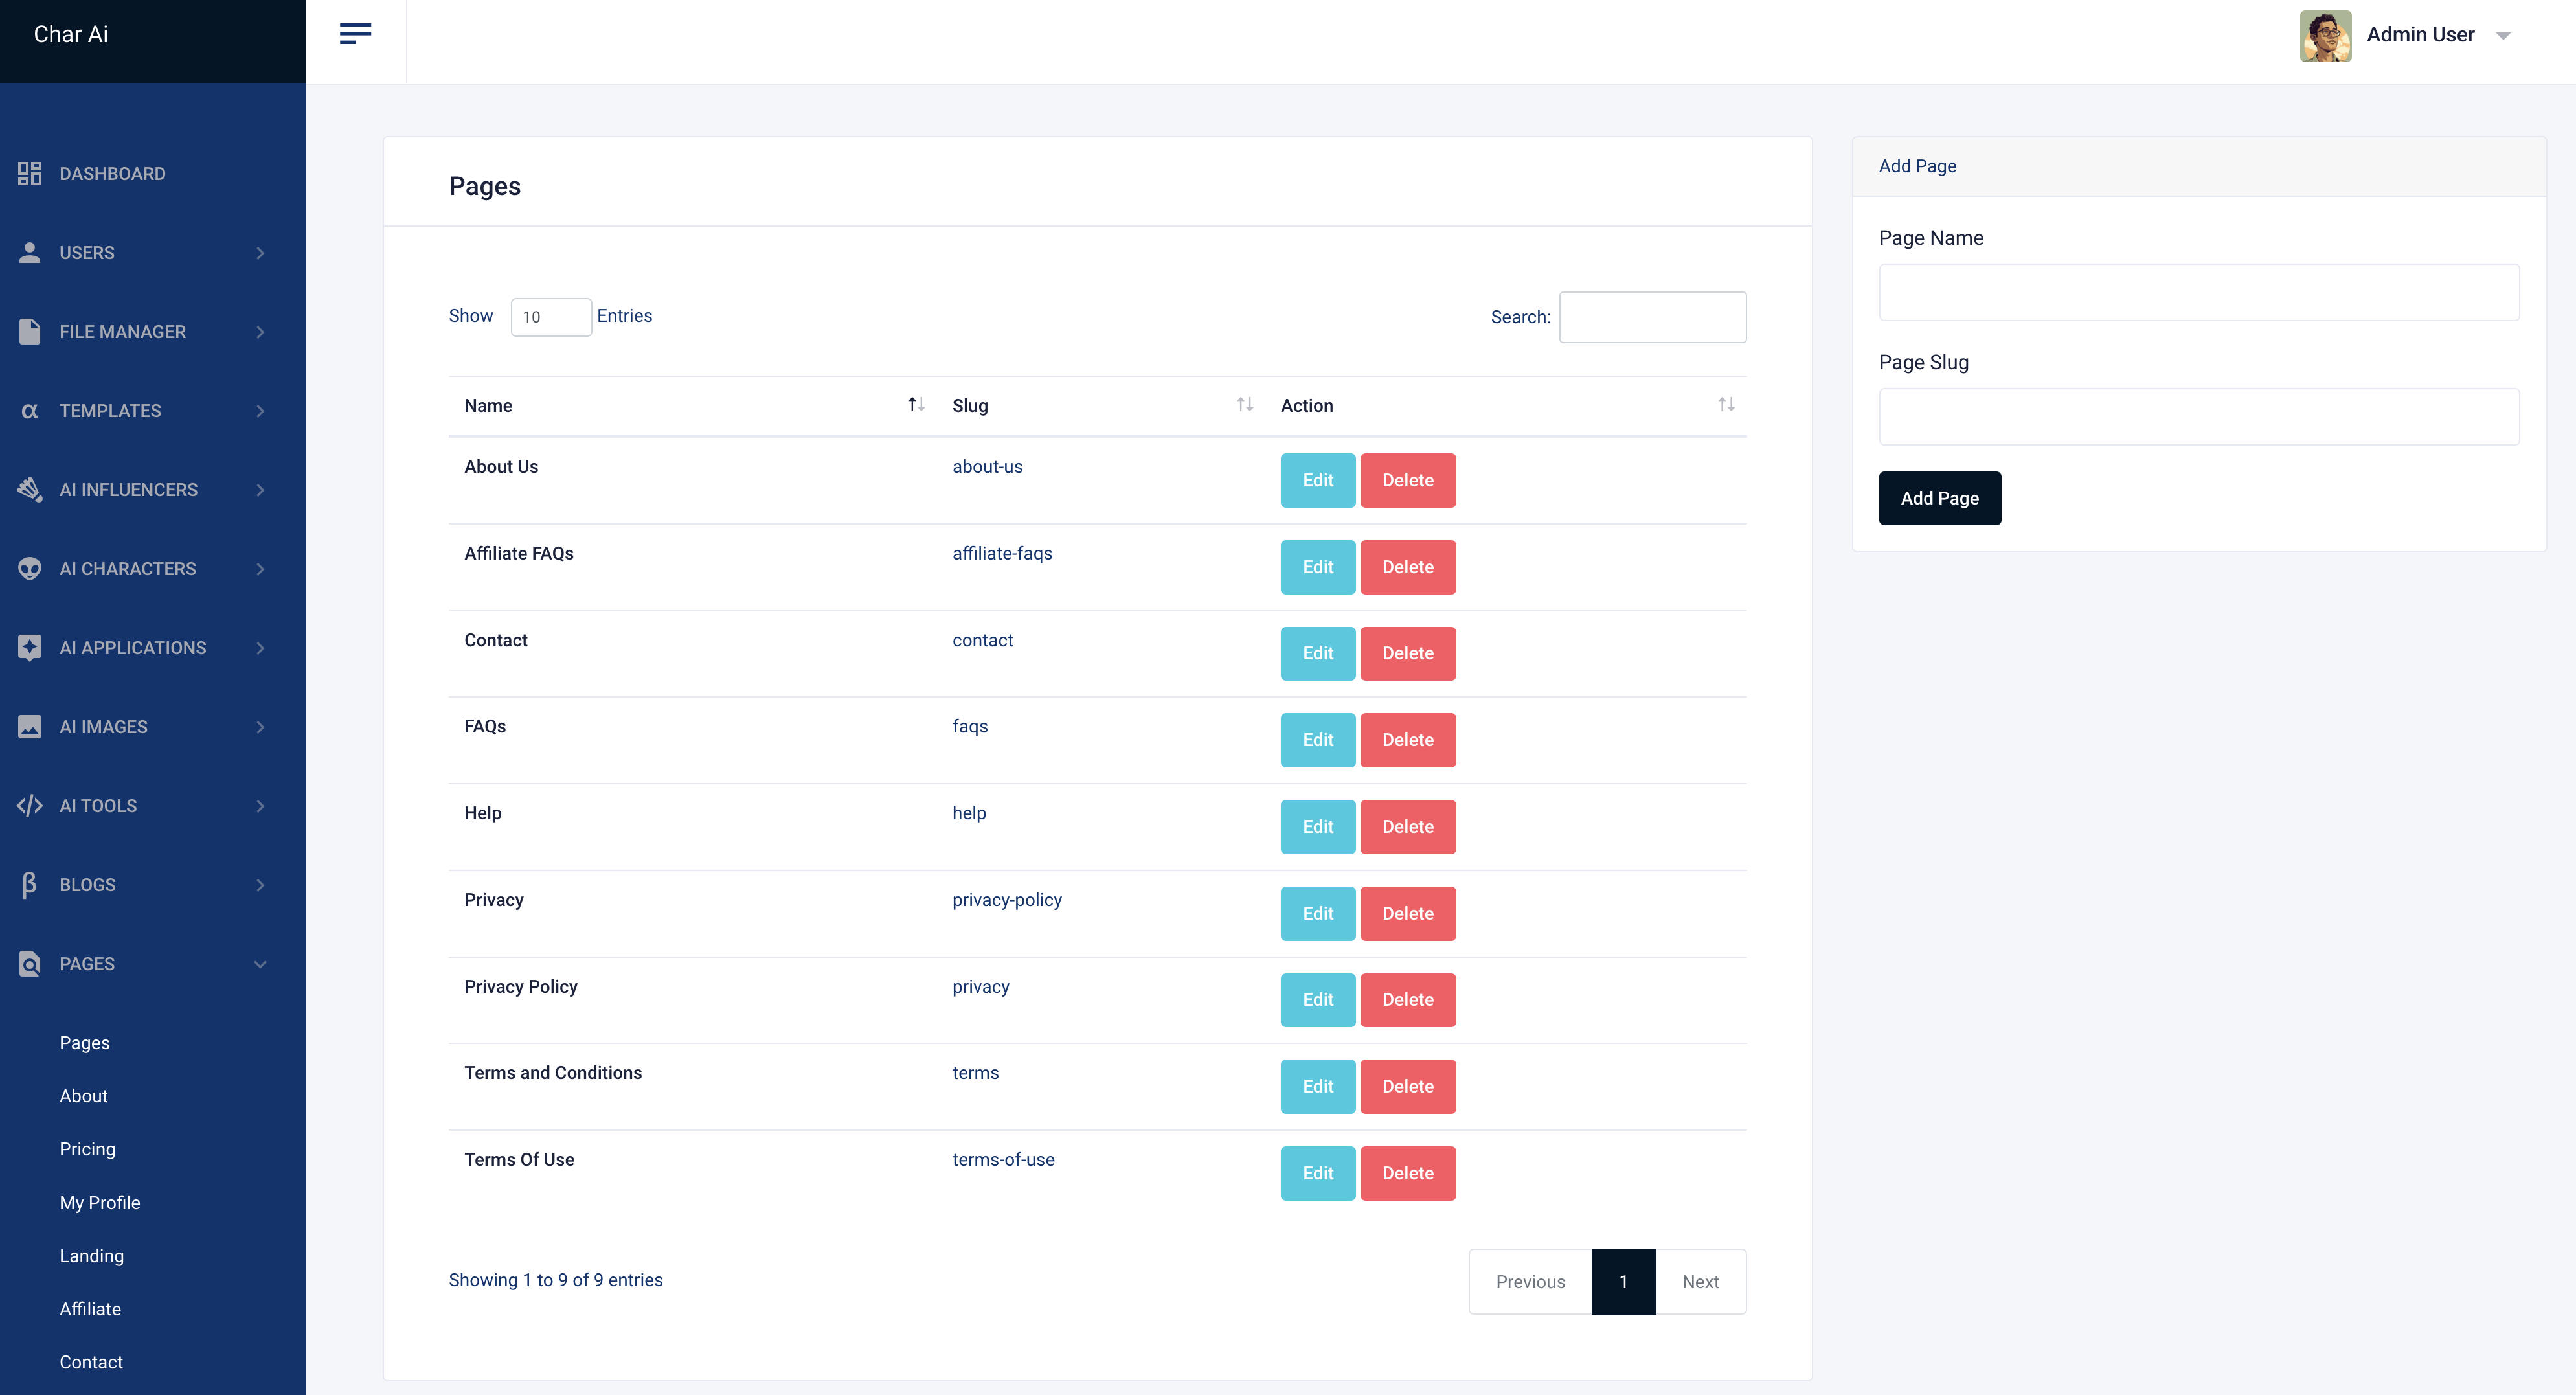
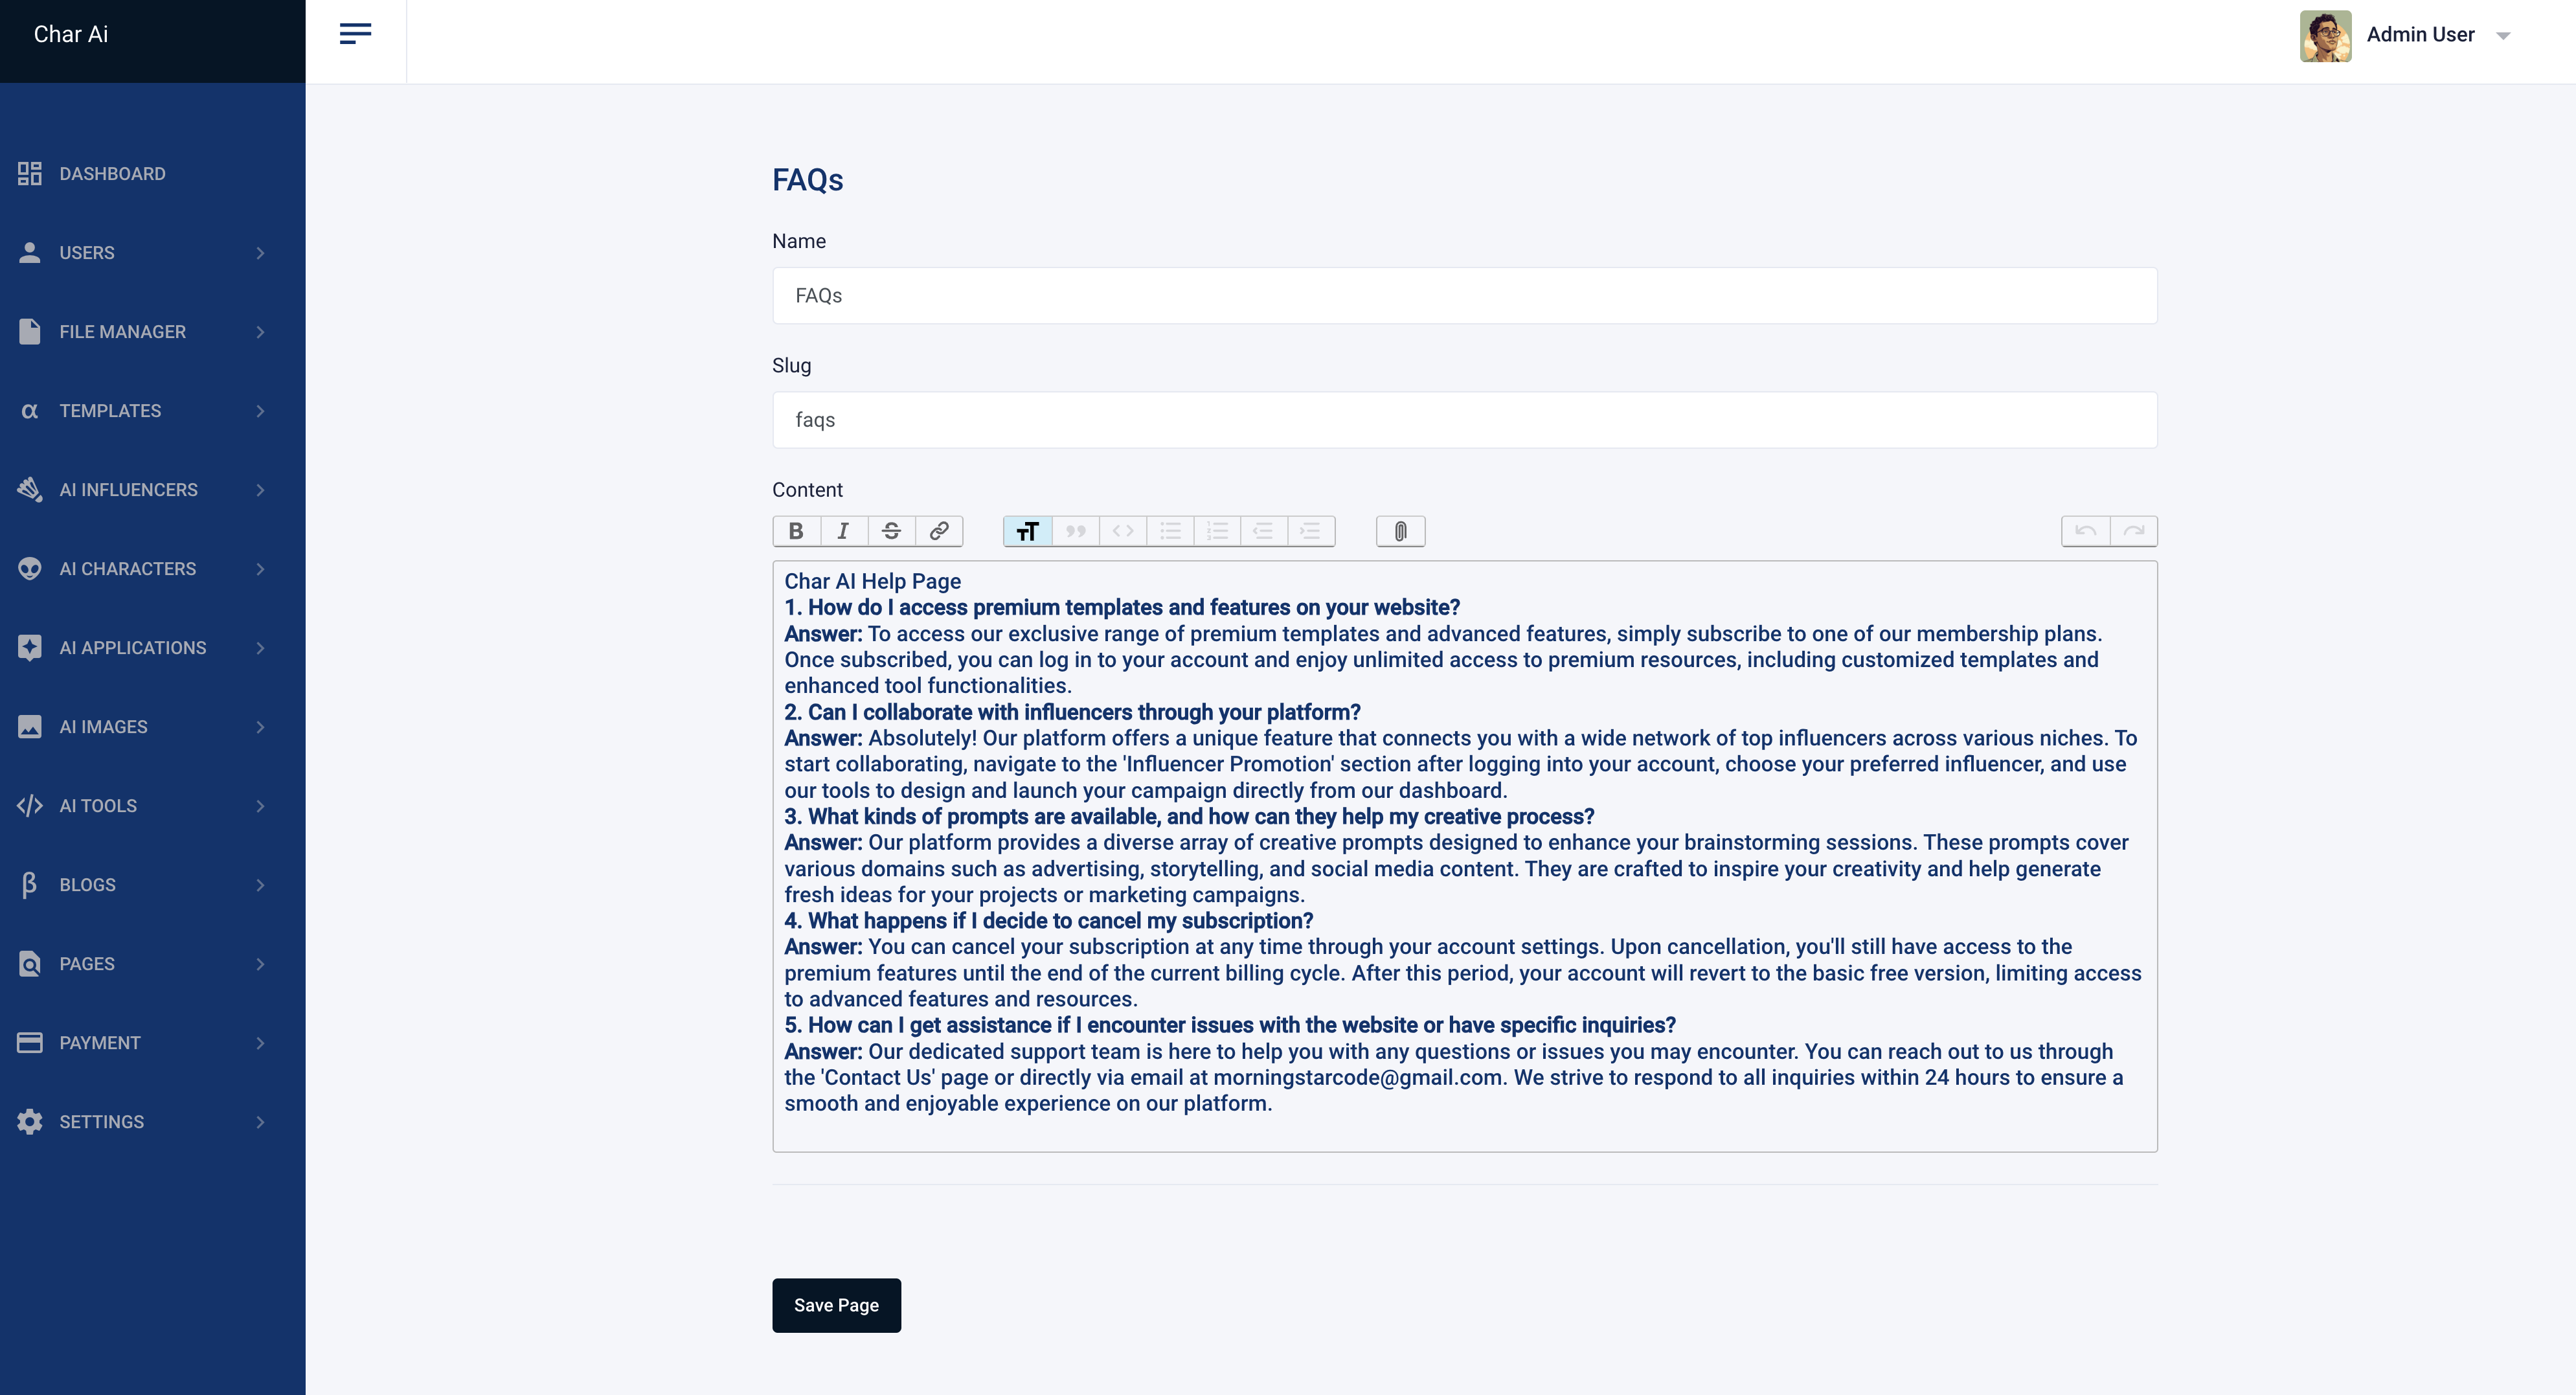
Pages
You can manage pages easily and dynamically from the admin panel. You can add, delete, edit, and manage pages.
Payment
You can manage payment features easily and dynamically from the admin panel.
- Subscription Packages
- Subscriptions
- Payments
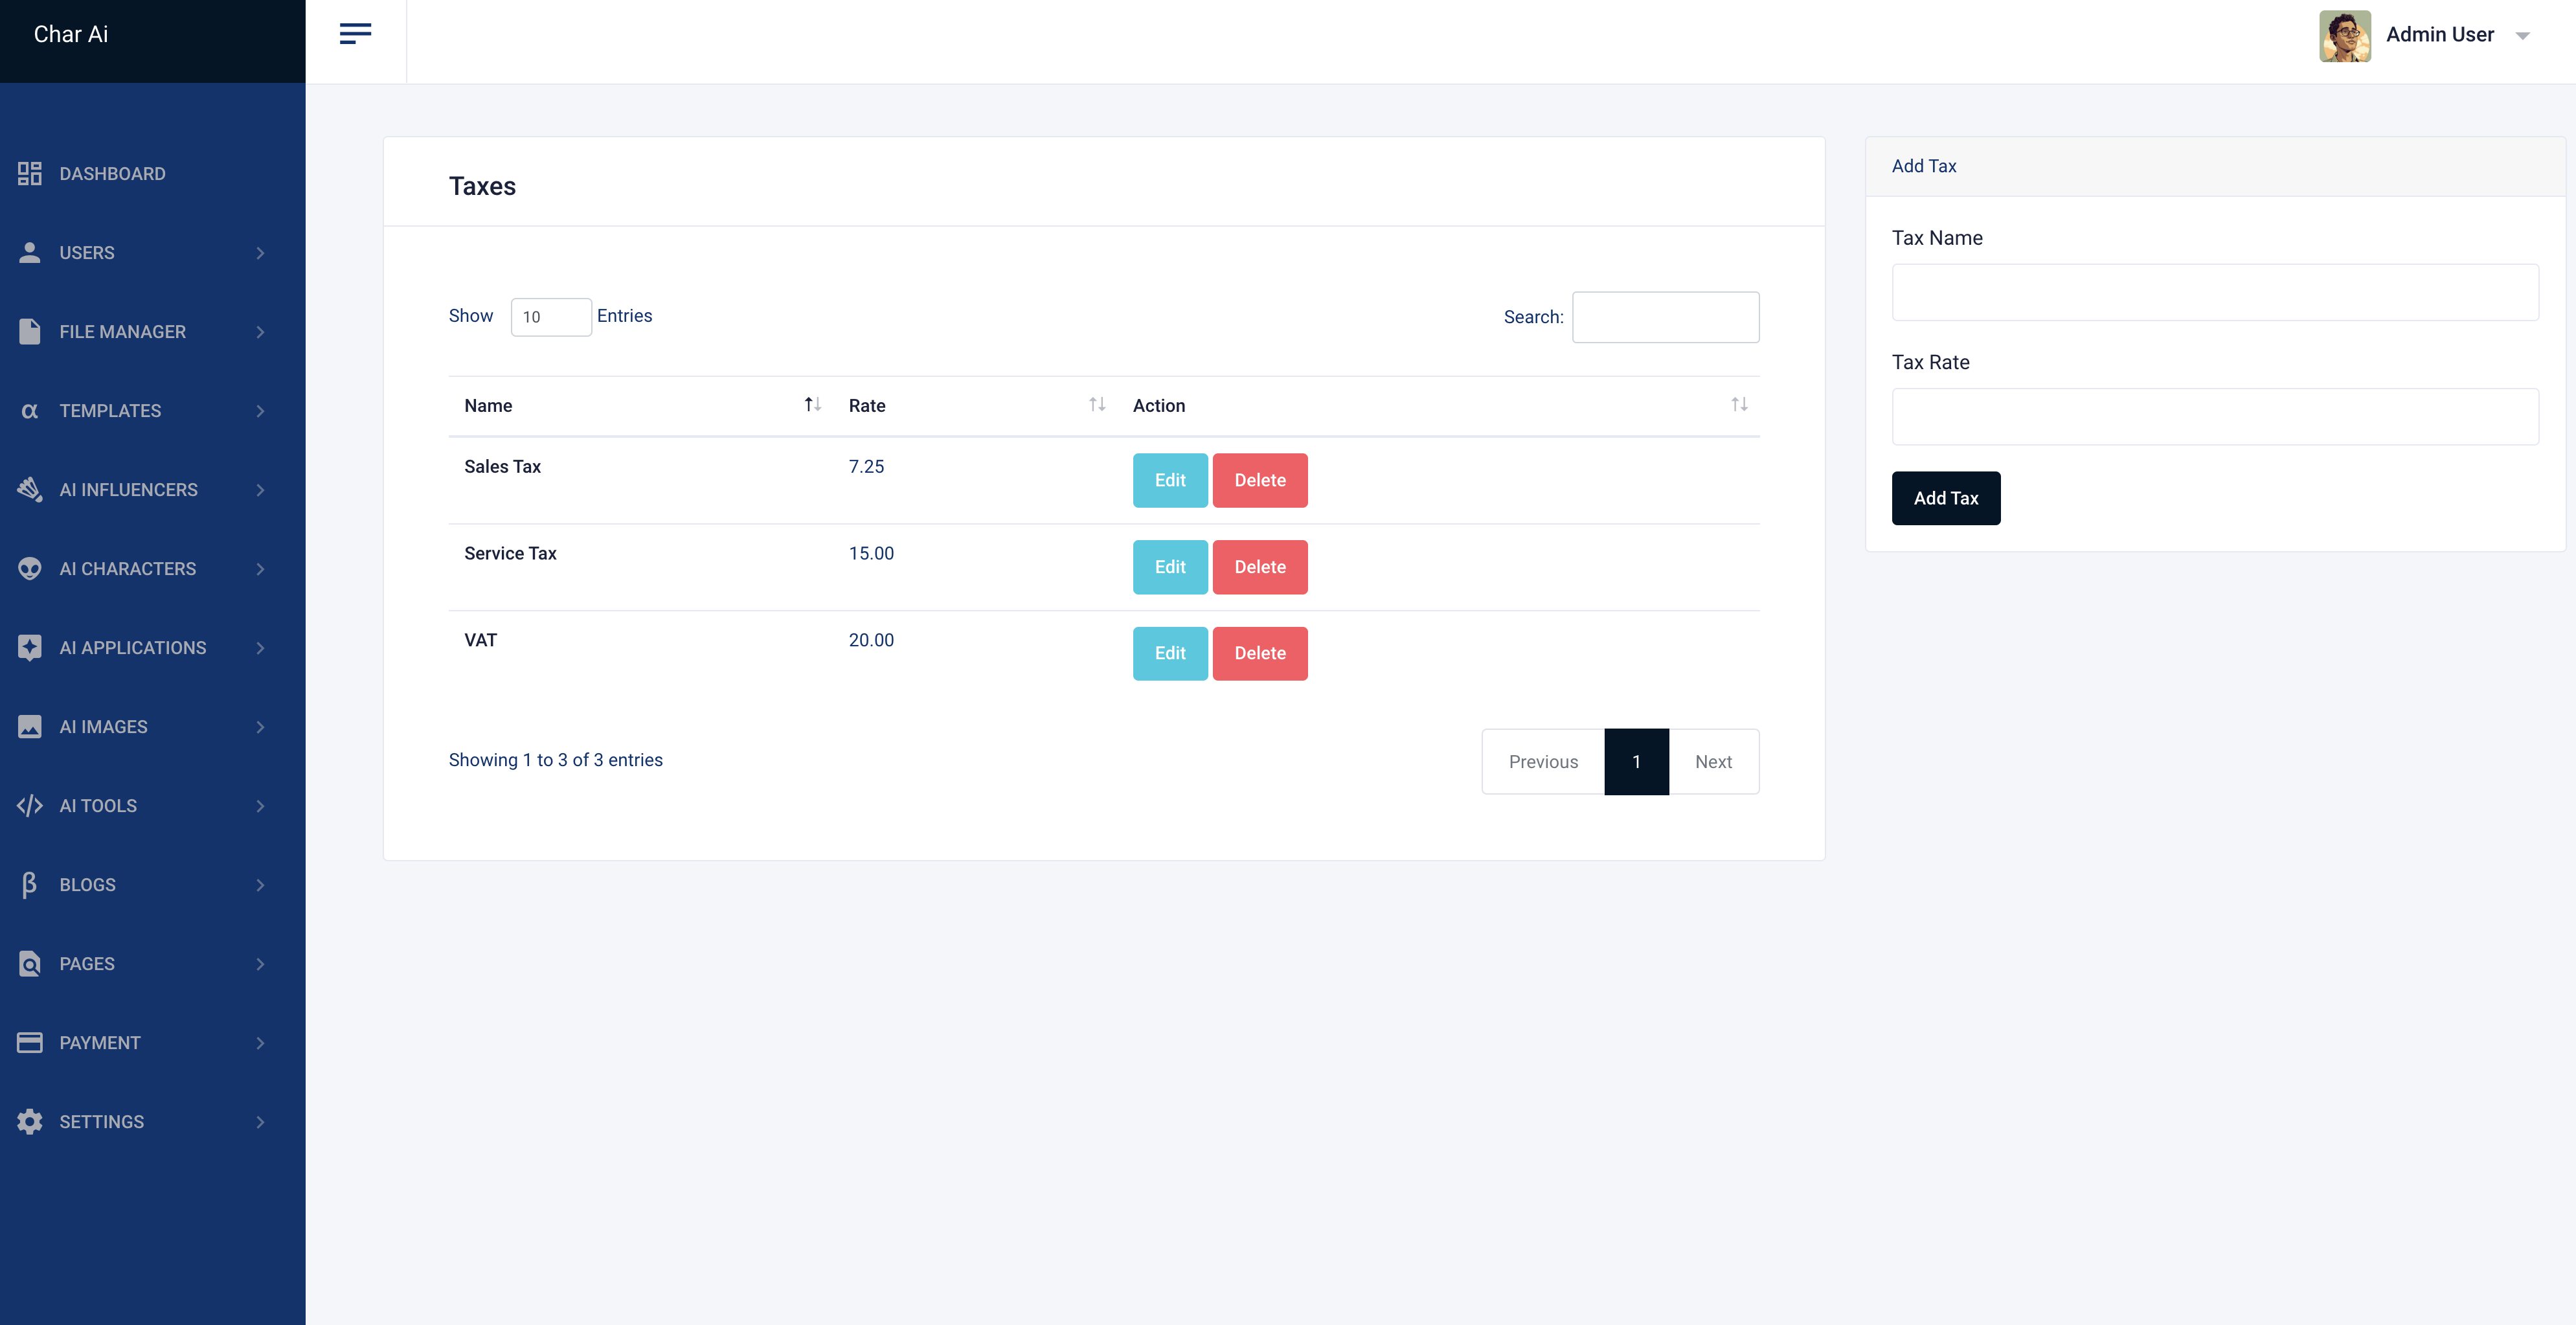
- Taxes
- Currencies
- Countries

FAQ
Thank you once again for purchasing CharAI SaaS script. As mentioned at the beginning, if you find any issue please write us on morningstarcode@gmail.com we would be glad to help you.
Social Login Settings
Important
Sign Up: Go to Facebook for Developers and sign up for a developer account if you don't already have one. https://developers.facebook.com
Create a New App:
Add Facebook Login to Your App:
Get the App ID and App Secret:
Set Up Valid OAuth Redirect URIs:
Full detail on how to create an Facebook login integration can be found here.
Important
Go to Google Developer Console: Visit the Google Developer Console and sign in with your Google account. https://console.cloud.google.com
Create a New Project:
Enable APIs:
Go to OAuth Consent Screen:
Create OAuth Credentials:
Get the Client ID and Client Secret:
Full detail on how to create an Google login integration can be found here.